The OpenStack project is an open source cloud computing platform that supports all types of cloud environments. The project aims for simple implementation, massive scalability, and a rich set of features. Cloud computing experts from around the world contribute to the project.
OpenStack provides an Infrastructure-as-a-Service (IaaS) solution through a variety of complemental services. Each service offers an application programming interface (API) that facilitates this integration. The following table provides a list of OpenStack services:
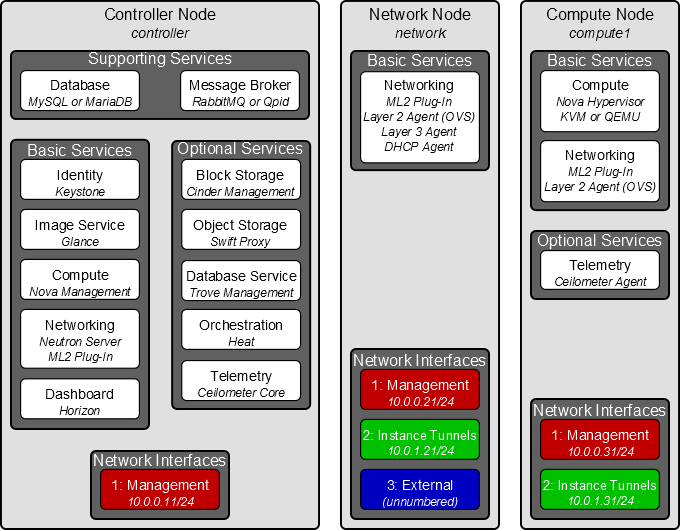
Sample Architecture We are trying to Set up. The Ip's will Vary , Please do check and clear ..

ON ALL THE NODE
#Making Selinux to Permissive
sed -i "s/SELINUX=.*/SELINUX=permissive/g" /etc/sysconfig/selinux
yum -y install policycoreutils setroubleshoot
setenforce 0
yum install -y euca2ools
yum install -y yum-plugin-priorities gedit curl wget nc
yum -y install ntp
service ntpd start
chkconfig ntpd on
yum -y install http://repos.fedorapeople.org/repos/openstack/openstack-icehouse/rdo-release-icehouse-3.noarch.rpm
yum -y install http://dl.fedoraproject.org/pub/epel/6/x86_64/epel-release-6-8.noarch.rpm
yum -y install openstack-utils
yum -y install openstack-selinux
yum -y upgrade
On All node add the following Rules in Iptables
-A INPUT -p tcp -m state --state NEW -m tcp --dport 80 -j ACCEPT
-A INPUT -p tcp -m state --state NEW -m tcp --dport 443 -j ACCEPT
-A INPUT -p tcp -m state --state NEW -m tcp --dport 22 -j ACCEPT
-A INPUT -p tcp -m state --state NEW -m tcp --dport 5000 -j ACCEPT
-A INPUT -p tcp -m state --state NEW -m tcp --dport 5672 -j ACCEPT
-A INPUT -p tcp -m state --state NEW -m tcp --dport 6080 -j ACCEPT
-A INPUT -p tcp -m state --state NEW -m tcp --dport 8774 -j ACCEPT
-A INPUT -p tcp -m state --state NEW -m tcp --dport 9292 -j ACCEPT
-A INPUT -p tcp -m state --state NEW -m tcp --dport 9696 -j ACCEPT
-A INPUT -p tcp -m state --state NEW -m tcp --dport 35357 -j ACCEPT
yum install MySQL-python -y
yum -y install qpid-cpp-server memcached
sed -i "s/auth=yes/auth=no/g" /etc/qpidd.conf
service qpidd start
chkconfig qpidd on
yum install mysql mysql-server MySQL-python -y
service mysqld start
chkconfig mysqld on
mysql_secure_installation
192.168.255.130 controller
192.168.216.130 controller
192.168.216.140 compute
192.168.216.141 compute
192.168.255.150 network
eth4 netwrok << Public Connection
192.168.216.150 netwrok
192.168.216.151 network
One of the external interface uses a special configuration without an IP address assigned to it. Configure the third interface as the external interface:
Replace INTERFACE_NAME with the actual interface name. For example, eth2 or ens256.
Edit the /etc/sysconfig/network-scripts/ifcfg-INTERFACE_NAME file to contain the following:
Do not change the HWADDR and UUID keys.
DEVICE=INTERFACE_NAME
TYPE=Ethernet
ONBOOT="yes"
BOOTPROTO="none"
Restart networking:
service network restart
=========================================
KEYSTONE_DBPASS keystone4mar Database password of Identity service
DEMO_PASS demo4mar Password of user demo
ADMIN_PASS admin4mar Password of user admin
GLANCE_DBPASS glance4mar Database password for Image Service
GLANCE_PASS glance4mar Password of Image Service user glance
NOVA_DBPASS nova4mar Database password for Compute service
NOVA_PASS nova4mar Password of Compute service user nova
DASH_DBPASS dash4mar Database password for the dashboard
CINDER_DBPASS cinder4mar Database password for the Block Storage service
CINDER_PASS cinder4mar Password of Block Storage service user cinder
NEUTRON_DBPASS neutron4mar Database password for the Networking service
NEUTRON_PASS neutron4mar Password of Networking service user neutron
HEAT_DBPASS heat4mar Database password for the Orchestration service
HEAT_PASS heat4mar Password of Orchestration service user heat
CEILOMETER_DBPASS ceil4mar Database password for the Telemetry service
CEILOMETER_PASS ceil4mar Password of Telemetry service user ceilometer
TROVE_DBPASS trove4mar Database password of Database service
TROVE_PASS trove4mar Password of Database Service user trove
=========================================
In my.cnf configure for INnode DB
bind-address = ***.***.***.***
default-storage-engine = innodb
innodb_file_per_table
collation-server = utf8_general_ci
init-connect = 'SET NAMES utf8'
character-set-server = utf8
yum install openstack-keystone python-keystoneclient -y
openstack-config --set /etc/keystone/keystone.conf database connection mysql://keystone:keystone4mar@controller/keystone
$ mysql -u root -p
CREATE DATABASE keystone;
GRANT ALL PRIVILEGES ON keystone.* TO 'keystone'@'localhost' IDENTIFIED BY 'keystone4mar';
GRANT ALL PRIVILEGES ON keystone.* TO 'keystone'@'%' IDENTIFIED BY 'keystone4mar';
exit
Create the database tables for the Identity Service:
su -s /bin/sh -c "keystone-manage db_sync" keystone
ADMIN_TOKEN=$(openssl rand -hex 10)
echo $ADMIN_TOKEN
openstack-config --set /etc/keystone/keystone.conf DEFAULT admin_token $ADMIN_TOKEN
keystone-manage pki_setup --keystone-user keystone --keystone-group keystone
chown -R keystone:keystone /etc/keystone/ssl
chmod -R o-rwx /etc/keystone/ssl
service openstack-keystone start
chkconfig openstack-keystone on
#Define users, tenants, and roles
*********Replace ADMIN_TOKEN with your authorization token
#export OS_SERVICE_TOKEN=$ADMIN_TOKEN
export OS_SERVICE_TOKEN=$(echo $ADMIN_TOKEN)
export OS_SERVICE_ENDPOINT=http://controller:35357/v2.0
#Create an administrative user
keystone user-create --name=admin --pass=admin4mar --email=ADMIN_EMAIL
keystone role-create --name=admin
keystone tenant-create --name=admin --description="Admin Tenant"
keystone user-role-add --user=admin --tenant=admin --role=admin
keystone user-role-add --user=admin --role=_member_ --tenant=admin
#Create a normal user
keystone user-create --name=demo --pass=demo4mar --email=DEMO_EMAIL
keystone tenant-create --name=demo --description="Demo Tenant"
keystone user-role-add --user=demo --role=_member_ --tenant=demo
#Create a service tenant
keystone tenant-create --name=service --description="Service Tenant"
#Define services and API endpoints
keystone service-create --name=keystone --type=identity --description="OpenStack Identity"
keystone endpoint-create --service-id=$(keystone service-list | awk '/ identity / {print $2}') --publicurl=http://controller:5000/v2.0 --internalurl=http://controller:5000/v2.0 --adminurl=http://controller:35357/v2.0
#Verify the Identity Service installation
unset OS_SERVICE_TOKEN OS_SERVICE_ENDPOINT
keystone --os-username=admin --os-password=admin4mar --os-auth-url=http://controller:35357/v2.0 token-get
keystone --os-username=admin --os-password=admin4mar --os-tenant-name=admin --os-auth-url=http://controller:35357/v2.0 token-get
echo "export OS_USERNAME=admin
export OS_PASSWORD=admin4mar
export OS_TENANT_NAME=admin
export OS_AUTH_URL=http://controller:35357/v2.0" >> /root/admin-openrc.sh
cat /root/admin-openrc.sh
source /root/admin-openrc.sh
keystone token-get
keystone user-list
keystone user-role-list --user admin --tenant admin
yum install python-pip
pip install python-PROJECTclient
ceilometer - Telemetry API
cinder - Block Storage API and extensions
glance - Image Service API
heat - Orchestration API
keystone - Identity service API and extensions
neutron - Networking API
nova - Compute API and extensions
swift - Object Storage API
trove - Database Service API
#On Red Hat Enterprise Linux, CentOS, or Fedora, use yum to install the clients from the packaged versions available in RDO:
yum install python-PROJECTclient
=====================
echo "export OS_USERNAME=demo
export OS_PASSWORD=demo4mar
export OS_TENANT_NAME=demo
export OS_AUTH_URL=http://controller:35357/v2.0" >> /root/demo-openrc.sh
cat /root/demo-openrc.sh
OpenStack provides an Infrastructure-as-a-Service (IaaS) solution through a variety of complemental services. Each service offers an application programming interface (API) that facilitates this integration. The following table provides a list of OpenStack services:
| Dashboard | Horizon | Provides a web-based self-service portal to interact with underlying OpenStack services, such as launching an instance, assigning IP addresses and configuring access controls. |
| Compute | Nova | Manages the lifecycle of compute instances in an OpenStack environment. Responsibilities include spawning, scheduling and decommissioning of virtual machines on demand. |
| Networking | Neutron | Enables network connectivity as a service for other OpenStack services, such as OpenStack Compute. Provides an API for users to define networks and the attachments into them. Has a pluggable architecture that supports many popular networking vendors and technologies. |
| Storage | ||
|---|---|---|
| Object Storage | Swift | Stores and retrieves arbitrary unstructured data objects via a RESTful, HTTP based API. It is highly fault tolerant with its data replication and scale out architecture. Its implementation is not like a file server with mountable directories. |
| Block Storage | Cinder | Provides persistent block storage to running instances. Its pluggable driver architecture facilitates the creation and management of block storage devices. |
| Shared services | ||
| Identity service | Keystone | Provides an authentication and authorization service for other OpenStack services. Provides a catalog of endpoints for all OpenStack services. |
| Image Service | Glance | Stores and retrieves virtual machine disk images. OpenStack Compute makes use of this during instance provisioning. |
| Telemetry | Ceilometer | Monitors and meters the OpenStack cloud for billing, benchmarking, scalability, and statistical purposes. |
| Higher-level services | ||
| Orchestration | Heat | Orchestrates multiple composite cloud applications by using either the native HOT template format or the AWS CloudFormation template format, through both an OpenStack-native REST API and a CloudFormation-compatible Query API. |
| Database Service | Trove | Provides scalable and reliable Cloud Database-as-a-Service functionality for both relational and non-relational database engines. |
Sample Architecture We are trying to Set up. The Ip's will Vary , Please do check and clear ..
ON ALL THE NODE
#Making Selinux to Permissive
sed -i "s/SELINUX=.*/SELINUX=permissive/g" /etc/sysconfig/selinux
yum -y install policycoreutils setroubleshoot
setenforce 0
yum install -y euca2ools
yum install -y yum-plugin-priorities gedit curl wget nc
yum -y install ntp
service ntpd start
chkconfig ntpd on
yum -y install http://repos.fedorapeople.org/repos/openstack/openstack-icehouse/rdo-release-icehouse-3.noarch.rpm
yum -y install http://dl.fedoraproject.org/pub/epel/6/x86_64/epel-release-6-8.noarch.rpm
yum -y install openstack-utils
yum -y install openstack-selinux
yum -y upgrade
On All node add the following Rules in Iptables
-A INPUT -p tcp -m state --state NEW -m tcp --dport 80 -j ACCEPT
-A INPUT -p tcp -m state --state NEW -m tcp --dport 443 -j ACCEPT
-A INPUT -p tcp -m state --state NEW -m tcp --dport 22 -j ACCEPT
-A INPUT -p tcp -m state --state NEW -m tcp --dport 5000 -j ACCEPT
-A INPUT -p tcp -m state --state NEW -m tcp --dport 5672 -j ACCEPT
-A INPUT -p tcp -m state --state NEW -m tcp --dport 6080 -j ACCEPT
-A INPUT -p tcp -m state --state NEW -m tcp --dport 8774 -j ACCEPT
-A INPUT -p tcp -m state --state NEW -m tcp --dport 9292 -j ACCEPT
-A INPUT -p tcp -m state --state NEW -m tcp --dport 9696 -j ACCEPT
-A INPUT -p tcp -m state --state NEW -m tcp --dport 35357 -j ACCEPT
ON OTHER NODE
yum install MySQL-python -y
ON CONTROLLER NODE
yum -y install qpid-cpp-server memcached
sed -i "s/auth=yes/auth=no/g" /etc/qpidd.conf
service qpidd start
chkconfig qpidd on
yum install mysql mysql-server MySQL-python -y
service mysqld start
chkconfig mysqld on
mysql_secure_installation
Over ALL Network
192.168.255.130 controller
192.168.216.130 controller
192.168.216.140 compute
192.168.216.141 compute
192.168.255.150 network
eth4 netwrok << Public Connection
192.168.216.150 netwrok
192.168.216.151 network
On NETWORK NODE
One of the external interface uses a special configuration without an IP address assigned to it. Configure the third interface as the external interface:
Replace INTERFACE_NAME with the actual interface name. For example, eth2 or ens256.
Edit the /etc/sysconfig/network-scripts/ifcfg-INTERFACE_NAME file to contain the following:
Do not change the HWADDR and UUID keys.
DEVICE=INTERFACE_NAME
TYPE=Ethernet
ONBOOT="yes"
BOOTPROTO="none"
Restart networking:
service network restart
=========================================
KEYSTONE_DBPASS keystone4mar Database password of Identity service
DEMO_PASS demo4mar Password of user demo
ADMIN_PASS admin4mar Password of user admin
GLANCE_DBPASS glance4mar Database password for Image Service
GLANCE_PASS glance4mar Password of Image Service user glance
NOVA_DBPASS nova4mar Database password for Compute service
NOVA_PASS nova4mar Password of Compute service user nova
DASH_DBPASS dash4mar Database password for the dashboard
CINDER_DBPASS cinder4mar Database password for the Block Storage service
CINDER_PASS cinder4mar Password of Block Storage service user cinder
NEUTRON_DBPASS neutron4mar Database password for the Networking service
NEUTRON_PASS neutron4mar Password of Networking service user neutron
HEAT_DBPASS heat4mar Database password for the Orchestration service
HEAT_PASS heat4mar Password of Orchestration service user heat
CEILOMETER_DBPASS ceil4mar Database password for the Telemetry service
CEILOMETER_PASS ceil4mar Password of Telemetry service user ceilometer
TROVE_DBPASS trove4mar Database password of Database service
TROVE_PASS trove4mar Password of Database Service user trove
=========================================
On Controller Node
In my.cnf configure for INnode DB
bind-address = ***.***.***.***
default-storage-engine = innodb
innodb_file_per_table
collation-server = utf8_general_ci
init-connect = 'SET NAMES utf8'
character-set-server = utf8
Installing Identity Service On Controller Node
yum install openstack-keystone python-keystoneclient -y
openstack-config --set /etc/keystone/keystone.conf database connection mysql://keystone:keystone4mar@controller/keystone
$ mysql -u root -p
CREATE DATABASE keystone;
GRANT ALL PRIVILEGES ON keystone.* TO 'keystone'@'localhost' IDENTIFIED BY 'keystone4mar';
GRANT ALL PRIVILEGES ON keystone.* TO 'keystone'@'%' IDENTIFIED BY 'keystone4mar';
exit
Create the database tables for the Identity Service:
su -s /bin/sh -c "keystone-manage db_sync" keystone
ADMIN_TOKEN=$(openssl rand -hex 10)
echo $ADMIN_TOKEN
openstack-config --set /etc/keystone/keystone.conf DEFAULT admin_token $ADMIN_TOKEN
keystone-manage pki_setup --keystone-user keystone --keystone-group keystone
chown -R keystone:keystone /etc/keystone/ssl
chmod -R o-rwx /etc/keystone/ssl
service openstack-keystone start
chkconfig openstack-keystone on
#Define users, tenants, and roles
*********Replace ADMIN_TOKEN with your authorization token
#export OS_SERVICE_TOKEN=$ADMIN_TOKEN
export OS_SERVICE_TOKEN=$(echo $ADMIN_TOKEN)
export OS_SERVICE_ENDPOINT=http://controller:35357/v2.0
#Create an administrative user
keystone user-create --name=admin --pass=admin4mar --email=ADMIN_EMAIL
keystone role-create --name=admin
keystone tenant-create --name=admin --description="Admin Tenant"
keystone user-role-add --user=admin --tenant=admin --role=admin
keystone user-role-add --user=admin --role=_member_ --tenant=admin
#Create a normal user
keystone user-create --name=demo --pass=demo4mar --email=DEMO_EMAIL
keystone tenant-create --name=demo --description="Demo Tenant"
keystone user-role-add --user=demo --role=_member_ --tenant=demo
#Create a service tenant
keystone tenant-create --name=service --description="Service Tenant"
#Define services and API endpoints
keystone service-create --name=keystone --type=identity --description="OpenStack Identity"
keystone endpoint-create --service-id=$(keystone service-list | awk '/ identity / {print $2}') --publicurl=http://controller:5000/v2.0 --internalurl=http://controller:5000/v2.0 --adminurl=http://controller:35357/v2.0
#Verify the Identity Service installation
unset OS_SERVICE_TOKEN OS_SERVICE_ENDPOINT
keystone --os-username=admin --os-password=admin4mar --os-auth-url=http://controller:35357/v2.0 token-get
keystone --os-username=admin --os-password=admin4mar --os-tenant-name=admin --os-auth-url=http://controller:35357/v2.0 token-get
echo "export OS_USERNAME=admin
export OS_PASSWORD=admin4mar
export OS_TENANT_NAME=admin
export OS_AUTH_URL=http://controller:35357/v2.0" >> /root/admin-openrc.sh
cat /root/admin-openrc.sh
source /root/admin-openrc.sh
keystone token-get
keystone user-list
keystone user-role-list --user admin --tenant admin
IF WE WANT TO INSTALL THE CLIENTS
yum install python-pip
pip install python-PROJECTclient
ceilometer - Telemetry API
cinder - Block Storage API and extensions
glance - Image Service API
heat - Orchestration API
keystone - Identity service API and extensions
neutron - Networking API
nova - Compute API and extensions
swift - Object Storage API
trove - Database Service API
#On Red Hat Enterprise Linux, CentOS, or Fedora, use yum to install the clients from the packaged versions available in RDO:
yum install python-PROJECTclient
Creating a client Profile file
=====================
echo "export OS_USERNAME=demo
export OS_PASSWORD=demo4mar
export OS_TENANT_NAME=demo
export OS_AUTH_URL=http://controller:35357/v2.0" >> /root/demo-openrc.sh
cat /root/demo-openrc.sh
