OpenStack Networking (neutron) Configure controller node
$ mysql -u root -p
CREATE DATABASE neutron;
GRANT ALL PRIVILEGES ON neutron.* TO 'neutron'@'localhost' IDENTIFIED BY 'neutron4mar';
GRANT ALL PRIVILEGES ON neutron.* TO 'neutron'@'%' IDENTIFIED BY 'neutron4mar';
exit
keystone user-create --name neutron --pass neutron4mar --email neutron@example.com
keystone user-role-add --user neutron --tenant service --role admin
keystone service-create --name neutron --type network --description "OpenStack Networking"
keystone endpoint-create --service-id $(keystone service-list | awk '/ network / {print $2}') --publicurl http://controller:9696 --adminurl http://controller:9696 --internalurl http://controller:9696
To install the Networking components
# yum -y install openstack-neutron openstack-neutron-ml2 python-neutronclient
openstack-config --set /etc/neutron/neutron.conf database connection mysql://neutron:neutron4mar@controller/neutron
openstack-config --set /etc/neutron/neutron.conf DEFAULT auth_strategy keystone
openstack-config --set /etc/neutron/neutron.conf keystone_authtoken auth_uri http://controller:5000
openstack-config --set /etc/neutron/neutron.conf keystone_authtoken auth_host controller
openstack-config --set /etc/neutron/neutron.conf keystone_authtoken auth_protocol http
openstack-config --set /etc/neutron/neutron.conf keystone_authtoken auth_port 35357
openstack-config --set /etc/neutron/neutron.conf keystone_authtoken admin_tenant_name service
openstack-config --set /etc/neutron/neutron.conf keystone_authtoken admin_user neutron
openstack-config --set /etc/neutron/neutron.conf keystone_authtoken admin_password neutron4mar
openstack-config --set /etc/neutron/neutron.conf DEFAULT rpc_backend neutron.openstack.common.rpc.impl_qpid
openstack-config --set /etc/neutron/neutron.conf DEFAULT qpid_hostname controller
openstack-config --set /etc/neutron/neutron.conf DEFAULT notify_nova_on_port_status_changes True
openstack-config --set /etc/neutron/neutron.conf DEFAULT notify_nova_on_port_data_changes True
openstack-config --set /etc/neutron/neutron.conf DEFAULT nova_url http://controller:8774/v2
openstack-config --set /etc/neutron/neutron.conf DEFAULT nova_admin_username nova
openstack-config --set /etc/neutron/neutron.conf DEFAULT nova_admin_tenant_id $(keystone tenant-list | awk '/ service / { print $2 }')
openstack-config --set /etc/neutron/neutron.conf DEFAULT nova_admin_password nova4mar
openstack-config --set /etc/neutron/neutron.conf DEFAULT nova_admin_auth_url http://controller:35357/v2.0
openstack-config --set /etc/neutron/neutron.conf DEFAULT core_plugin ml2
openstack-config --set /etc/neutron/neutron.conf DEFAULT service_plugins router
openstack-config --set /etc/neutron/plugins/ml2/ml2_conf.ini ml2 type_drivers gre
openstack-config --set /etc/neutron/plugins/ml2/ml2_conf.ini ml2 tenant_network_types gre
openstack-config --set /etc/neutron/plugins/ml2/ml2_conf.ini ml2 mechanism_drivers openvswitch
openstack-config --set /etc/neutron/plugins/ml2/ml2_conf.ini ml2_type_gre tunnel_id_ranges 1:1000
openstack-config --set /etc/neutron/plugins/ml2/ml2_conf.ini securitygroup firewall_driver neutron.agent.linux.iptables_firewall.OVSHybridIptablesFirewallDriver
openstack-config --set /etc/neutron/plugins/ml2/ml2_conf.ini securitygroup enable_security_group True
openstack-config --set /etc/nova/nova.conf DEFAULT network_api_class nova.network.neutronv2.api.API
openstack-config --set /etc/nova/nova.conf DEFAULT neutron_url http://controller:9696
openstack-config --set /etc/nova/nova.conf DEFAULT neutron_auth_strategy keystone
openstack-config --set /etc/nova/nova.conf DEFAULT neutron_admin_tenant_name service
openstack-config --set /etc/nova/nova.conf DEFAULT neutron_admin_username neutron
openstack-config --set /etc/nova/nova.conf DEFAULT neutron_admin_password neutron4mar
openstack-config --set /etc/nova/nova.conf DEFAULT neutron_admin_auth_url http://controller:35357/v2.0
openstack-config --set /etc/nova/nova.conf DEFAULT linuxnet_interface_driver nova.network.linux_net.LinuxOVSInterfaceDriver
openstack-config --set /etc/nova/nova.conf DEFAULT firewall_driver nova.virt.firewall.NoopFirewallDriver
openstack-config --set /etc/nova/nova.conf DEFAULT security_group_api neutron
ln -s /etc/neutron/plugins/ml2/ml2_conf.ini /etc/neutron/plugin.ini
service openstack-nova-api restart
service openstack-nova-scheduler restart
service openstack-nova-conductor restart
service neutron-server start
chkconfig neutron-server on
Neutron ON NETWORK NODE
Edit /etc/sysctl.conf to contain the following:
net.ipv4.ip_forward=1
net.ipv4.conf.all.rp_filter=0
net.ipv4.conf.default.rp_filter=0
Implement the changes:
sysctl -p
yum -y install openstack-neutron openstack-neutron-ml2 openstack-neutron-openvswitch
openstack-config --set /etc/neutron/neutron.conf DEFAULT auth_strategy keystone
openstack-config --set /etc/neutron/neutron.conf keystone_authtoken auth_uri http://controller:5000
openstack-config --set /etc/neutron/neutron.conf keystone_authtoken auth_host controller
openstack-config --set /etc/neutron/neutron.conf keystone_authtoken auth_protocol http
openstack-config --set /etc/neutron/neutron.conf keystone_authtoken auth_port 35357
openstack-config --set /etc/neutron/neutron.conf keystone_authtoken admin_tenant_name service
openstack-config --set /etc/neutron/neutron.conf keystone_authtoken admin_user neutron
openstack-config --set /etc/neutron/neutron.conf keystone_authtoken admin_password neutron4mar
openstack-config --set /etc/neutron/neutron.conf DEFAULT rpc_backend neutron.openstack.common.rpc.impl_qpid
openstack-config --set /etc/neutron/neutron.conf DEFAULT qpid_hostname controller
openstack-config --set /etc/neutron/neutron.conf DEFAULT core_plugin ml2
openstack-config --set /etc/neutron/neutron.conf DEFAULT service_plugins router
verbose = True to the [DEFAULT] section in /etc/neutron/neutron.conf to assist with troubleshooting.
Comment out any lines in the [service_providers] section.
openstack-config --set /etc/neutron/l3_agent.ini DEFAULT interface_driver neutron.agent.linux.interface.OVSInterfaceDriver
openstack-config --set /etc/neutron/l3_agent.ini DEFAULT use_namespaces True
We recommend adding verbose = True to the [DEFAULT] section in /etc/neutron/l3_agent.ini to assist with troubleshooting.
openstack-config --set /etc/neutron/dhcp_agent.ini DEFAULT interface_driver neutron.agent.linux.interface.OVSInterfaceDriver
openstack-config --set /etc/neutron/dhcp_agent.ini DEFAULT dhcp_driver neutron.agent.linux.dhcp.Dnsmasq
openstack-config --set /etc/neutron/dhcp_agent.ini DEFAULT use_namespaces True
openstack-config --set /etc/neutron/metadata_agent.ini DEFAULT auth_url http://controller:5000/v2.0
openstack-config --set /etc/neutron/metadata_agent.ini DEFAULT auth_region regionOne
openstack-config --set /etc/neutron/metadata_agent.ini DEFAULT admin_tenant_name service
openstack-config --set /etc/neutron/metadata_agent.ini DEFAULT admin_user neutron
openstack-config --set /etc/neutron/metadata_agent.ini DEFAULT admin_password neutron4mar
openstack-config --set /etc/neutron/metadata_agent.ini DEFAULT nova_metadata_ip controller
openstack-config --set /etc/neutron/metadata_agent.ini DEFAULT metadata_proxy_shared_secret meta4mar
We recommend adding verbose = True to the [DEFAULT] section in /etc/neutron/metadata_agent.ini to assist with troubleshooting.
Perform the next two steps on the controller node.
On the controller node, configure Compute to use the metadata service:
Replace METADATA_SECRET with the secret you chose for the metadata proxy.
openstack-config --set /etc/nova/nova.conf DEFAULT service_neutron_metadata_proxy true
openstack-config --set /etc/nova/nova.conf DEFAULT neutron_metadata_proxy_shared_secret meta4mar
#On the controller node, restart the Compute API service:
service openstack-nova-api restart
To configure the Modular Layer 2 (ML2) plug-in
Replace INSTANCE_TUNNELS_INTERFACE_IP_ADDRESS with the IP address of the instance tunnels network interface on your network node. openstack-config --set /etc/neutron/plugins/ml2/ml2_conf.ini ml2 type_drivers gre
openstack-config --set /etc/neutron/plugins/ml2/ml2_conf.ini ml2 tenant_network_types gre
openstack-config --set /etc/neutron/plugins/ml2/ml2_conf.ini ml2 mechanism_drivers openvswitch
openstack-config --set /etc/neutron/plugins/ml2/ml2_conf.ini ml2_type_gre tunnel_id_ranges 1:1000
openstack-config --set /etc/neutron/plugins/ml2/ml2_conf.ini ovs local_ip 192.168.216.151
openstack-config --set /etc/neutron/plugins/ml2/ml2_conf.ini ovs tunnel_type gre
openstack-config --set /etc/neutron/plugins/ml2/ml2_conf.ini ovs enable_tunneling True
openstack-config --set /etc/neutron/plugins/ml2/ml2_conf.ini securitygroup firewall_driver neutron.agent.linux.iptables_firewall.OVSHybridIptablesFirewallDriver
openstack-config --set /etc/neutron/plugins/ml2/ml2_conf.ini securitygroup enable_security_group True
service openvswitch start
chkconfig openvswitch on
#Add the integration bridge:ovs-vsctl add-br br-int
#Add the external bridge:ovs-vsctl add-br br-ex
#Add a port to the external bridge that connects to the physical external network interface:#Replace INTERFACE_NAME with the actual interface name. For example, eth2 or ens256.ovs-vsctl add-port br-ex eth4
Depending on your network interface driver, you may need to disable Generic Receive Offload (GRO) to achieve suitable throughput between your instances and the external network.
To temporarily disable GRO on the external network interface while testing your environment:
# ethtool -K INTERFACE_NAME gro off ln -s /etc/neutron/plugins/ml2/ml2_conf.ini /etc/neutron/plugin.ini
cp /etc/init.d/neutron-openvswitch-agent /etc/init.d/neutron-openvswitch-agent.orig
sed -i 's,plugins/openvswitch/ovs_neutron_plugin.ini,plugin.ini,g' /etc/init.d/neutron-openvswitch-agent
service neutron-openvswitch-agent start
service neutron-l3-agent start
service neutron-dhcp-agent start
service neutron-metadata-agent start
chkconfig neutron-openvswitch-agent on
chkconfig neutron-l3-agent on
chkconfig neutron-dhcp-agent on
chkconfig neutron-metadata-agent on
Neutron Configure compute node
Edit /etc/sysctl.conf to contain the following:
net.ipv4.conf.all.rp_filter=0
net.ipv4.conf.default.rp_filter=0
Implement the changes:
# sysctl -p
To install the Networking components
yum -y install openstack-neutron-ml2 openstack-neutron-openvswitch
Replace NEUTRON_PASS with the password you chose for the neutron user in the Identity service.
openstack-config --set /etc/neutron/neutron.conf DEFAULT auth_strategy keystone
openstack-config --set /etc/neutron/neutron.conf keystone_authtoken auth_uri http://controller:5000
openstack-config --set /etc/neutron/neutron.conf keystone_authtoken auth_host controller
openstack-config --set /etc/neutron/neutron.conf keystone_authtoken auth_protocol http
openstack-config --set /etc/neutron/neutron.conf keystone_authtoken auth_port 35357
openstack-config --set /etc/neutron/neutron.conf keystone_authtoken admin_tenant_name service
openstack-config --set /etc/neutron/neutron.conf keystone_authtoken admin_user neutron
openstack-config --set /etc/neutron/neutron.conf keystone_authtoken admin_password neutron4mar
openstack-config --set /etc/neutron/neutron.conf DEFAULT rpc_backend neutron.openstack.common.rpc.impl_qpid
openstack-config --set /etc/neutron/neutron.conf DEFAULT qpid_hostname controller
openstack-config --set /etc/neutron/neutron.conf DEFAULT core_plugin ml2
openstack-config --set /etc/neutron/neutron.conf DEFAULT service_plugins router
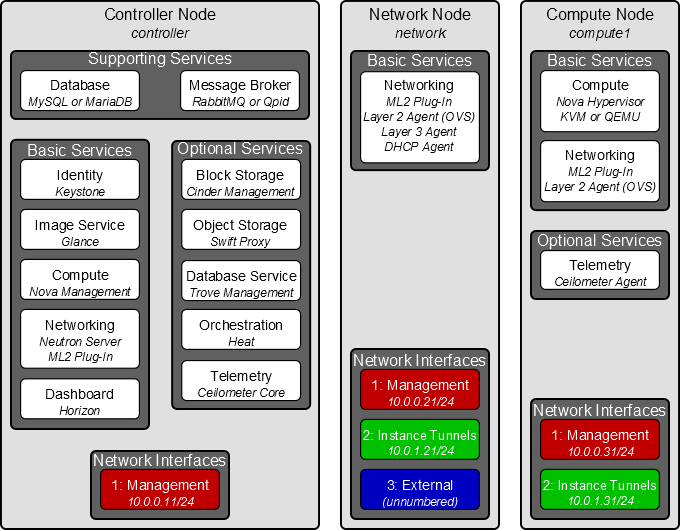
Replace INSTANCE_TUNNELS_INTERFACE_IP_ADDRESS with the IP address of the instance tunnels network interface on your compute node. This guide uses 10.0.1.31 for the IP address of the instance tunnels network interface on the first compute node.
openstack-config --set /etc/neutron/plugins/ml2/ml2_conf.ini ml2 type_drivers gre
openstack-config --set /etc/neutron/plugins/ml2/ml2_conf.ini ml2 tenant_network_types gre
openstack-config --set /etc/neutron/plugins/ml2/ml2_conf.ini ml2 mechanism_drivers openvswitch
openstack-config --set /etc/neutron/plugins/ml2/ml2_conf.ini ml2_type_gre tunnel_id_ranges 1:1000
openstack-config --set /etc/neutron/plugins/ml2/ml2_conf.ini ovs local_ip 192.168.216.141
openstack-config --set /etc/neutron/plugins/ml2/ml2_conf.ini ovs tunnel_type gre
openstack-config --set /etc/neutron/plugins/ml2/ml2_conf.ini ovs enable_tunneling True
openstack-config --set /etc/neutron/plugins/ml2/ml2_conf.ini securitygroup firewall_driver neutron.agent.linux.iptables_firewall.OVSHybridIptablesFirewallDriver
openstack-config --set /etc/neutron/plugins/ml2/ml2_conf.ini securitygroup enable_security_group True
service openvswitch start
chkconfig openvswitch on
#Add the integration bridge:ovs-vsctl add-br br-int
Replace NEUTRON_PASS with the password you chose for the neutron user in the Identity service.openstack-config --set /etc/nova/nova.conf DEFAULT network_api_class nova.network.neutronv2.api.API
openstack-config --set /etc/nova/nova.conf DEFAULT neutron_url http://controller:9696
openstack-config --set /etc/nova/nova.conf DEFAULT neutron_auth_strategy keystone
openstack-config --set /etc/nova/nova.conf DEFAULT neutron_admin_tenant_name service
openstack-config --set /etc/nova/nova.conf DEFAULT neutron_admin_username neutron
openstack-config --set /etc/nova/nova.conf DEFAULT neutron_admin_password neutron4mar
openstack-config --set /etc/nova/nova.conf DEFAULT neutron_admin_auth_url http://controller:35357/v2.0
openstack-config --set /etc/nova/nova.conf DEFAULT linuxnet_interface_driver nova.network.linux_net.LinuxOVSInterfaceDriver
openstack-config --set /etc/nova/nova.conf DEFAULT firewall_driver nova.virt.firewall.NoopFirewallDriver
openstack-config --set /etc/nova/nova.conf DEFAULT security_group_api neutron
ln -s /etc/neutron/plugins/ml2/ml2_conf.ini /etc/neutron/plugin.ini
#Due to a packaging bug, the Open vSwitch agent initialization script explicitly looks for the Open vSwitch plug-in configuration file rather than a symbolic link /etc/neutron/plugin.ini pointing to the ML2 plug-in configuration file. Run the following commands to resolve this issue:
cp /etc/init.d/neutron-openvswitch-agent /etc/init.d/neutron-openvswitch-agent.orig
sed -i 's,plugins/openvswitch/ovs_neutron_plugin.ini,plugin.ini,g' /etc/init.d/neutron-openvswitch-agent
#Restart the Compute service:
service openstack-nova-compute restart
#Start the Open vSwitch (OVS) agent and configure it to start when the system boots:
service neutron-openvswitch-agent start
chkconfig neutron-openvswitch-agent on