Pages

Showing posts with label Cloud. Show all posts

Tuesday, October 14, 2014

Openstack Juno- Part 1 - Basic Configuration

Juno is the latest version of Openstack which is expected to once of the main milestone in the Openstack releases with a good set of updated to all the Services and First one of its series which will run over Rhel/Centos 7

Making Selinux to Permissive ON ALL THE NODE
=============================================
sed -i "s/SELINUX=.*/SELINUX=permissive/g" /etc/sysconfig/selinux
sed -i "s/SELINUX=.*/SELINUX=permissive/g" /etc/selinux/config ; setenforce 0


Configure Sysctl.conf ON ALL THE NODE
=============================================
echo 1 > /proc/sys/net/ipv4/ip_forward
grep -q net.ipv4.ip_forward /etc/sysctl.conf  ||echo "net.ipv4.ip_forward = 1 " >> /etc/sysctl.conf

grep -q net.ipv4.conf.all.rp_filter /etc/sysctl.conf || echo "net.ipv4.conf.all.rp_filter=0" >> /etc/sysctl.conf

grep -q net.ipv4.conf.default.rp_filter /etc/sysctl.conf  || echo "net.ipv4.conf.default.rp_filter = 0 " >> /etc/sysctl.conf

grep -q net.ipv4.ip_nonlocal_bind /etc/sysctl.conf || echo "net.ipv4.ip_nonlocal_bind = 1" >> /etc/sysctl.conf

sysctl -p

https://github.com/brightbox/bootstaller/blob/master/auto/CentOS-7-x86_64-Brightbox-7.0_20140717.ks
sed -i "s/10.0.0.2/8.8.8.8/g" /etc/resolv.conf

Installing Needed Packages ON THE NODE
=============================================
yum -y upgrade
yum install http://rdo.fedorapeople.org/openstack-juno/rdo-release-juno.rpm -y
yum -y install https://dl.fedoraproject.org/pub/epel/7/x86_64/e/epel-release-7-2.noarch.rpm -y
yum -y install policycoreutils setroubleshoot
setenforce 0
yum install -y euca2ools
yum install -y yum-plugin-priorities gedit curl wget nc
yum -y install ntp
service ntpd start
chkconfig ntpd on
yum -y install openstack-utils
yum -y install openstack-selinux


On all compute node
yum -y install sysfsutils sg3_utils


Installing Mysql Server in Controller
============================================
yum install mariadb mariadb-server MySQL-python -y

Into /etc/my.cnf
-----
default-storage-engine = innodb
innodb_file_per_table
collation-server = utf8_general_ci
init-connect = 'SET NAMES utf8'
character-set-server = utf8
-----

systemctl enable mariadb.service
systemctl start mariadb.service

mysql_secure_installation


Installing The Broker Service
============================================

yum install rabbitmq-server -y

systemctl enable rabbitmq-server.service
systemctl start rabbitmq-server.service

rabbitmqctl change_password guest RABBIT_PASS


Thursday, October 9, 2014

Creating Centos-7 Image for Openstack


Download the Centos-7 Minimal ISO from the centos ISO repo

http://isoredirect.centos.org/centos/7/isos/x86_64/

Setting up the KVM environment to create the custom images.

yum install kvm qemu-kvm python-virtinst libvirt libvirt-python virt-manager libguestfs-tools

Script for starting the KVM installation  cat createcentos7.sh
=============
IMAGE=Centos7.qcow2
VIRTIO_ISO=/root/virtio-win-0.1-81.iso
ISO=/ISO/CentOS-7.0-1406-x86_64-Minimal.iso

KVM=/usr/libexec/qemu-kvm
if [ ! -f "$KVM" ]; then
    KVM=/usr/bin/kvm
fi

qemu-img create -f qcow2 -o preallocation=metadata $IMAGE 8G

$KVM -m 2048 -smp 2 -cdrom $ISO -drive file=$VIRTIO_ISO,index=3,media=cdrom  -drive file=$IMAGE,if=virtio,boot=off -boot d -vga std -k en-us -vnc 192.168.2.10:4 -usbdevice tablet
=============
using any VNC client connect to 192.168.2.10:4  and do the rest of configuration.

Complete the installation do the following configurations after starting the image in openstack


cat <<EOF >/etc/sysconfig/network-scripts/ifcfg-eth0
DEVICE="eth0"
BOOTPROTO="dhcp"
ONBOOT="yes"
TYPE="Ethernet"
PERSISTENT_DHCLIENT=1
EOF

cat <<EOF > /etc/sysconfig/network
NETWORKING=yes
NOZEROCONF=yes
EOF
yum update -y

yum -y install https://dl.fedoraproject.org/pub/epel/7/x86_64/e/epel-release-7-2.noarch.rpm -y

yum install cloud-init

yum history new
yum clean all
truncate -c -s 0 /var/log/yum.log
rm -rf /var/lib/yum/*
rm -rf /var/lib/random-seed
rm -rf /root/install.log
rm -rf /root/install.log.syslog
rm -rf /root/anaconda-ks.cfg
rm -rf /var/log/anaconda*


Now save the Vm as a snapshot and use it again :)

Tuesday, October 7, 2014

Delete a VM in an Error State in Openstack

Delete a VM in an Error State

mysql -u$MYSQL_USER -p$MYSQL_PASSWD -h$MYSQL_HOST -e 'USE nova; DELETE FROM security_group_instance_association WHERE instance_id IN (SELECT id FROM instances WHERE vm_state = "error");'
mysql -u$MYSQL_USER -p$MYSQL_PASSWD -h$MYSQL_HOST -e 'USE nova; DELETE FROM block_device_mapping WHERE instance_id IN (SELECT id FROM instances WHERE vm_state = "error");'
mysql -u$MYSQL_USER -p$MYSQL_PASSWD -h$MYSQL_HOST -e 'USE nova; DELETE FROM instance_info_caches WHERE instance_id IN (SELECT uuid FROM instances WHERE vm_state = "error");'
mysql -u$MYSQL_USER -p$MYSQL_PASSWD -h$MYSQL_HOST -e 'USE nova; UPDATE fixed_ips SET allocated = 0 WHERE instance_id IN (SELECT id FROM instances WHERE vm_state = "error");'
mysql -u$MYSQL_USER -p$MYSQL_PASSWD -h$MYSQL_HOST -e 'USE nova; DELETE FROM instances WHERE vm_state = "error";'

Resetting the Instance state once it’s in a stuck state in Openstack

Resetting the Instance state once it’s in a stuck state

$ nova list
+--------------------------------------+----------------+---------+------------------------------------------.  -------------+-------------+----------------------------------+
| ID                                                                 | Name         | Status        |   Task State  | Power State | Networks                                      |
+--------------------------------------+----------------+---------+-------------------------------------------  -------------+-------------+----------------------------------+
| ca9496e9-0bd2-4734-9cf9-eb4e264628f7 | www            | SHUTOFF | powering-on | Shutdown    | fsf-lan=10.0.3.18, 93.20.168.177  |
+--------------------------------------+----------------+---------+----------------------------------------------------------+-------------+----------------------------------+

   
Setting the fields for the instance directly in the database will allow operations on the instance (nova start or nova volume-detach for instance):

$ mysql -e "update instances set task_state = NULL, \
           vm_state = 'stopped', \
           power_state = 4 \
           where deleted = 0 and hostname = 'www' and \
           uuid = 'ca9496e9-0bd2-4734-9cf9-eb4e264628f7'" nova

Removing a Cinder volume from the MYSQL in Openstack


Get the Cinder Volume’s ID from Cinder List and use it in other commands

>>cinder list;
$> nova volume-detach testvm aaaaaaaa-bbbb-cccc-dddd-eeeeeeeeeeee
$> cinder delete vol-00000001
Or
In mysql Server
mysql
use cidner;
SELECT id,status,attach_status,mountpoint,instance_uuid from volumes;
UPDATE volumes SET status="available", attach_status="detached", mountpoint=NULL, instance_uuid=NULL WHERE id="57b32eaf-7b71-49bf-a8fd-4115567a6cda";
SELECT id,status,attach_status,mountpoint,instance_uuid from volumes;
bye

Monday, October 6, 2014

Nova issue with deleting Vm

We can delete the nova instance which are in error/deleting state by following the steps mentioned below.

Get the instance ID from command “nova list ” and reset the state using “nova reset-state <ID>” command

nova list

[root@controller1 ~]# nova list
+--------------------------------------+-----------------+--------+------------+-------------+----------------------------------------------+
| ID                                   | Name            | Status | Task State | Power State | Networks                                     |
+--------------------------------------+-----------------+--------+------------+-------------+----------------------------------------------+
| 0ccfa148-97de-4be9-b85d-4283037746b1 | Ha-Porxy-F5     | ACTIVE | -          | Running     | Trusted-Internal-NIC=10.0.0.157, 10.1.15.140 |
| e61a759d-528c-423b-bb24-dcf7e3a5618e | Ha-Porxy-Mysql  | ACTIVE | -          | Running     | Trusted-Internal-NIC=10.0.0.158, 10.1.15.139 |

nova reset-state 0ccfa148-97de-4be9-b85d-4283037746b1


You can also use the --active parameter to force the instance back to an active state instead of an error state. For example:

$ nova reset-state --active c6bbbf26-b40a-47e7-8d5c-eb17bf65c485

Sunday, October 5, 2014

Neutron check Commands

To list all the virtual routers and dhcp server
>> ip netns ls

[root@neutronww1 ~]# ip netns
qrouter-641ca25a-7832-4818-b7ww5b-559c8f75ba5c
qdhcp-71ed8a34-a2d5-4d84-9dww47-e5e107dd8d7e
qdhcp-35a33370-d641-4dca-9wwdab-4ac2d9ffc7c6
qdhcp-e0b51c09-57dd-4b3a-a1ww1f-c83903d52e4d
qrouter-3b7f1bcc-0c95-47d7-a2ww17-9fe2aef7f0c0
qrouter-ac17d3c5-9bf4-4788-b2www6c-ca8aa249613b
[root@neutron1 ~]#

Here the virtual routers are once which start with extension qrouter and dhcp server are those which start with extension qdhcp.


To get more details about the virtual routers and dhcp server we can use following command

>>[root@n1 ~]# ip netns exec <virtual router/dhcp server IP from ip netns command> <network command>

Examples

ip netns exec qrouter-641ca25a-7832-4818-b7ww5b-559c8f75ba5c ip a
ip netns exec qrouter-641ca25a-7832-4818-b7www5b-559c8f75ba5c ifconfig
ip netns exec qrouter-641ca25a-7832-4818-b7www5b-559c8f75ba5c route -n
ip netns exec qrouter-641ca25a-7832-4818-bwww75b-559c8f75ba5c ping

In the above examples we use the commands like “ip a”, “ifconfig” and “route” to list different parameters of the virtual router and dhcp server.  We can use the route command to add up more routing rules if needed.  There we can use the commands like ip, ifconfig, route, ping etc just as we use it on the physical system. To tweak/troubleshoot the entire system. 

Saturday, October 4, 2014

Bridge Interface shown down in Horizon Dashboard @ Openstack


sudo ovs-vsctl br-get-external-id br-ex returns nothing, and so br-ex is excluded from the list of ancillary bridges and so the gateway port always shows as DOWN.
A workaround is to set the bridge-id to br-ex and restart the L2 agent:

ovs-vsctl br-set-external-id br-ex bridge-id br-ex
ovs-vsctl br-set-external-id br-ex-2 bridge-id br-ex-2

Monday, September 29, 2014

Configure HA using Corosync and pacemaker

Opening needed Ports in Iptables if We are using IPtables
/etc/sysconfig/iptables. Towards the end of the file, but before any REJECT statements, we add the following lines:
-A INPUT -p udp -m state --state NEW -m multiport --dports 5404,5405 -j ACCEPT
-A INPUT -m tcp -p tcp --dport 7788 -j ACCEPT
-A INPUT -m tcp -p tcp --dport 3306 -j ACCEPT

Installing modules
yum -y install wget
rpm -Uvh http://elrepo.org/elrepo-release-6-5.el6.elrepo.noarch.rpm
yum -y install drbd84-utils kmod-drbd84 --enablerepo=elrepo
yum -y install pacemaker corosync cluster-glue

wget -P /etc/yum.repos.d/ http://download.opensuse.org/repositories/network:/ha-clustering:/Stable/CentOS_CentOS-6/network:ha-clustering:Stable.repo
yum install crmsh

Configure Corosync 

vi /etc/corosync/corosync.conf
totem {
version: 2
secauth: off
threads: 0
interface {
ringnumber: 0
bindnetaddr: 10.0.0.0
mcastaddr: 226.94.1.1
mcastport: 5405
ttl: 1
}
}

logging {
fileline: off
to_stderr: no
to_logfile: yes
to_syslog: yes
logfile: /var/log/cluster/corosync.log
debug: off
timestamp: on
logger_subsys {
subsys: AMF
debug: off
}
}

amf {
mode: disabled
}

service {
        # Load the Pacemaker Cluster Resource Manager
        ver:       1
        name:      pacemaker
}

aisexec {
        user:   root
        group:  root
}


chkconfig --level 3 corosync on
service corosync start
chkconfig --level 3 pacemaker on
service pacemaker start

Checking the Cluster Connectivity
corosync-objctl runtime.totem.pg.mrp.srp.members

Check the service and cluster status
crm_mon -1


Configuring the cluster
>>crm configure
property no-quorum-policy="ignore" pe-warn-series-max="1000" pe-input-series-max="1000" pe-error-series-max="1000" cluster-recheck-interval="5min"
property stonith-enabled=false
commit

Adding a Cluster server for common IP (VIP)
>>crm configure
primitive p_api-ip ocf:heartbeat:IPaddr2 params ip="10.0.0.199" cidr_netmask="24" op monitor interval="30s"
commit

Now we need to configure the needed services in the CRM.


Tuesday, September 23, 2014

HAproxy Load Balancing Algorithms

HAproxy Load Balancing Algorithms
The algoritm you define determines how HAproxy balances load across your servers. You can set the algorithm to use with the balance parameter.

Round Robin
Requests are rotated among the servers in the backend.

Servers declared in the backend section also accept a weight parameter which specifies their relative weight. When balancing load, the Round Robin algorithm will respect that weight ratio.
Example:

...
option tcplog
balance roundrobin
maxconn 10000
...
Static Round Robin
Each server is used in turn, according to the defined weight for the server. This algorithm is a static version of the round-robin algoritm, which means that changing the weight ratio for a server on the fly will have no effect. However, you can define as many servers as you like with this algorithm. In addition, when a server comes online, this algoritm ensures that the server is immediately reintroduced into the farm after re-computing the full map. This algoritm also consome slightly less CPU cycles (around -1%).

Example:

...
option tcplog
balance static-rr
maxconn 10000
...
Least Connection
Each server is used in turn, according to the defined weight for the server. This algorithm is a static version of the round-robin algoritm, which means that changing the weight ratio for a server on the fly will have no effect. However, you can define as many servers as you like with this algorithm. In addition, when a server comes online, this algoritm ensures that the server is immediately reintroduced into the farm after re-computing the full map. This algoritm also consome slightly less CPU cycles than the Round Robin algorithm (around -1%).

Example:

...
option tcplog
balance leastconn
maxconn 10000
...
Source
A hash of the source IP is divided by the total weight of the running servers to determine which server will receive the request. This ensures that clients from the same IP address always hit the same server, which is a poor man's session persistence solution.

Example:

...
option tcplog
balance source
maxconn 10000
...
URI
This algorithm hashes either the left part of the URI (before the question mark) or the whole URI (if the whole parameter is present) and divides the hash value by the total weight of the running servers. The result designates which server will receive the request. This ensures that the proxy will always direct the same URI to the same server as long as all servers remain online.

This is used with proxy caches and anti-virus proxies in order to maximize the cache hit rate. This algorithm is static by default, which means that changing a server's weight on the fly will have no effect. However, you can change this using a hash-type parameter.

You can only use this algorithm for a configuration with an HTTP backend.
Exampple:

...
option tcplog
balance uri
maxconn 10000
...
URL Parameter
The URL parameter specified in argument will be looked up in the query string of each HTTP GET request.

You can use this algorithm to check specific parts of the URL, such as values sent through POST requests. For example, you can set this algorithm to direct a request that specifies a user_id with a specific value to the same server using the url_param method. Essentially, this is another way of achieving session persistence in some cases (see the official HAproxy documentation for more information).

Example:

...
option tcplog
balance url_param userid
maxconn 10000
...
or

...
option tcplog
balance url_param session_id check_post 64
maxconn 10000
...

Friday, September 19, 2014

Openstack Heat : Installing Applications along with the heat template

Installing Applications along with the heat template. If needed we can mention the network ID, Image ID etc in the file itself instead of asking it from outside.
================================================
heat_template_version: 2013-05-23

description: Test Template

parameters:
NAME:
type: string
description : Instance Name
ImageID:
type: string
description: Image use to boot a server
NetID:
type: string
description: Network ID for the server

resources:
server1:
type: OS::Nova::Server
properties:
name: { get_param: NAME }
image: { get_param: ImageID }
key_name: Cloud
flavor: "m1.small"
networks:
- network: { get_param: NetID }
user_data_format: RAW
user_data: |
#!/bin/bash -v
echo "nameserver 8.8.8.8" > /etc/resolv.conf
yum update -y
yum install httpd -y

outputs:
server1_private_ip:
description: IP address of the server in the private network
value: { get_attr: [ server1, first_address ] }
================================================

heat stack-create -f heat.yml -P "ImageID=abc9818d-ee5f-4778-ada5-a29105ea9c02;NetID=71ed8a34-a2d5-4d84-9d47-e5e107dd8d7e" Centos-Stack

Thursday, September 18, 2014

Opensatck Icehouse Installing Part -8 Heat - Orchestration Service

Installing Heat - Orchestration Service

Installing the Packages

yum install openstack-heat-api openstack-heat-engine openstack-heat-api-cfn

Configuring the Service

Setting Message Brocker
rpc_backend = heat.openstack.common.rpc.impl_kombu
rabbit_host=controller

Configuring Mysql
openstack-config --set /etc/heat/heat.conf database connection mysql://heat:test4heat@controller/heat

on mysql Server
mysql
CREATE DATABASE heat;
GRANT ALL PRIVILEGES ON heat.* TO 'heat'@'localhost' IDENTIFIED BY 'test4heat';
GRANT ALL PRIVILEGES ON heat.* TO 'heat'@'%' IDENTIFIED BY 'test4heat';
GRANT ALL PRIVILEGES ON heat.* TO 'heat'@'192.168.10.30' IDENTIFIED BY 'test4heat';
GRANT ALL PRIVILEGES ON heat.* TO 'heat'@'192.168.10.31' IDENTIFIED BY 'test4heat';
GRANT ALL PRIVILEGES ON heat.* TO 'heat'@'192.168.10.35' IDENTIFIED BY 'test4heat';
GRANT ALL PRIVILEGES ON heat.* TO 'heat'@'192.168.10.32' IDENTIFIED BY 'test4heat';
GRANT ALL PRIVILEGES ON heat.* TO 'heat'@'192.168.10.36' IDENTIFIED BY 'test4heat';
FLUSH PRIVILEGES;
exit
Create the heat service tables

# su -s /bin/sh -c "heat-manage db_sync" heat

Creating Service User
keystone user-create --name=heat --pass=test4heat --email=heat@example.com
keystone user-role-add --user=heat --tenant=service --role=admin

Run the following commands to configure the Orchestration service to authenticate with the Identity service:

openstack-config --set /etc/heat/heat.conf keystone_authtoken auth_uri http://controller:5000/v2.0
openstack-config --set /etc/heat/heat.conf keystone_authtoken auth_port 35357
openstack-config --set /etc/heat/heat.conf keystone_authtoken auth_protocol http
openstack-config --set /etc/heat/heat.conf keystone_authtoken admin_tenant_name service
openstack-config --set /etc/heat/heat.conf keystone_authtoken admin_user heat
openstack-config --set /etc/heat/heat.conf keystone_authtoken admin_password test4heat
openstack-config --set /etc/heat/heat.conf ec2authtoken auth_uri http://controller:5000/v2.0

Register the Heat and CloudFormation APIs with the Identity Service so that other OpenStack services can locate these APIs. Register the services and specify the endpoints:

keystone service-create --name=heat --type=orchestration --description="Orchestration"
keystone endpoint-create --service-id=$(keystone service-list | awk '/ orchestration / {print $2}') --publicurl=http://controller:8004/v1/%\(tenant_id\)s --internalurl=http://controller:8004/v1/%\(tenant_id\)s --adminurl=http://controller:8004/v1/%\(tenant_id\)s
keystone service-create --name=heat-cfn --type=cloudformation --description="Orchestration CloudFormation"
keystone endpoint-create --service-id=$(keystone service-list | awk '/ cloudformation / {print $2}') --publicurl=http://controller:8000/v1 --internalurl=http://controller:8000/v1 --adminurl=http://controller:8000/v1

Create the heat_stack_user role.

keystone role-create --name heat_stack_user


The example uses the IP address of the controller (10.0.0.11) instead of the controller host name since our example architecture does not include a DNS setup. Make sure that the instances can resolve the controller host name if you choose to use it in the URLs.
openstack-config --set /etc/heat/heat.conf DEFAULT heat_metadata_server_url http://192.168.10.30:8000
openstack-config --set /etc/heat/heat.conf DEFAULT heat_waitcondition_server_url http://192.168.10.30:8000/v1/waitcondition


service openstack-heat-api start
service openstack-heat-api-cfn start
service openstack-heat-engine start
chkconfig openstack-heat-api on
chkconfig openstack-heat-api-cfn on
chkconfig openstack-heat-engine on

Thursday, September 4, 2014

Openstack Icehouse install Part -7 Cinder Service Block storage

Install Cinder- Block Storage Service

On Controller Node
Install the appropriate packages

yum install openstack-cinder -y

Configure Block Storage to use your database

openstack-config --set /etc/cinder/cinder.conf database connection mysql://cinder:cinder4admin@controller/cinder

Creating Database
On Mysql Server

mysql -u root -p

CREATE DATABASE cinder;
GRANT ALL PRIVILEGES ON cinder.* TO 'cinder'@'localhost' IDENTIFIED BY 'cinder4admin';
GRANT ALL PRIVILEGES ON cinder.* TO 'cinder'@'10.1.15.30' IDENTIFIED BY 'cinder4admin';
GRANT ALL PRIVILEGES ON cinder.* TO 'cinder'@'%' IDENTIFIED BY 'cinder4admin';
GRANT ALL PRIVILEGES ON cinder.* TO 'cinder'@'10.1.15.31' IDENTIFIED BY 'cinder4admin';
GRANT ALL PRIVILEGES ON cinder.* TO 'cinder'@'10.1.15.35' IDENTIFIED BY 'cinder4admin';
GRANT ALL PRIVILEGES ON cinder.* TO 'cinder'@'10.1.15.36' IDENTIFIED BY 'cinder4admin';
GRANT ALL PRIVILEGES ON cinder.* TO 'cinder'@'10.1.15.32' IDENTIFIED BY 'cinder4admin';
GRANT ALL PRIVILEGES ON cinder.* TO 'cinder'@'10.1.15.42' IDENTIFIED BY 'cinder4admin';
exit;

Create the database tables

su -s /bin/sh -c "cinder-manage db sync" cinder

Create a cinder user.

keystone user-create --name=cinder --pass=cinder4admin --email=cinder@example.com
keystone user-role-add --user=cinder --tenant=service --role=admin

Edit the /etc/cinder/cinder.conf configuration file:

openstack-config --set /etc/cinder/cinder.conf DEFAULT auth_strategy keystone
openstack-config --set /etc/cinder/cinder.conf keystone_authtoken auth_uri http://controller:5000
openstack-config --set /etc/cinder/cinder.conf keystone_authtoken auth_host controller
openstack-config --set /etc/cinder/cinder.conf keystone_authtoken auth_protocol http
openstack-config --set /etc/cinder/cinder.conf keystone_authtoken auth_port 35357
openstack-config --set /etc/cinder/cinder.conf keystone_authtoken admin_user cinder
openstack-config --set /etc/cinder/cinder.conf keystone_authtoken admin_tenant_name service
openstack-config --set /etc/cinder/cinder.conf keystone_authtoken admin_password cinder4admin

Configure Block Storage to use the Qpid message broker:

openstack-config --set /etc/cinder/cinder.conf DEFAULT rpc_backend cinder.openstack.common.rpc.impl_qpid
openstack-config --set /etc/cinder/cinder.conf DEFAULT qpid_hostname 10.1.15.40

Register the Block Storage service with the Identity service so that other OpenStack services can locate it:

keystone service-create --name=cinder --type=volume --description="OpenStack Block Storage"
keystone endpoint-create --service-id=$(keystone service-list | awk '/ volume / {print $2}') --publicurl=http://controller:8776/v1/%\(tenant_id\)s --internalurl=http://controller:8776/v1/%\(tenant_id\)s --adminurl=http://controller:8776/v1/%\(tenant_id\)s

Register a service and endpoint for version 2 of the Block Storage service API:

keystone service-create --name=cinderv2 --type=volumev2 --description="OpenStack Block Storage v2"
keystone endpoint-create --service-id=$(keystone service-list | awk '/ volumev2 / {print $2}') --publicurl=http://controller:8776/v2/%\(tenant_id\)s --internalurl=http://controller:8776/v2/%\(tenant_id\)s --adminurl=http://controller:8776/v2/%\(tenant_id\)s

Start and configure the Block Storage services to start when the system boots:

service openstack-cinder-api start
service openstack-cinder-scheduler start
chkconfig openstack-cinder-api on
chkconfig openstack-cinder-scheduler on

On Cinder Service Node.

Setting Up NFS Share .

Installing NFS packages
yum install nfs-utils nfs-utils-lib

Make and configure partition
mkfs.ext4 /dev/mapper/vg_cloud2-LogVol03
mkdir /home/cinder_nfs
mount /dev/mapper/vg_cloud2-LogVol03 /home/cinder_nfs/
Add entries in Fstab
/dev/mapper/vg_cloud2-LogVol02 /home/cinder_nfs ext4 rw 0 0

Add Share to NFS
vi /etc/exports
/home/cinder_nfs *(rw,sync,no_root_squash,no_subtree_check)
exportfs -a
showmount -e 192.168.11.42

service nfs start
service nfs restart
service iptables stop
chkconfig iptables off
Install the Cinder Software
yum install openstack-cinder scsi-target-utils

Configure the Service

Copy the /etc/cinder/cinder.conf configuration file from the controller, or perform the following steps to set the keystone credentials:
openstack-config --set /etc/cinder/cinder.conf DEFAULT auth_strategy keystone
openstack-config --set /etc/cinder/cinder.conf keystone_authtoken auth_uri http://controller:5000
openstack-config --set /etc/cinder/cinder.conf keystone_authtoken auth_host controller
openstack-config --set /etc/cinder/cinder.conf keystone_authtoken auth_protocol http
openstack-config --set /etc/cinder/cinder.conf keystone_authtoken auth_port 35357
openstack-config --set /etc/cinder/cinder.conf keystone_authtoken admin_user cinder
openstack-config --set /etc/cinder/cinder.conf keystone_authtoken admin_tenant_name service
openstack-config --set /etc/cinder/cinder.conf keystone_authtoken admin_password cinder4admin
openstack-config --set /etc/cinder/cinder.conf DEFAULT rpc_backend cinder.openstack.common.rpc.impl_qpid
openstack-config --set /etc/cinder/cinder.conf DEFAULT qpid_hostname 10.1.15.40

openstack-config --set /etc/cinder/cinder.conf database connection mysql://cinder:cinder4admin@controller/cinder
openstack-config --set /etc/cinder/cinder.conf DEFAULT glance_host controller

[root@compute2 ~]# cat /etc/cinder/nfsshares
192.168.11.42:/home/cinder_nfs
[root@compute2 ~]#

openstack-config --set /etc/cinder/cinder.conf DEFAULT nfs_shares_config /etc/cinder/nfsshares
openstack-config --set /etc/cinder/cinder.conf DEFAULT volume_driver cinder.volume.drivers.nfs.NfsDriver
service openstack-cinder-volume start
chkconfig openstack-cinder-volume on

Monday, September 1, 2014

Creating Custom Windows Images for Openstack

Setting up the KVM environment to create the custom images.

yum install kvm qemu-kvm python-virtinst libvirt libvirt-python virt-manager libguestfs-tools

Once the packages are installed we need to get the ISO’s.

For example are getting windows7 from the http://www.w7forums.com/threads/official-windows-7-sp1-iso-image-downloads.12325/
wget http://msft.digitalrivercontent.net/win/X17-24395.iso

Now we need the Virtio Driver’s so that windows can detect unsigned devices like linux from http://alt.fedoraproject.org/pub/alt/virtio-win/latest/

wget http://alt.fedoraproject.org/pub/alt/virtio-win/latest/virtio-win-0.1-81.iso

First Create the Disk on which the OS need to be installed

qemu-img create -f qcow2 -o preallocation=metadata windows.qcow2 20G

Start the KVM installation
/usr/libexec/qemu-kvm -m 2048 -smp 2 -cdrom X17-24395.iso -drive file=virtio-win-0.1-81.iso,index=3,media=cdrom -drive file= windows.qcow2,if=virtio,boot=off -boot d -vga std -k en-us -vnc 10.1.17.42:1 -usbdevice tablet

Connect to Installation

Once the above step is done you will be able to connect to VNC using 10.1.17.42:1
You will be connected to VNC and you will be at the installations screen. Click Next to continue

Windows-install00

Select Install option to continue with installation.

Windows-install01

While secting the Installation driver we need to load the driver, Select the load driveroption and load the driver from the Virto ISO we have mounted

Windows-install02

Continue with the installation

Windows-install04

Once you are done download the Cloud init for windows from

https://github.com/cloudbase/cloudbase-init
Once installation is completed load the computer with virto NIC with following Command

/usr/libexec/qemu-kvm -m 2048 -smp 2 -drive file=virtio-win-0.1-81.iso,index=3,media=cdrom -drive file=windows-7.qcow2,if=virtio -boot d -vga std -k en-us -vnc 10.1.17.42:1 -usbdevice tablet -net nic,model=virtio
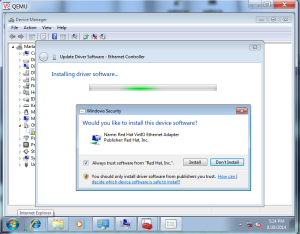
Connect to VNC and add the Virto NIC Driver From Device manager

Windows-install06

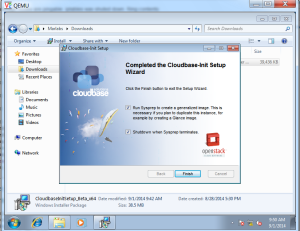
Now install the Cloud-init and initialize the Image

Windows-install10

Enable RDP for the access.

Now the Image is ready for Use .

You can get the windows password by

nova get-password <instance ID> <ssh-key>


Nova Rule

nova secgroup-add-rule default tcp 3389 3389 0.0.0.0/0

Tuesday, August 26, 2014

"Host key verification failed" error while resizing instance Openstack

Setting allow_resize_to_same_host=true will enable the resizing in All in one model of installation . but if we have mutiple controller and compute node's we will be getting an authentication error as following

"/usr/lib/python2.6/site-packages/nova/virt/libvirt/driver.py", line 4907,
in migrate_disk_and_power_off\n utils.execute(\'ssh\', dest, \'mkdir\', \'-p\', inst_base)\n', '
File "/usr/lib/python2.6/site-packages/nova/utils.py", line 165, in execute\n return processutils.execute(*cmd, **kwargs)\n', '
File "/usr/lib/python2.6/site-packages/nova/openstack/common/processutils.py", line 193, in execute\n cmd=\' \'.join(cmd))\n',
"ProcessExecutionError: Unexpected error while running command.\nCommand: ssh 10.1.15.44
mkdir -p /var/lib/nova/instances/5d5ced81-6fb1-4028-97cd-686e450d1bab\nExit code: 255\nStdout: ''\nStderr:
'Host key verification failed.\\r\\n'\n"]

This is due to a bug in nova as told in below bug report which can be solved by enabling password less authentication between the compute and controller node's nova user .

https://bugzilla.redhat.com/show_bug.cgi?id=975014#c3

By default the nova user does not have a shell so we need to enable the shell and do steps to enable password less authentication between all the server .

Enable shell for nova user


In all the controller and compute server’s enable nova user.

sed -i "s/\/var\/lib\/nova:\/sbin\/nologin/\/var\/lib\/nova:\/bin\/bash/g" /etc/passwd

cat /etc/passwd |grep nova

nova:x:162:162:OpenStack Nova Daemons:/var/lib/nova:/bin/bash

Enable password less authentication

Between all the compute and controller nodes create password less authenticatioin for user nova.


su - nova

ssh-keygen

ssh-copy-id

Tuesday, August 19, 2014

Creating Multiple Network in Openstack – Icehouse

Adding first network

On Network Node

#Add the integration bridge:
ovs-vsctl add-br br-int
#Add the external bridge:
ovs-vsctl add-br br-ex
#Add a port to the external bridge that connects to the physical external network interface:
#Replace INTERFACE_NAME with the actual interface name. For example, eth2 or ens256.
ovs-vsctl add-port br-ex eth2

On Controller Node

[root@controller1 ~]# source /root/admin-openrc.sh
[root@controller1 ~]# neutron net-create ext-net --shared --router:external=True
Created a new network:
+---------------------------+--------------------------------------+
| Field | Value |
+---------------------------+--------------------------------------+
| admin_state_up | True |
| id | 2fdfff06-5837-4ab8-b971-c08696165e9d |
| name | ext-net |
| provider:network_type | gre |
| provider:physical_network | |
| provider:segmentation_id | 1 |
| router:external | True |
| shared | True |
| status | ACTIVE |
| subnets | |
| tenant_id | 8c9fb6577a1e45879f35e3e43b34de58 |
+---------------------------+--------------------------------------+
[root@controller1 ~]#
[root@controller1 ~]# neutron subnet-create ext-net --name ext-subnet --allocation-pool start=192.168.10.129,end=192.168.10.254 --disable-dhcp --gateway 192.168.10.1 192.168.10.128/24
Created a new subnet:
+------------------+------------------------------------------------+
| Field | Value |
+------------------+------------------------------------------------+
| allocation_pools | {"start": "192.168.10.129", "end": "192.168.10.254"} |
| cidr | 192.168.10.0/24 |
| dns_nameservers | |
| enable_dhcp | False |
| gateway_ip | 192.168.10.1 |
| host_routes | |
| id | 09ec246e-4b1d-4fcb-babc-fdfd73ad13d0 |
| ip_version | 4 |
| name | ext-subnet |
| network_id | 2fdfff06-5837-4ab8-b971-c08696165e9d |
| tenant_id | 8c9fb6577a1e45879f35e3e43b34de58 |
+------------------+------------------------------------------------+
[root@controller1 ~]# neutron net-create demo-net
Created a new network:
+---------------------------+--------------------------------------+
| Field | Value |
+---------------------------+--------------------------------------+
| admin_state_up | True |
| id | df86ab38-57f2-432b-8ea8-ef30ceb72607 |
| name | demo-net |
| provider:network_type | gre |
| provider:physical_network | |
| provider:segmentation_id | 2 |
| shared | False |
| status | ACTIVE |
| subnets | |
| tenant_id | 8c9fb6577a1e45879f35e3e43b34de58 |
+---------------------------+--------------------------------------+
[root@controller1 ~]# neutron subnet-create demo-net --name demo-subnet --gateway 10.0.0.1 10.0.0.0/24
Created a new subnet:
+------------------+--------------------------------------------+
| Field | Value |
+------------------+--------------------------------------------+
| allocation_pools | {"start": "10.0.0.2", "end": "10.0.0.254"} |
| cidr | 10.0.0.0/24 |
| dns_nameservers | |
| enable_dhcp | True |
| gateway_ip | 10.0.0.1 |
| host_routes | |
| id | 7f103f72-1d77-48d9-a4eb-fdb10c6dc11d |
| ip_version | 4 |
| name | demo-subnet |
| network_id | df86ab38-57f2-432b-8ea8-ef30ceb72607 |
| tenant_id | 8c9fb6577a1e45879f35e3e43b34de58 |
+------------------+--------------------------------------------+
[root@controller1 ~]# neutron router-create demo-router
Created a new router:
+-----------------------+--------------------------------------+
| Field | Value |
+-----------------------+--------------------------------------+
| admin_state_up | True |
| external_gateway_info | |
| id | d2e481dd-a624-4447-8ea7-54fac383ec52 |
| name | demo-router |
| status | ACTIVE |
| tenant_id | 8c9fb6577a1e45879f35e3e43b34de58 |
+-----------------------+--------------------------------------+
[root@controller1 ~]# neutron router-interface-add demo-router demo-subnet
uter demo-router
neutron router-gateway-set demo-router ext-net
Added interface 628fbec4-625b-4b03-a2c5-92666cbc72af to router demo-router.
[root@controller1 ~]# #Set gateway for router demo-router
[root@controller1 ~]# neutron router-gateway-set demo-router ext-net
Set gateway for router demo-router
On Network Node

Edit /etc/neutron/l3_agent.ini and add following details
handle_internal_only_routers = True
gateway_external_network_id = ****.*****.*****.*****.****
external_network_bridge = br-ex

As per above example
handle_internal_only_routers = True
gateway_external_network_id = 2fdfff06-5837-4ab8-b971-c08696165e9d
external_network_bridge = br-ex
Adding the Second Network

On Network Node

ovs-vsctl add-br br-ex-2
ovs-vsctl add-port br-ex-2 eth3
On Controller Node

[root@controller1 ~]# source /root/admin-openrc.sh
[root@controller1 ~]# neutron net-create ext-net-2 --shared --router:external=True
Created a new network:
+---------------------------+--------------------------------------+
| Field | Value |
+---------------------------+--------------------------------------+
| admin_state_up | True |
| id | 19b85183-9637-4bea-9b26-92caf2a5cb99 |
| name | ext-net-2 |
| provider:network_type | gre |
| provider:physical_network | |
| provider:segmentation_id | 3 |
| router:external | True |
| shared | True |
| status | ACTIVE |
| subnets | |
| tenant_id | 8c9fb6577a1e45879f35e3e43b34de58 |
+---------------------------+--------------------------------------+
[root@controller1 ~]# neutron subnet-create ext-net-2 --name ext-subnet-2 --allocation-pool start=192.168.11.50,end=192.168.11.254 --disable-dhcp --gateway 192.168.11.1 192.168.11.0/24
Created a new subnet:
+------------------+-----------------------------------------------+
| Field | Value |
+------------------+-----------------------------------------------+
| allocation_pools | {"start": "192.168.11.50", "end": "192.168.11.254"} |
| cidr | 192.168.11.0/24 |
| dns_nameservers | |
| enable_dhcp | False |
| gateway_ip | 192.168.11.1 |
| host_routes | |
| id | 92dcc66d-00a3-4678-a8ac-9d72a94613ed |
| ip_version | 4 |
| name | ext-subnet-2 |
| network_id | 19b85183-9637-4bea-9b26-92caf2a5cb99 |
| tenant_id | 8c9fb6577a1e45879f35e3e43b34de58 |
+------------------+-----------------------------------------------+
[root@controller1 ~]# neutron router-create demo-router-2
Created a new router:
+-----------------------+--------------------------------------+
| Field | Value |
+-----------------------+--------------------------------------+
| admin_state_up | True |
| external_gateway_info | |
| id | e9e194bb-dafe-4e41-b867-0a64c2e74e29 |
| name | demo-router-2 |
| status | ACTIVE |
| tenant_id | 8c9fb6577a1e45879f35e3e43b34de58 |
+-----------------------+--------------------------------------+
[root@controller1 ~]# neutron router-gateway-set demo-router-2 ext-net-2
Set gateway for router demo-router-2
[root@controller1 ~]# neutron net-create demo-net-2
Created a new network:
+---------------------------+--------------------------------------+
| Field | Value |
+---------------------------+--------------------------------------+
| admin_state_up | True |
| id | f6238c45-9de4-4869-ad3e-cf3d1a647285 |
| name | demo-net-2 |
| provider:network_type | gre |
| provider:physical_network | |
| provider:segmentation_id | 4 |
| shared | False |
| status | ACTIVE |
| subnets | |
| tenant_id | 8c9fb6577a1e45879f35e3e43b34de58 |
+---------------------------+--------------------------------------+
[root@controller1 ~]# neutron subnet-create demo-net-2 --name demo-subnet-2 --gateway 10.1.0.1 10.1.0.0/24
Created a new subnet:
+------------------+--------------------------------------------+
| Field | Value |
+------------------+--------------------------------------------+
| allocation_pools | {"start": "10.1.0.2", "end": "10.1.0.254"} |
| cidr | 10.1.0.0/24 |
| dns_nameservers | |
| enable_dhcp | True |
| gateway_ip | 10.1.0.1 |
| host_routes | |
| id | 30bcb484-e7e7-42a5-9a08-b7364f94180a |
| ip_version | 4 |
| name | demo-subnet-2 |
| network_id | f6238c45-9de4-4869-ad3e-cf3d1a647285 |
| tenant_id | 8c9fb6577a1e45879f35e3e43b34de58 |
+------------------+--------------------------------------------+
[root@controller1 ~]# neutron router-interface-add demo-router-2 demo-subnet-2
Added interface daa4f64d-117c-49ee-a5b6-430c837a59d5 to router demo-router-2.
[root@controller1 ~]#

On Network Node

Edit /etc/neutron/l3_agent.ini and add following details
handle_internal_only_routers = False
gateway_external_network_id = ****.*****.*****.*****.****
external_network_bridge = br-ex

As per above example
handle_internal_only_routers = False
gateway_external_network_id = 19b85183-9637-4bea-9b26-92caf2a5cb99
external_network_bridge = br-ex-2

[root@neutron1 ~]# cp /etc/init.d/neutron-l3-agent /etc/init.d/neutron-l3-agent-2

Make the change in the following Lines to get the difference command as below
[root@neutron1 ~]# diff -n /etc/init.d/neutron-l3-agent /etc/init.d/neutron-l3-agent-2
d3 1
a3 1
# neutron-l3-agent-2 OpenStack Neutron Layer 3 Agent
d18 1
a18 1
"/etc/$proj/l3_agent-2.ini" \
d21 1
a21 1
pidfile="/var/run/$proj/$prog-2.pid"
d23 1
a23 1
[ -e /etc/sysconfig/$prog-2 ] && . /etc/sysconfig/$prog-2
d25 1
a25 1
lockfile=/var/lock/subsys/$prog-2
d32 2
a33 3
echo -n $"Starting $prog-2: "
daemon --user neutron --pidfile $pidfile "$exec --log-file /var/log/$proj/$plugin-2.log --config-file /usr/share/neutron/neutron-dist.conf --config-file /etc/neutron/neutron.conf --config-file /etc/neutron/l3_agent-2.ini --config-file /etc/neutron/fwaas_driver.ini &>/dev/null & echo \$! > $pidfile"

d41 2
a42 2
echo -n $"Stopping $prog-2: "
killproc -p $pidfile $prog-2
[root@neutron1 ~]#

[root@neutron1 ~]# chkconfig neutron-l3-agent-2 on
[root@neutron1 ~]# openstack-service restart
Stopping neutron-dhcp-agent: [ OK ]
Starting neutron-dhcp-agent: [ OK ]
Stopping neutron-l3-agent: [ OK ]
Starting neutron-l3-agent: [ OK ]
Stopping neutron-l3-agent-2: [ OK ]
Starting neutron-l3-agent-2: [ OK ]
Stopping neutron-metadata-agent: [ OK ]
Starting neutron-metadata-agent: [ OK ]
Stopping neutron-openvswitch-agent: [ OK ]
Starting neutron-openvswitch-agent: [ OK ]
[root@neutron1 ~]#
Tuesday, August 12, 2014

Openstack - Error While resizing the instance

Error While resizing the instance

=========
2014-08-12 09:38:08.449 13602 WARNING nova.scheduler.utils [req-7cf9b53a-24ed-46e7-adce-6c5e83c2839b 2ca1137e67d741e0839e67e
4959a8eea 8c9fb6577a1e45879f35e3e43b34de58] Failed to compute_task_migrate_server: No valid host was found.
=========
Solution

make sure following settings are enables in all the nova.conf

"allow_resize_to_same_host=true"
"allow_migrate_to_same_host=true"

After enabling it reboot all the openstack services and try the resizing from dashboard

We will be asked for an conformation for resizing, if we don't select any option resizing will fail

By command promt
[root@controller1 ~]# nova list
+--------------------------------------+------------------+--------+------------+-------------+-------------------+
| ID | Name | Status | Task State | Power State | Networks |
+--------------------------------------+------------------+--------+------------+-------------+-------------------+
| 0c86c7bd-e815-4616-9c01-30cb8eb09414 | Test Instance 00 | ACTIVE | - | Running | demo-net=10.0.0.9 |
+--------------------------------------+------------------+--------+------------+-------------+-------------------+

List the available flavors with the following command:

$ nova flavor-list
+----+-----------+-----------+------+-----------+------+-------+-------------+-----------+
| ID | Name | Memory_MB | Disk | Ephemeral | Swap | VCPUs | RXTX_Factor | Is_Public |
+----+-----------+-----------+------+-----------+------+-------+-------------+-----------+
| 1 | m1.tiny | 512 | 0 | 0 | | 1 | 1.0 | True |
| 2 | m1.small | 2048 | 20 | 0 | | 1 | 1.0 | True |
| 3 | m1.medium | 4096 | 40 | 0 | | 2 | 1.0 | True |
| 4 | m1.large | 8192 | 80 | 0 | | 4 | 1.0 | True |
| 5 | m1.xlarge | 16384 | 160 | 0 | | 8 | 1.0 | True |
+----+-----------+-----------+------+-----------+------+-------+-------------+-----------+
To resize the server, pass the server ID or name and the new flavor to the nova resize command. Include the --poll parameter to report the resize progress.

$ nova resize myCirrosServer 4 --poll
Instance resizing... 100% complete
Finished
Show the status for your server:

$ nova list

[root@controller1 ~]# nova list
+--------------------------------------+------------------+--------+------------------+-------------+-------------------+
| ID | Name | Status | Task State | Power State | Networks |
+--------------------------------------+------------------+--------+------------------+-------------+-------------------+
| 0c86c7bd-e815-4616-9c01-30cb8eb09414 | Test Instance 00 | RESIZE | resize_migrating | Running | demo-net=10.0.0.9 |
+--------------------------------------+------------------+--------+------------------+-------------+-------------------+

When the resize completes, the status becomes VERIFY_RESIZE.

Confirm the resize:

$ nova resize-confirm 0c86c7bd-e815-4616-9c01-30cb8eb094145
The server status becomes ACTIVE.

If the resize fails or does not work as expected, you can revert the resize:

$ nova resize-revert 0c86c7bd-e815-4616-9c01-30cb8eb09414
The server status becomes ACTIVE.

Wednesday, July 30, 2014

Iscsi Intiator + Multipath

Install the Packages

yum -y install iscsi-initiator-utils
yum install device-mapper-multipath -y
/etc/init.d/multipathd start
/etc/init.d/iscsid start

chkconfig multipathd on
chkconfig iscsid on

#Discover the target.
iscsiadm -m discovery -t sendtargets -p 192.168.1.100

iscsiadm -m discovery -t sendtargets -p 192.168.0.100

# creating new iscsi interface
iscsiadm -m iface -I iscsi-eth1 -o new

iscsiadm -m iface -I iscsi-eth2 -o new

iscsiadm -m iface -I iscsi-eth1 -o update -n iface.net_ifacename -v eth1

iscsiadm -m iface -I iscsi-eth2 -o update -n iface.net_ifacename -v eth2

#login to all discovered targets
iscsiadm -m node -l
#to Create the multipath config file automatically

#multipath -F
/sbin/mpathconf

#else Create a file /etc/multipath.conf with the following content:

echo "
defaults {
udev_dir /dev
polling_interval 10
path_selector "round-robin 0"
path_grouping_policy multibus
path_checker readsector0
rr_min_io 100
max_fds 8192
rr_weight priorities
failback immediate
no_path_retry fail
user_friendly_names yes
}

" >> /etc/multipath.conf
[root@controller1 ~]# /etc/init.d/multipathd restart
ok
Stopping multipathd daemon: [ OK ]
Starting multipathd daemon: [ OK ]
[root@controller1 ~]# multipath -ll
mpatha (36a4badb00053ae7f0000f49e53d73254) dm-3 DELL,MD3000i
size=250G features='3 queue_if_no_path pg_init_retries 50' hwhandler='1 rdac' wp=rw
|-+- policy='round-robin 0' prio=6 status=active
| |- 4:0:0:2 sdb 8:16 active ready running
| `- 5:0:0:2 sdc 8:32 active ready running
`-+- policy='round-robin 0' prio=1 status=enabled
|- 3:0:0:2 sde 8:64 active ghost running
`- 6:0:0:2 sdd 8:48 active ghost running
[root@controller1 ~]#
#Add Following to /etc/multipath.conf
multipaths {
multipath {
wwid 36a4badb00053ae7f0000f49e53d73254
alias lun0
path_grouping_policy multibus
path_checker readsector0
path_selector "round-robin 0"
failback manual
rr_weight priorities
no_path_retry fail
}
}

[root@controller1 ~]# multipath -ll
Jul 29 07:11:45 | multipath.conf line 20, invalid keyword: path_checker
lun0 (36a4badb00053ae7f0000f49e53d73254) dm-3 DELL,MD3000i
size=250G features='3 queue_if_no_path pg_init_retries 50' hwhandler='1 rdac' wp=rw
|-+- policy='round-robin 0' prio=6 status=active
| |- 4:0:0:2 sdb 8:16 active ready running
| `- 5:0:0:2 sdc 8:32 active ready running
`-+- policy='round-robin 0' prio=1 status=enabled
|- 3:0:0:2 sde 8:64 active ghost running
`- 6:0:0:2 sdd 8:48 active ghost running
[root@controller1 ~]#

#List the All DISK's which will include ISCSI drive
fdisk -l

# Use Mkfs to create the file system and mount it using _netdev option


More iscsiadm commands

iscsiadm -m session

iscsiadm -m node -u

targets configuration will be in /var/lib/iscsi

GFS - Global File System from Redhat + Iscsi drive sharing.

# install packages

yum groupinstall -y "High Availability"
yum install -y cman gfs2-utils modcluster ricci luci cluster-snmp iscsi-initiator-utils openais oddjob rgmanager

On each node create a cluster config file

# /etc/cluster/cluster.conf
<?xml version="1.0"?>
<cluster config_version="3" name="cluster1">
<clusternodes>
<clusternode name="node1" nodeid="1"/>
<clusternode name="node2" nodeid="2"/>
</clusternodes>
</cluster>

passwd ricci
chkconfig iptables off
#or configure the Ports to be opened.
chkconfig ip6tables off
chkconfig ricci on
chkconfig cman on
chkconfig rgmanager on
chkconfig modclusterd on
service iptables stop
service ip6tables stop
service ricci start
service cman start
service rgmanager start
service modclusterd start

service ricci restart
service cman restart
service rgmanager restart
service modclusterd restart
# for node1 only
chkconfig luci on
service luci start

[root@controller1 ~]# chkconfig luci on
vice luci start[root@controller1 ~]# service luci start
Adding following auto-detected host IDs (IP addresses/domain names), corresponding to `controller1' address, to the configuration of self-managed certificate `/var/lib/luci/etc/cacert.config' (you can change them by editing `/var/lib/luci/etc/cacert.config', removing the generated certificate `/var/lib/luci/certs/host.pem' and restarting luci):
(none suitable found, you can still do it manually as mentioned above)

Generating a 2048 bit RSA private key
writing new private key to '/var/lib/luci/certs/host.pem'
Start luci... [ OK ]
Point your web browser to https://controller1:8084 (or equivalent) to access luci
[root@controller1 ~]#

Making GFS file system
/sbin/mkfs.gfs2 -j 10 -p lock_dlm -t cluster1:GFS /dev/sdb

Mounting the partion
# edit /etc/fstab and append the following.
/dev/sdb /path_to_mount gfs2 defaults,noatime,nodiratime 0 0

Monday, July 21, 2014

Neutron + Pacemaker for HA Gives error

I was trying to configure HA for neutron server in icehouse implementation. I was able to set up ha for all other services except neutron. I was trying to use pacemaker for setting up HA  by following http://docs.openstack.org/high-availability-guide/content/_add_neutron_l3_agent_resource_to_pacemaker.html

but still i get following error. dhcp agent and metadata agent is showing no error but l3 agent is not working.

output of crm_mon -1
Last updated:FriJul1814:03:252014Last change:FriJul1813:54:042014 via cibadmin on network1 Stack: classic openais (with plugin)Current DC: network2 - partition with quorum Version:1.1.10-14.el6_5.3-368c7262Nodes configured,2 expected votes 4Resources configured

Online:[ network1 network2 ]

p_api-ip (ocf::heartbeat:IPaddr2):Started network2

p_neutron-dhcp-agent (ocf::openstack:neutron-dhcp-agent):Started network1

p_neutron-metadata-agent (ocf::openstack:neutron-metadata-agent):Started network1

Failed actions: p_neutron-l3-agent_start_0 on network2 'unknown error'(1): call=13, status=TimedOut,last-rc-change='Fri Jul 18 04:32:06 2014', queued=20091ms,exec=0ms p_neutron-l3-agent_start_0 on network1 'unknown error'(1): call=23, status=TimedOut,last-rc-change='Fri Jul 18 14:03:01 2014', queued=20010ms,exec=0ms[root@network1 openstack]#

Solution

The neutron-agent-l3 script to blame as it tries to communicate with neutron server
directly on port 9696, while communication is handled by AMQP service
(Qpid in my case). We need to modify the script to use Qpid port and not neutron server one.