Pages

Showing posts with label k8s. Show all posts

Wednesday, July 12, 2023

Demo Rancher - K8s Platform

Rancher is a complete software stack for teams to manage, deploy, and scale containers in production. It's built on Kubernetes and provides a streamlined interface for deploying, scaling, and managing Kubernetes clusters.

Here are the steps to deploy Rancher on a Linux machine:

Step 1: Provisioning a Linux Host

The requirements for the Linux Host are as follows: Any modern Linux distribution. Ubuntu 18.04 is commonly used for this purpose.
  • A minimum of 4GB RAM.
  • A minimum of 2 CPUs.

Step 2: Install Docker

You can install Docker on your Linux machine by following the official Docker installation documentation for your respective Linux distribution.

For Ubuntu, you can install Docker using the following commands:

sudo apt-get update sudo apt-get install apt-transport-https ca-certificates curl software-properties-common curl -fsSL https://download.docker.com/linux/ubuntu/gpg | sudo apt-key add - sudo add-apt-repository "deb [arch=amd64] https://download.docker.com/linux/ubuntu $(lsb_release -cs) stable" sudo apt-get update sudo apt-get install docker-ce

To verify that Docker is installed correctly, run the following command
sudo docker run hello-world

Step 3: Install Rancher

Run the following Docker command to install Rancher
sudo docker run -d --restart=unless-stopped -p 80:80 -p 443:443 --privileged rancher/rancher:latest
This will pull the latest Rancher server Docker image and start a container.

Step 4: Access Rancher

Rancher operates an HTTPS server on port 443 and HTTP on port 80 of the host machine. You can connect to Rancher using a web browser at the host's IP address or DNS name.

Step 5: Set the Admin Password and URL

The first time you access Rancher, you'll be prompted to set a password for the admin user, and then confirm the server URL.

Step 6: Creating a Kubernetes Cluster

From the Global view, navigate to Clusters and click on "Add Cluster". You will have a list of options to choose from for where to deploy your Kubernetes cluster. It could be on existing nodes, an infrastructure provider, or hosted Kubernetes providers.

After the selection, just follow the respective on-screen instructions to proceed with the cluster creation.

Step 7: Deploying Workloads

Once your cluster is active, you can start deploying workloads. This can be done from the 'Default' project within your cluster.

These steps should allow you to deploy Rancher on a Linux machine and manage other Kubernetes clusters. Note that Rancher's flexibility allows for many other configurations, which may vary based on your specific requirements.


Monday, April 10, 2023

Kubernetes(k8s) Sample Commands - 02

Following are a few of the  kubectl commands for managing Kubernetes clusters:

  • kubectl get nodes -o=jsonpath='{XX}'
    • This command retrieves information about the nodes in the cluster using the jsonpath output format. Replace {XX} with the desired path.
  • kubectl get nodes -o=custom-columns=<Column name>
    • This command retrieves information about the nodes in the cluster using custom columns output format. Replace <Column name> with the desired column name
  • --sort-by=
    • This option is used to sort the output based on a specified field.
  • kubectl get node node01 -o json > /opt/outputs/node01.json
    • This command retrieves information about a specific node and saves it as a JSON file.
  • kubectl get nodes -o jsonpath='{.items[*].status.nodeInfo.osImage}' > /opt/outputs/nodes_os.txt
    • This command retrieves the OS image of all the nodes in the cluster and saves it in a text file.
  • kubectl config view --kubeconfig=my-kube-config -o jsonpath="{.users[*].name}" > /opt/outputs/users.txt
    • This command retrieves the names of all users in the kubeconfig file and saves it in a text file.
  • kubectl get pv --sort-by=.spec.capacity.storage > /opt/outputs/storage-capacity-sorted.txt
    • This command retrieves the capacity of all persistent volumes and sorts the output by storage capacity.
  • kubectl config view --kubeconfig=my-kube-config -o jsonpath="{.contexts[?(@.context.user=='aws-user')].name}" > /opt/outputs/aws-context-name
    • This command retrieves the context name for a specific user in the kubeconfig file.
  • kubectl run test-nslookup --image=busybox:1.28 --rm -it --restart=Never -- nslookup nginx-resolver-service
    • This command creates a pod named test-nslookup and runs a DNS lookup on nginx-resolver-service.
  • kubectl run test-nslookup --image=busybox:1.28 --rm -it --restart=Never -- nslookup nginx-resolver-service > /root/CKA/nginx.svc
    • This command creates a pod named test-nslookup and redirects the output of the DNS lookup to a file.
  • K get nodes -o jason | jq -c paths |grep type
    • This command retrieves the paths of all fields in the node objects in the cluster that contain the word "type".
  • kubectl create deployment --image=nginx nginx --replicas=4 --dry-run=client -o yaml > nginx-deployment.yaml
    • This command creates a deployment named nginx with 4 replicas and saves the deployment manifest as a YAML file. The --dry-run=client flag is used to simulate the deployment without actually creating it.

Monday, November 7, 2022

Updated Metallb 0.13.7 Configuration for K8s 1.25

In the new Metallb 0.13.7 configuration for Kubernetes 1.25, there is a new step that needs to be taken before configuring the address pool. You need to enable the ARP (Address Resolution Protocol) to ensure that the load balancer can correctly route traffic between pods.

To enable the ARP, you need to run the following command:

kubectl get configmap kube-proxy -n kube-system -o yaml | \
sed -e "s/strictARP: false/strictARP: true/" | \
kubectl apply -f - -n kube-system

This command fetches the kube-proxy configuration map, updates the "strictARP" option from "false" to "true" and applies the updated map to the kube-system namespace.

Once ARP is enabled, you can apply the new Metallb configuration file by running the following command:

kubectl apply -f https://raw.githubusercontent.com/metallb/metallb/v0.13.7/config/manifests/metallb-native.yaml
This command fetches the Metallb configuration file and applies it to your cluster.

Next, you need to create an IP address pool that Metallb can use to assign IP addresses to services. To do this, you can create a YAML file with the following contents:

apiVersion: metallb.io/v1beta1
kind: IPAddressPool
metadata:
  name: first-pool
  namespace: metallb-system
spec:
  addresses:
  - 172.16.2.80-172.16.2.90
This YAML file creates an IP address pool named "first-pool" in the "metallb-system" namespace. The pool has a range of IP addresses between 172.16.2.80 and 172.16.2.90 that Metallb can use to assign to services.

You can apply this YAML file to your cluster using the following command:

kubectl apply -f <filename>.yaml


With these steps, you have successfully configured Metallb 0.13.7 for Kubernetes 1.25 and set up an IP address pool that Metallb can use to assign IP addresses to services. This will help you improve the load balancing capabilities of your Kubernetes cluster and make it more scalable and reliable.

Updation for the below setup
https://www.adminz.in/2022/01/setting-up-metallb-load-balancer-with.html


Friday, August 5, 2022

Kubernets Components

 Kubernetes, also known as K8s, is a popular container orchestration tool that automates the deployment, scaling, and management of containerized applications. The Kubernetes environment is made up of several core components that work together to provide a scalable and robust container management system. While there are other optional components available, these core components are essential to the Kubernetes environment.


  • Kubernetes API Server: The Kubernetes API server acts as the primary management hub for the Kubernetes cluster. It exposes the Kubernetes API, which is used by other components to interact with the cluster. The API server validates and processes API requests, and updates the cluster state accordingly.
  • etcd: etcd is a distributed key-value store that stores the configuration data and state of the Kubernetes cluster. It provides a reliable and consistent data store that is used by the Kubernetes API server and other components to store and retrieve data.
  • kubelet: The kubelet is responsible for managing and monitoring individual nodes (worker machines) in the Kubernetes cluster. It communicates with the Kubernetes API server to ensure that the containers running on a node are healthy and running as intended.
  • kube-proxy: The kube-proxy is responsible for managing network communication within the Kubernetes cluster. It sets up and maintains network routes and load balancing for Kubernetes services running on the cluster.
  • Kubernetes Scheduler: The Kubernetes scheduler is responsible for scheduling workloads (containers) onto worker nodes in the cluster. It considers factors such as resource availability, workload constraints, and affinity rules to make optimal scheduling decisions.


Data Plane: Worker Nodes, Where the Pods or Containers with workload run
Control Plane: Master Node, where the k8s components run

Following are the Components of the Control Plane
  • Apiserver
    • Apiserver service act as the connection between all the components in the Control Plane and Data Plane
    • Orchestrating all operations in the cluster
    • Expose the K8s API which end users use for operation and monitoring
    • Collect data from Kubelet for Monitoring
    • Authenticates - Validates - retrieve data
    • Give data or do the operations with data
    • Pass data to kubelet to perform operations in the Worker node
  • etcd
    • etcd service is mainly used for the storage of all the details. Etcd is basically a key-value pair data store. 
    • Store Data not limited to the following details
      • Registry
      • Nodes
      • Pods
      • Config
      • Secrets
      • Accounts
      • Roles
      • -- other components as well
  • Kube scheduler
    • Identify the right worker nodes in which containers can be deployed and give data back to API Servers, then kubelet get data from API server and deploys the container. 
    • Keeps on monitoring the API Server for operations 
    • Identify the right worker node for mentioned operation and give it back to API Server
    • Filter nodes
    • Ranks nodes : 
      • Resource requirements, resources left after container placement
      • Taints and Tolerations
      • Node Selectors/Affinity
      • Labels and Selectors
      • Resource limits
      • Manual Scheduling 
      • Daemon Sets
      • Multiple Schedulers
      • Scheduler Events
  • Kube-controller-Manager
    • Watch Status
    • Remediate Situations
    • Monitor the state of the system and try to bring it to the desired state

Following are the Components of the Data Plane
  • Kubectl
    • Client used to connect to API Server
  • Kubelet
    • Agent runs on each Worker nodes
    • Listens to the Kube APIs and Performs the Operation 
    • give back data to Kube API Server for monitoring of operation
  • Kube-proxy
    • Enable communication between services in Worker nodes
    • Pod-Network
      • by Default All pods connect to each other
    • Create Iptable rules to allow communication between pods and services


Friday, January 28, 2022

Kubernetes(k8s) with Containerd Using Ansible Over Ubuntu Machines

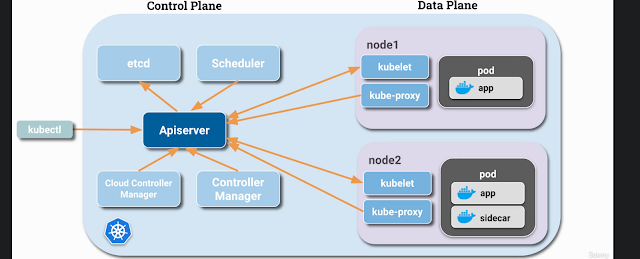
Kubernetes is a popular container orchestration system that provides a powerful platform for managing containerized applications. Containerd is a lightweight, yet powerful container runtime that provides the underlying infrastructure for many Kubernetes deployments. In this, we can see how to set up Kubernetes with Containerd using Ansible over Ubuntu machines.

Environment

  • Ubuntu VM's running on Vmware
  • K8s with Containerd Runtime

User Creation

  • Asks for the User Name which has to be created
  • Create's the user
  • Adds a dedicated Sudo entry 
  • Setting up Password less sudo for user
  • Copy the local uses ssh key to server for password less auth
  • Print the details
  • Updates the System
  • Steps added for the Package Cleaning as well. 

- hosts: all
become: yes

vars_prompt:
- name: "new_user"
prompt: "Account need to be create in remote server."
private: no

tasks:
- name: creating the user {{ new_user }}.
user:
name: "{{ new_user }}"
createhome: yes
shell: /bin/bash
append: yes
state: present

- name: Create a dedicated sudo entry file for the user.
file:
path: "/etc/sudoers.d/{{ new_user }}"
state: touch
mode: '0600'
- name: "Setting up Sudo without Password for user {{ new_user }}."
lineinfile:
dest: "/etc/sudoers.d/{{ new_user }}"
line: '{{ new_user }} ALL=(ALL) NOPASSWD: ALL'
validate: 'visudo -cf %s'

- name: Set authorized key for user copying it from current {{ new_user }} user.
authorized_key:
user: "{{ new_user }}"
state: present
key: "{{ lookup('file', lookup('env','HOME') + '/.ssh/id_rsa.pub') }}"

- name: Print the created user.
shell: id "{{ new_user }}"
register: new_user_created
- debug:
msg: "{{ new_user_created.stdout_lines[0] }}"

- name: Remove Docker packages
apt:
name: docker-ce docker-ce-cli containerd.io
state: absent
purge: yes

- name: Remove Docker directories
file:
path: "{{ item }}"
state: absent
with_items:
- /etc/docker
- /var/lib/docker
- /var/run/docker.sock

- name: Remove containerd packages
apt:
name: containerd
state: absent
purge: yes

- name: Remove containerd directories
file:
path: "{{ item }}"
state: absent
with_items:
- /etc/containerd
- /var/lib/containerd
- name: "Update cache & Full system update"
apt:
update_cache: true
cache_valid_time: 3600
force_apt_get: true


Package Installation in Master and Worker Nodes

  • Copy the local host files to all the server for name resolution
  • update the hostnames of the machines based on the names in host file
  • Temporary Swap off
  • Swap off in fstab
  • Create a empty file for containerd module.
  • Configure module for containerd.
  • Create a empty file for kubernetes sysctl params.
  • Configure sysctl params for Kubernetes.
  • Apply sysctl params without reboot
  • Installing Prerequisites for Kubernetes
  • Add Docker’s official GPG key
  • Add Docker Repository
  • Install containerd.
  • Configure containerd.
  • Configure containerd.
  • Creating containerd Config file
  • Enable containerd service, and start it.
  • Add Google official GPG key
  • Add Kubernetes Repository
  • Installing Kubernetes Cluster Packages.
  • Enable service kubelet, and enable persistently
  • Reboot all the Kubernetes nodes.

- hosts: "master, workers"
remote_user: ansible
become: yes
become_method: sudo
become_user: root
gather_facts: yes
connection: ssh
tasks:
- name: Copying the host file
copy:
src: /etc/hosts
dest: /etc/hosts
owner: root
group: root

- name: "Updating hostnames"
hostname:
name: "{{ new_hostname }}"

- name: Make the Swap inactive
command: swapoff -a

- name: Remove Swap entry from /etc/fstab.
lineinfile:
dest: /etc/fstab
regexp: swap
state: absent

- name: Create a empty file for containerd module.
copy:
content: ""
dest: /etc/modules-load.d/containerd.conf
force: no

- name: Configure module for containerd.
blockinfile:
path: /etc/modules-load.d/containerd.conf
block: |
overlay
br_netfilter

- name: Create a empty file for kubernetes sysctl params.
copy:
content: ""
dest: /etc/sysctl.d/99-kubernetes-cri.conf
force: no

- name: Configure sysctl params for Kubernetes.
lineinfile:
path: /etc/sysctl.d/99-kubernetes-cri.conf
line: "{{ item }}"
with_items:
- 'net.bridge.bridge-nf-call-iptables = 1'
- 'net.ipv4.ip_forward = 1'
- 'net.bridge.bridge-nf-call-ip6tables = 1'

- name: Apply sysctl params without reboot.
command: sysctl --system

- name: Installing Prerequisites for Kubernetes
apt:
name:
- apt-transport-https
- ca-certificates
- curl
- gnupg-agent
- vim
- software-properties-common
state: present

- name: Add Docker’s official GPG key
apt_key:
url: https://download.docker.com/linux/ubuntu/gpg
state: present
- name: Add Docker Repository
apt_repository:
repo: deb [arch=amd64] https://download.docker.com/linux/ubuntu bionic stable
state: present
filename: docker
update_cache: yes

- name: "Update cache & Full system update"
apt:
update_cache: true
upgrade: dist
cache_valid_time: 3600
force_apt_get: true

- name: Install containerd.
apt:
name:
- containerd.io
state: present

- name: Configure containerd.
file:
path: /etc/containerd
state: directory

- name: Enable containerd service, and start it.
systemd:
name: containerd
state: restarted
enabled: yes
daemon-reload: yes

- name: Add Google official GPG key
apt_key:
url: https://packages.cloud.google.com/apt/doc/apt-key.gpg
state: present

- name: Add Kubernetes Repository
apt_repository:
repo: deb http://apt.kubernetes.io/ kubernetes-xenial main
state: present
filename: kubernetes
mode: 0600

- name: "Update cache & Full system update"
apt:
update_cache: true
upgrade: dist
cache_valid_time: 3600
force_apt_get: true

- name: Installing Kubernetes Cluster Packages.
apt:
name:
- kubeadm
- kubectl
- kubelet
state: present

- name: Enable service kubelet, and enable persistently
service:
name: kubelet
enabled: yes

- name: Reboot all the kubernetes nodes.
reboot:
msg: "Reboot initiated by Ansible"
connect_timeout: 5
reboot_timeout: 3600
pre_reboot_delay: 0
post_reboot_delay: 30
test_command: whoami


Master Configuration

  • Pulls all needed images
  • Reset Kubeadm if its already configured
  • Initialize K8s cluster
  • Create Directory for Kube config file in master
  • Create a local kube config file in master
  • Copy the kube config file to ansible local server
  • Genarates the Kube toke for workers and stores it
  • Copy the token to master's tmp directory
  • Copy the toke to ansible local tmp direcotry
  • Initialize the pod network with fannel
  • Copy the output to mater file
  • Copy the output to ansible local server


- hosts: master
remote_user: ansible
become: yes
become_method: sudo
become_user: root
gather_facts: yes
connection: ssh
tasks:

- name: Pulling images required for setting up a Kubernetes cluster
shell: kubeadm config images pull

- name: Resetting kubeadm
shell: kubeadm reset -f
register: output

- name: Initializing Kubernetes cluster
shell: kubeadm init --apiserver-advertise-address=$(ip a |grep ens160| grep 'inet ' | awk '{print $2}' | cut -f1 -d'/') --pod-network-cidr 10.244.0.0/16 --v=5
register: myshell_output

- debug: msg="{{ myshell_output.stdout }}"

- name: Create .kube to home directory of master server
file:
path: $HOME/.kube
state: directory
mode: 0755

- name: Copy admin.conf to user's kube config to master server
copy:
src: /etc/kubernetes/admin.conf
dest: $HOME/.kube/config
remote_src: yes

- name: Copy admin.conf to user's kube config to ansible local server
become: yes
become_method: sudo
become_user: root
fetch:
src: /etc/kubernetes/admin.conf
dest: /Users/rahulraj/.kube/config
flat: yes
- name: Get the token for joining the nodes with Kuberentes master.
shell: kubeadm token create --print-join-command
register: kubernetes_join_command
- debug:
msg: "{{ kubernetes_join_command.stdout_lines }}"

- name: Copy K8s Join command to file in master
copy:
content: "{{ kubernetes_join_command.stdout_lines[0] }}"
dest: "/tmp/kubernetes_join_command"

- name: Copy join command from master to local ansible server
fetch:
src: "/tmp/kubernetes_join_command"
dest: "/tmp/kubernetes_join_command"
flat: yes

- name: Install Pod network
shell: kubectl apply -f https://raw.githubusercontent.com/coreos/flannel/master/Documentation/kube-flannel.yml
register: myshell_output

- name: Copy the output to master file
copy:
content: "{{ myshell_output.stdout }}"
dest: "/tmp/pod_network_setup.txt"

- name: Copy network output from master to local ansible server
fetch:
src: "/tmp/pod_network_setup.txt"
dest: "/tmp/pod_network_setup.txt"
flat: yes


Worker Configuration

  • Copy the token from ansible local file to worker nodes
  • Reset the kubeadm 
  • Join the Worker node to Master by running the command

- hosts: workers
remote_user: ansible
become: yes
become_method: sudo
become_user: root
gather_facts: yes
connection: ssh
tasks:

- name: Copy token to worker nodes.
become: yes
become_method: sudo
become_user: root
copy:
src: /tmp/kubernetes_join_command
dest: /tmp/kubernetes_join_command
mode: 0777
- name: Resetting kubeadm
shell: kubeadm reset -f
register: output

- name: Join the Worker nodes with the master.
become: yes
become_method: sudo
become_user: root
command: sh /tmp/kubernetes_join_command
register: joined_or_not
- debug:
msg: "{{ joined_or_not.stdout }}"


K8s should be up with the worker nodes now. 


Friday, January 21, 2022

Setting up MetalLB Load Balancer with Kubernetes k8s.

When we are deploying the Kubernetes in the local development environment and if we need to publish the services through load balancer services then Metallb load balancer is one of the easiest solutions we can use. All we need is a set of IP range from our network which metal lb can use.  

Following are the k8s configurations that need to be applied on the cluster. 

Below is the config map which mentions the IPs which can be used for the load balancers

apiVersion: v1
kind: ConfigMap
metadata:
namespace: metallb-system
name: config
data:
config: |
address-pools:
- name: default
protocol: layer2
addresses:
- 172.16.2.80-172.16.2.90


Below is the ansible-playbook I used to deploy the metal load balancer on the k8s cluster. 
  • Initialize the master with Metallb Clusters
  • Copy the metallb Configuration to master
  • Kube apply the configuration on master. 


- hosts: master
remote_user: ansible
become: yes
become_method: sudo
become_user: root
gather_facts: yes
connection: ssh
tasks:
- name: Initializing Metallb cluster
shell: kubectl apply -f https://raw.githubusercontent.com/google/metallb/v0.8.3/manifests/metallb.yaml
register: myshell_output

- name: Copying the Metallb config file
copy:
src: /Users/rahulraj/workspace/vmware-ansible/k8s/playbook/metallb-congif.yml
dest: $HOME/metallb-congif.yml


- name: Configuring Metallb cluster
shell: kubectl apply -f $HOME/metallb-congif.yml
register: myshell_output


For testing it we shall deploy a sample Nginx and expose it through load balancer type services. 

k create deployment nginx-deployments --image=nginx --replicas=3 --port=80
k expose deployment nginx-deployments --port=80 --target-port=80 --type=LoadBalancer


Output should be like following 

 kubectl get svc
NAME                TYPE           CLUSTER-IP       EXTERNAL-IP   PORT(S)        AGE
kubernetes          ClusterIP      10.96.0.1        <none>        443/TCP        25h
nginx-deployments   LoadBalancer   10.100.137.154   172.16.2.80   80:30973/TCP   13h