http://superuser.com/questions/261060/git-how-can-i-config-git-to-ignore-file-permissions-changes
turn off the filemode so that permissions of files are not considered.
For Mac Machines
http://stackoverflow.com/questions/8402281/github-push-error-permission-denied
cd ~
ssh-keygen
cat .ssh/id_rsa.pub > .ssh/authorized_keys
Internalize a project in server
cd /opt/git/
mkdir <Project-name>
cd <Project-name>
git inti --bare
In client
git clone xxxx@xxx.xxx.xxx.xxx:/opt/git/<Project-name>
cd <Project-name>
git add *
git commit -m "Test Files"
>>git remote add <remote-name> <git-repo-URL>
git remote add orgin xxxx@xxx.xxx.xxx.xxx:/opt/git/<Project-name>
git push orgin master
Branching
git checkout -b <Branch-name>
git push <remote-name> <branch-name>
git push <remote-name> <local-branch-name>:<remote-branch-name>
List ALL Branching
git branch -a
List Remote Branching
git branch -r
Merge two branch
git checkout a (you will switch to branch a)
git merge b (this will merge all changes from branch b into branch a)
git commit -a (this will commit your changes)
List Merged Branches
git branch --merged lists the branches that have been merged into the current branch
git branch --no-merged lists the branches that have not been merged into the current branch
Thursday, May 29, 2014
Wednesday, May 28, 2014
Installing ffmpeg-php with php5.4
yum update
yum install gcc make automake bzip2 unzip patch subversion libjpeg-devel yasm
Installing the DAG repo for ffmpeg
yum install http://packages.sw.be/rpmforge-release/rpmforge-release-0.5.2-2.el6.rf.x86_64.rpm
yum install ffmpeg ffmpeg-devel ffmpeg-libpostproc
yumum install mplayer
In cpanel install all the needed modules
/scripts/installruby
gem install flvtool2
yum install mencoder gpac gpac-libs
Lets get ffmpeg-php
wget http://downloads.sourceforge.net/ffmpeg-php/ffmpeg-php-0.6.0.tbz2
tar xjf ffmpeg-php-0.6.0.tbz2
cd ffmpeg-php-0.6.0
sed -i 's/PIX_FMT_RGBA32/PIX_FMT_RGB32/g' ffmpeg_frame.c
phpize
./configure
make
Note: If you are running php5.4 you may need to make following change then run “make” above again:
pico ffmpeg_movie.c
in ffmpeg_movie.c:
row 311: list_entry *le; TO zend_rsrc_list_entry *le;
row 346: list_entry new_le; TO zend_rsrc_list_entry new_le;
row 360: hashkey_length+1, (void *)&new_le, sizeof(list_entry), TO hashkey_length+1, (void *)&new_le,sizeof(zend_rsrc_list_entry),
Now let’s really install everything
make test
make install
## will get a out put as below
Installing shared extensions: /usr/local/lib/php/extensions/no-debug-non-zts-20100525/
pico /usr/local/lib/php.ini
Now add following to end of file but substitute no-debug-non-zts-20100525 below for where it installed it in your “make install” command above
extension_dir = "/usr/local/lib/php/extensions/no-debug-non-zts-20100525"
extension="ffmpeg.so"
Wednesday, May 21, 2014
IFS Internal Field Separator in Bash Scripting
IFS stands for Internal Field Separator - it's a character that separate fields. In the example you posted it is set to new line character (\n), so after setting it for will process text line by line. In that example you could change value of $IFS (to some letter that you have in your input file) and check how text will be splitted.[root@ip-192-168-1-36 tmp]# for i in `cat sample.txt`; do echo $i; done
Mar 10
Mar 11
Mar 7
Mar 8
Mar 9
[root@ip-192-168-1-36 tmp]# IFS=$' '
[root@ip-192-168-1-36 tmp]# for i in `cat sample.txt`; do echo $i; done
Mar
10
Mar
11
Mar
7
Mar
8
Mar
9
[root@ip-192-168-1-36 tmp]# IFS=$'\n'
[root@ip-192-168-1-36 tmp]# for i in `cat sample.txt`; do echo $i; done
Mar 10
Mar 11
Mar 7
Mar 8
Mar 9
[root@ip-192-168-1-36 tmp]#
Installing rar in linux
for 64 bit
install unrar centos x64
#wget http://pkgs.repoforge.org/unrar/unrar-4.0.7-1.el6.rf.x86_64.rpm
#rpm -Uvh unrar-4.0.7-1.el6.rf.x86_64.rpm
install rar centos x64
#wget http://pkgs.repoforge.org/rar/rar-3.8.0-1.el6.rf.x86_64.rpm
#rpm -Uvh rar-3.8.0-1.el6.rf.x86_64.rpm
for 32 bit
install unrar centos 32
#wget http://pkgs.repoforge.org/unrar/unrar-4.0.7-1.el6.rf.i686.rpm
#rpm -Uvh unrar-4.0.7-1.el6.rf.i686.rpm
install rar centos 32
#wget http://pkgs.repoforge.org/rar/rar-3.8.0-1.el6.rf.i686.rpm
#rpm -Uvh rar-3.8.0-1.el6.rf.i686.rpm
you can also use matching OS rpm from
http://pkgs.repoforge.org/rpmforge-release/
Installing Amazon Command Line using PIP
Installing the repo needed for pip
cd /tmp
wget http://mirror-fpt-telecom.fpt.net/fedora/epel/6/i386/epel-release-6-8.noarch.rpm
rpm -ivh epel-release-6-8.noarch.rpm
Installing C-compiler for Pip
yum install gcc
Installing amazon cli
pip install awscli
Configure Amazon Cli
aws configrue
you need aws access key ,secret key, default region and output format.
Installing and configuring Amazon EC2 command line
Now download the Amazon API CLI tools using following command and extract them at a proper place. For this example, we are using /opt directory.
# mkdir /opt/ec2
# wget http://s3.amazonaws.com/ec2-downloads/ec2-api-tools.zip
# unzip ec2-api-tools.zip -d /tmp
# mv /tmp/ec2-api-tools-* /opt/ec2/tools
Step 3- Download Private Key and Certificate Files
Now create and download X.509 certificate (private key file and certificate file) files from your account from Security Credentials page and copy to /opt/ec2/certs/ directory.
# ls -l /opt/ec2/certs/
-rw-r--r--. 1 root root 1281 May 15 12:57 my-ec2-cert.pem
-rw-r--r--. 1 root root 1704 May 15 12:56 my-ec2-pk.pem
Step 4- Configure Environment
Install JAVA
The Amazon EC2 command line tools required Java 1.6 or later version. Make sure you have proper java installed on your system. You can install JRE or JDK , both are ok to use.
# java -version
java version "1.8.0_05"
Java(TM) SE Runtime Environment (build 1.8.0_05-b13)
Java HotSpot(TM) Client VM (build 25.5-b02, mixed mode)
If you don’t have Java installed your system, Use below links to install Java on your system first
Installing JAVA/JDK 8 on CentOS, RHEL and Fedora
Installing JAVA/JDK 8 on Ubuntu
Now edit ~/.bashrc file and add the following values at end of file
export EC2_BASE=/opt/ec2
export EC2_HOME=$EC2_BASE/tools
export EC2_PRIVATE_KEY=$EC2_BASE/certs/my-ec2-pk.pem
export EC2_CERT=$EC2_BASE/certs/my-ec2-cert.pem
export EC2_URL=https://ec2.xxxxxxx.amazonaws.com
export AWS_ACCOUNT_NUMBER=
export PATH=$PATH:$EC2_HOME/bin
export JAVA_HOME=/opt/jdk1.8.0_05
Now execute the following command to set environment variables
$ source ~/.bashrc
After completing all configuration, let’s run following command to quickly verify setup.
# ec2-describe-regions
REGION eu-west-1 ec2.eu-west-1.amazonaws.com
REGION sa-east-1 ec2.sa-east-1.amazonaws.com
REGION us-east-1 ec2.us-east-1.amazonaws.com
REGION ap-northeast-1 ec2.ap-northeast-1.amazonaws.com
REGION us-west-2 ec2.us-west-2.amazonaws.com
REGION us-west-1 ec2.us-west-1.amazonaws.com
REGION ap-southeast-1 ec2.ap-southeast-1.amazonaws.com
REGION ap-southeast-2 ec2.ap-southeast-2.amazonaws.com
Tuesday, May 20, 2014
Centos Additional repos
Install CentALT in CentOS/RHEL 6/5
Use one of below option to install CentALT repository as per your system architecture and operating system.
CentOS/RHEL 6, 32 Bit (i386):
# rpm -Uvh http://centos.alt.ru/repository/centos/6/i386/centalt-release-6-1.noarch.rpm
CentOS/RHEL 6, 64 Bit x86_64):
# rpm -Uvh http://centos.alt.ru/repository/centos/6/x86_64/centalt-release-6-1.noarch.rpm
MySql Server Cluster (Maria+galera)
Add MariaDB Repositories
========================
Create a mariadb repository /etc/yum.repos.d/mariadb.repo using following content in your system. Below repository will work on CentOS 6.x systems, For other system use repository generation tool and add to your system.
For CentOS 6 – 64bit
[mariadb]
name = MariaDB
baseurl = http://yum.mariadb.org/5.5/centos6-amd64
gpgkey=https://yum.mariadb.org/RPM-GPG-KEY-MariaDB
gpgcheck=1
For CentOS 6 – 32bit
[mariadb]
name = MariaDB
baseurl = http://yum.mariadb.org/5.5/centos6-x86
gpgkey=https://yum.mariadb.org/RPM-GPG-KEY-MariaDB
gpgcheck=1
Install MariaDB and Galera
==========================
Before installing MariaDB Galera cluster packages, remove any existing MySQL or MariaDB packages installed on system. After that use following command to install on all nodes.
# yum install MariaDB-Galera-server MariaDB-client galera
Initial MariaDB Configuration
=============================
After successfully installing packages in above steps do the some initial MariaDB configurations. Use following command and follow the instructions on all nodes of cluster. If will prompt to set root account password also.
# mysql_secure_installation
# service mysql start
After that create a user in MariaDB on all nodes, which can access database from your network in cluster.
# mysql -u root -p
MariaDB [(none)]> GRANT ALL PRIVILEGES ON *.* TO 'root'@'%' IDENTIFIED BY 'password' WITH GRANT OPTION;
MariaDB [(none)]> FLUSH PRIVILEGES;
MariaDB [(none)]> exit
and stop MariaDB service before starting cluster configuration
# service mysql stop
Setup Cluster Configuration on database1
========================================
Lets start setup MariaDB Galera cluster from database1 server. Edit MariaDB server configuration file and add following values under [mariadb] section.
[root@database1 ~]# vim /etc/my.cnf.d/server.cnf
query_cache_size=0
binlog_format=ROW
default_storage_engine=innodb
innodb_autoinc_lock_mode=2
wsrep_provider=/usr/lib/galera/libgalera_smm.so
wsrep_cluster_address=gcomm://10.0.0.4,10.0.0.5
wsrep_cluster_name='cluster1'
wsrep_node_address='10.0.0.2'
wsrep_node_name='database1'
wsrep_sst_method=rsync
wsrep_sst_auth=root:password
Start cluster using following command.
[root@database1 ~]# /etc/init.d/mysql bootstrap
Bootstrapping the clusterStarting MySQL.... SUCCESS!
If you get any problem during startup check MariaDB error log file /var/lib/mysql/<hostname>.err
Add database2 in MariaDB Cluster
================================
After successfully starting cluster on database1. Start configuration on database2. Edit MariaDB server configuration file and add following values under [mariadb] section. All the settings are similar to database1 except wsrep_node_address, wsrep_cluster_address and wsrep_node_name.
[root@database2 ~]# vim /etc/my.cnf.d/server.cnf
query_cache_size=0
binlog_format=ROW
default_storage_engine=innodb
innodb_autoinc_lock_mode=2
wsrep_provider=/usr/lib/galera/libgalera_smm.so
wsrep_cluster_address=gcomm://10.0.0.2,10.0.0.5
wsrep_cluster_name='cluster1'
wsrep_node_address='10.0.0.4'
wsrep_node_name='database2'
wsrep_sst_method=rsync
wsrep_sst_auth=root:password
Start cluster using following command.
[root@database2 ~]# /etc/init.d/mysql start
Starting MySQL..... SUCCESS!
Add database3 in MariaDB Cluster
================================
This server is optional, If you want only two server in cluster, you can ignore this step, but you need to remove third server ip from database1/database2 configuration files. To add this server make changes same as database2.
[root@database3 ~]# vim /etc/my.cnf.d/server.cnf
query_cache_size=0
binlog_format=ROW
default_storage_engine=innodb
innodb_autoinc_lock_mode=2
wsrep_provider=/usr/lib/galera/libgalera_smm.so
wsrep_cluster_address=gcomm://10.0.0.2,10.0.0.4
wsrep_cluster_name='cluster1'
wsrep_node_address='10.0.0.5'
wsrep_node_name='database3'
wsrep_sst_method=rsync
wsrep_sst_auth=root:password
Start cluster using following command.
[root@db3 ~]# /etc/init.d/mysql start
Starting MySQL..... SUCCESS!
========================
Create a mariadb repository /etc/yum.repos.d/mariadb.repo using following content in your system. Below repository will work on CentOS 6.x systems, For other system use repository generation tool and add to your system.
Disable Selinux in redhat sever's.
For CentOS 6 – 64bit
[mariadb]
name = MariaDB
baseurl = http://yum.mariadb.org/5.5/centos6-amd64
gpgkey=https://yum.mariadb.org/RPM-GPG-KEY-MariaDB
gpgcheck=1
For CentOS 6 – 32bit
[mariadb]
name = MariaDB
baseurl = http://yum.mariadb.org/5.5/centos6-x86
gpgkey=https://yum.mariadb.org/RPM-GPG-KEY-MariaDB
gpgcheck=1
Install MariaDB and Galera
==========================
Before installing MariaDB Galera cluster packages, remove any existing MySQL or MariaDB packages installed on system. After that use following command to install on all nodes.
# yum install MariaDB-Galera-server MariaDB-client galera
Initial MariaDB Configuration
=============================
After successfully installing packages in above steps do the some initial MariaDB configurations. Use following command and follow the instructions on all nodes of cluster. If will prompt to set root account password also.
# mysql_secure_installation
# service mysql start
After that create a user in MariaDB on all nodes, which can access database from your network in cluster.
# mysql -u root -p
MariaDB [(none)]> GRANT ALL PRIVILEGES ON *.* TO 'root'@'%' IDENTIFIED BY 'password' WITH GRANT OPTION;
MariaDB [(none)]> FLUSH PRIVILEGES;
MariaDB [(none)]> exit
and stop MariaDB service before starting cluster configuration
# service mysql stop
Setup Cluster Configuration on database1
========================================
Lets start setup MariaDB Galera cluster from database1 server. Edit MariaDB server configuration file and add following values under [mariadb] section.
[root@database1 ~]# vim /etc/my.cnf.d/server.cnf
query_cache_size=0
binlog_format=ROW
default_storage_engine=innodb
innodb_autoinc_lock_mode=2
wsrep_provider=/usr/lib/galera/libgalera_smm.so
wsrep_cluster_address=gcomm://10.0.0.4,10.0.0.5
wsrep_cluster_name='cluster1'
wsrep_node_address='10.0.0.2'
wsrep_node_name='database1'
wsrep_sst_method=rsync
wsrep_sst_auth=root:password
Start cluster using following command.
[root@database1 ~]# /etc/init.d/mysql bootstrap
Bootstrapping the clusterStarting MySQL.... SUCCESS!
If you get any problem during startup check MariaDB error log file /var/lib/mysql/<hostname>.err
Add database2 in MariaDB Cluster
================================
After successfully starting cluster on database1. Start configuration on database2. Edit MariaDB server configuration file and add following values under [mariadb] section. All the settings are similar to database1 except wsrep_node_address, wsrep_cluster_address and wsrep_node_name.
[root@database2 ~]# vim /etc/my.cnf.d/server.cnf
query_cache_size=0
binlog_format=ROW
default_storage_engine=innodb
innodb_autoinc_lock_mode=2
wsrep_provider=/usr/lib/galera/libgalera_smm.so
wsrep_cluster_address=gcomm://10.0.0.2,10.0.0.5
wsrep_cluster_name='cluster1'
wsrep_node_address='10.0.0.4'
wsrep_node_name='database2'
wsrep_sst_method=rsync
wsrep_sst_auth=root:password
Start cluster using following command.
[root@database2 ~]# /etc/init.d/mysql start
Starting MySQL..... SUCCESS!
Add database3 in MariaDB Cluster
================================
This server is optional, If you want only two server in cluster, you can ignore this step, but you need to remove third server ip from database1/database2 configuration files. To add this server make changes same as database2.
[root@database3 ~]# vim /etc/my.cnf.d/server.cnf
query_cache_size=0
binlog_format=ROW
default_storage_engine=innodb
innodb_autoinc_lock_mode=2
wsrep_provider=/usr/lib/galera/libgalera_smm.so
wsrep_cluster_address=gcomm://10.0.0.2,10.0.0.4
wsrep_cluster_name='cluster1'
wsrep_node_address='10.0.0.5'
wsrep_node_name='database3'
wsrep_sst_method=rsync
wsrep_sst_auth=root:password
Start cluster using following command.
[root@db3 ~]# /etc/init.d/mysql start
Starting MySQL..... SUCCESS!
Saturday, May 17, 2014
Enable up/Down arrow in powershell
For this, you need PSReadline. First, install PsGet if you don’t have it:To install it just run the following URL in powershell.
(new-object Net.WebClient).DownloadString("http://psget.net/GetPsGet.ps1 ' ') | iex
Then, install PSReadline:
install-module PSReadline
Import PSReadline after loading the persistent history:
Import-Module PSReadLine
And you will be able to recall previous commands with up arrow key. Add the following to have partial history search with up/down arrow key:
Set-PSReadlineKeyHandler -Key UpArrow -Function HistorySearchBackward
Set-PSReadlineKeyHandler -Key DownArrow -Function HistorySearchForward
Lastly, to enable bash style completion:
Set-PSReadlineKeyHandler -Key Tab -Function Complete
History Command in PowerShell
To add the a command to a new or existing profile
On the computer that hosts the data warehouse management server,
click Start, point to Programs, point to Windows PowerShell 1.0, right-click Windows PowerShell, and then click Run as administrator.
At the Windows PowerShell prompt, type the following command, and then press ENTER:
>>Test-path $profile
If the results of the previous command are false, go to step 4. If the results are true, go to step 5.
Type the following command, and then press ENTER.
New-item –type file –force $profile
Type the following command, and then press ENTER.
Notepad $profile
Add the following Content into profile file.
===================
Set-Location C:\
$a = Get-Date
“Date: ” + $a.ToShortDateString()
“Time: ” + $a.ToShortTimeString()
$MaximumHistoryCount = 1KB
if (!(Test-Path ~\PowerShell -PathType Container))
{ New-Item ~\PowerShell -ItemType Directory
}
function bye
{ Get-History -Count 1KB |Export-CSV ~\PowerShell\history.csv
exit
}
if (Test-path ~\PowerShell\History.csv)
{ Import-CSV ~\PowerShell\History.csv |Add-History
}
PS> Get-History |Get-Member -MemberType Property
TypeName: Microsoft.PowerShell.Commands.HistoryInfo
Name MemberType Definition
---- ---------- ----------
CommandLine Property System.String CommandLine {get;}
EndExecutionTime Property System.DateTime EndExecutionTime {get;}
ExecutionStatus Property System.Management.Automation.Runspaces.Pip...
Id Property System.Int64 Id {get;}
StartExecutionTime Property System.DateTime StartExecutionTime {get;}
This means that you can find out when something was executed (e.g. which session it happened in) using the following command:
PS> ghy |ft id,endexecutiontime,commandline -auto
Id EndExecutionTime CommandLine
-- ---------------- -----------
612 6/29/2006 5:39:34 AM gcm export-csv |fl *
613 6/30/2006 6:51:16 PM ipconfig
614 6/30/2006 8:51:38 PM cd C:\kits
On the computer that hosts the data warehouse management server,
click Start, point to Programs, point to Windows PowerShell 1.0, right-click Windows PowerShell, and then click Run as administrator.
At the Windows PowerShell prompt, type the following command, and then press ENTER:
>>Test-path $profile
If the results of the previous command are false, go to step 4. If the results are true, go to step 5.
Type the following command, and then press ENTER.
New-item –type file –force $profile
Type the following command, and then press ENTER.
Notepad $profile
Add the following Content into profile file.
===================
Set-Location C:\
$a = Get-Date
“Date: ” + $a.ToShortDateString()
“Time: ” + $a.ToShortTimeString()
$MaximumHistoryCount = 1KB
if (!(Test-Path ~\PowerShell -PathType Container))
{ New-Item ~\PowerShell -ItemType Directory
}
function bye
{ Get-History -Count 1KB |Export-CSV ~\PowerShell\history.csv
exit
}
if (Test-path ~\PowerShell\History.csv)
{ Import-CSV ~\PowerShell\History.csv |Add-History
}
====================
PS> Get-History |Get-Member -MemberType Property
TypeName: Microsoft.PowerShell.Commands.HistoryInfo
Name MemberType Definition
---- ---------- ----------
CommandLine Property System.String CommandLine {get;}
EndExecutionTime Property System.DateTime EndExecutionTime {get;}
ExecutionStatus Property System.Management.Automation.Runspaces.Pip...
Id Property System.Int64 Id {get;}
StartExecutionTime Property System.DateTime StartExecutionTime {get;}
This means that you can find out when something was executed (e.g. which session it happened in) using the following command:
PS> ghy |ft id,endexecutiontime,commandline -auto
Id EndExecutionTime CommandLine
-- ---------------- -----------
612 6/29/2006 5:39:34 AM gcm export-csv |fl *
613 6/30/2006 6:51:16 PM ipconfig
614 6/30/2006 8:51:38 PM cd C:\kits
Friday, May 16, 2014
Create a Windows PowerShell Profile
To add the a command to a new or existing profile
On the computer that hosts the data warehouse management server, click Start, point to Programs, point to Windows PowerShell 1.0, right-click Windows PowerShell, and then click Run as administrator.
At the Windows PowerShell prompt, type the following command, and then press ENTER:
Test-path $profile
If the results of the previous command are false, go to step 4. If the results are true, go to step 5.
Type the following command, and then press ENTER.
New-item –type file –force $profile
Type the following command, and then press ENTER.
Notepad $profile
In the profile, type the command you need ,If you are adding this command to an existing profile, add it on a new line at the end of the profile.
On the menu bar, click File, and then click Exit.
In Notepad, click Save.
Type the following commands, and then press ENTER after each command.
Set-ExecutionPolicy RemoteSigned
. $profile
Thursday, May 15, 2014
Apache load balancing using mod_jk
Considering you have two tomcat server's and both are configured and port 8009 is listened by ajp in tomcat.
Download the module from http://tomcat.apache.org/download-connectors.cgi
Sample Version http://apache.mirrors.hoobly.com/tomcat/tomcat-connectors/jk/tomcat-connectors-1.2.40-src.tar.gz
#tar -xvf tomcat-connectors-1.2.37-src.tar
# cd tomcat-connectors-1.2.32-src/native/
# which usr/sbin/apxs
# ./configure --with-apxs=/usr/sbin/apxs --enable-api-compatibility
# make
# make install
after completed this activity you will get mod_jk.so file in /usr/lib64/httpd/modules/mod_jk.so
or else copy the modules to apache's module directory.
if get it , going well
Installation part has been completed, let's start configuration part
4. Open httpd.conf file and add end of line.
# vi /etc/httpd/conf/httpd.conf
JkWorkersFile "/etc/httpd/conf/worker.properties"
JkLogFile "/var/log/httpd/mod_jk.log"
JkRequestLogFormat "%w %V %T"
JkOptions +ForwardKeySize +ForwardURICompat -ForwardDirectories
JkLogLevel info
JkLogStampFormat "[%a %b %d %H:%M:%S %Y]"
The below two lines in the virtualhost.
JkMount / loadbalancer
JkMount /status status
Content of the worker.properties
cat /etc/httpd/conf/worker.properties
worker.list=loadbalancer,status
worker.template.type=ajp13
worker.template.connection_pool_size=50
worker.template.socket_timeout=1200
worker.node2.reference=worker.template
worker.node1.port=8009
worker.node1.host=54.86.231.61
worker.node1.type=ajp13
worker.node2.jvm_route=node1
worker.node2.port=8009
worker.node2.host=54.86.17.252
worker.node2.type=ajp13
worker.node2.jvm_route=node2
worker.loadbalancer.type=lb
worker.loadbalancer.balance_workers=node1,node2
#worker.loadbalancer.sticky_session=TRUE
to check the status
worker.status.type=status
Tomcat-Static-Unicast-Clustering
Tomcat needs to be configured to allow for setup of cluster of two nodes over unicast. Following is section of my ${LIFERAY_HOME}/tomcat-6.0.32/conf/server.xml on server1 (replace node1 with node2 and swap location of IP_ADDRESSES and change unique_id to anything 16 bit long other than{0,0,0,0,0,0,0,0,0,0,0,0,0,0,0,2}, on server.xml in server2) which allowed for this. IP_ADDRESSES here refer to private ip addresses of server1 and server2 respectively.
================================
<Engine name="Catalina" defaultHost="localhost" jvmRoute="node1">
<Cluster className="org.apache.catalina.ha.tcp.SimpleTcpCluster" channelSendOptions="6" channelStartOptions="3">
<Manager className="org.apache.catalina.ha.session.DeltaManager" expireSessionsOnShutdown="false" notifyListenersOnReplication="true" />
<Channel className="org.apache.catalina.tribes.group.GroupChannel">
<Receiver className="org.apache.catalina.tribes.transport.nio.NioReceiver"
autoBind="0" selectorTimeout="5000" maxThreads="6"
address="IP_ADDRESS_SERVER1" port="4444" />
<Sender className="org.apache.catalina.tribes.transport.ReplicationTransmitter">
<Transport className="org.apache.catalina.tribes.transport.nio.PooledParallelSender"
timeout="60000"
keepAliveTime="10"
keepAliveCount="0"
/>
</Sender>
<Interceptor className="org.apache.catalina.tribes.group.interceptors.TcpPingInterceptor" staticOnly="true"/>
<Interceptor className="org.apache.catalina.tribes.group.interceptors.TcpFailureDetector"/>
<Interceptor className="org.apache.catalina.tribes.group.interceptors.StaticMembershipInterceptor">
<Member className="org.apache.catalina.tribes.membership.StaticMember"
host="IP_ADDRESS_SERVER2"
port="4444"
uniqueId="{0,0,0,0,0,0,0,0,0,0,0,0,0,0,0,2}"/>
</Interceptor>
</Channel>
<Valve className="org.apache.catalina.ha.tcp.ReplicationValve" filter="" />
<Valve className="org.apache.catalina.ha.session.JvmRouteBinderValve" />
<ClusterListener className="org.apache.catalina.ha.session.JvmRouteSessionIDBinderListener"/>
<ClusterListener className="org.apache.catalina.ha.session.ClusterSessionListener"/>
</Cluster>
=================================
Monday, May 12, 2014
Apache load balancer
An add-in module that acts as a software load balancer and ensures that traffic is split across back-end servers or workers to reduce latencies and give users a better experience.
mod_proxy_balancer distributes requests to multiple worker processes running on back-end servers to let multiple resources service incoming traffic and processing. It ensures efficient utilization of the back-end workers to prevent any single worker from getting overloaded.
When you configure mod_proxy_balancer, you can choose among three load-balancing algorithms: Request Counting, Weighted Traffic Counting, and Pending Request Counting, which we'll discuss in detail in a moment. The best algorithm to use depends on the individual use case; if you are not sure which to try first, go with Pending Request Counting.
The add-in also supports session stickyness, meaning you can optionally ensure that all the requests from a particular IP address or in a particular session goes to the same back-end server. The easiest way to achieve stickyness is to use cookies, either inserted by the Apache web server or by the back-end servers.
A general configuration for load balancing defined in /etc/httpd/httpd.conf would look like this:
<Proxy balancer://A_name_signifying_your_app>
BalancerMember http://ip_address:port/ loadfactor=appropriate_load_factor # Balancer member 1
BalancerMember http://ip_address:port/ loadfactor=appropriate_load_factor # Balancer member 2
ProxySet lbmethod=the_Load_Balancing_algorithm
</Proxy>
You can specify anything for a name, but it's good to choose one that's significant. BalancerMember specifies a back-end worker's IP address and port number. A worker can be a back-end HTTP server or anything that can serve HTTP traffic. You can omit the port number if you use the web server's default port of 80. You can define as many BalancerMembers as you want; the optimal number depends on the capabilities of each server and the incoming traffic load. The loadfactor variable specifies the load that a back-end worker can take. Depending upon the algorithm, this can represent a number of requests or a number of bytes. lbmethod specifies the algorithm to be used for load balancing.
Let's look at how to configure each of the three options.
Get an Open Source Support Quote
Request Counting
With this algorithm, incoming requests are distributed among back-end workers in such a way that each back end gets a proportional number of requests defined in the configuration by the loadfactor variable. For example, consider this Apache config snippet:
<Proxy balancer://myapp>
BalancerMember http://192.168.10.11/ loadfactor=1 # Balancer member 1
BalancerMember http://192.168.10.10/ loadfactor=3 # Balancer member 2
ProxySet lbmethod=byrequests
</Proxy>
In this example, one request out of every four will be sent to 192.168.10.11, while three will be sent to 192.168.10.10. This might be an appropriate configuration for a site with two servers, one of which is more powerful than the other.
Weighted Traffic Counting Algorithm
The Weighted Traffic Counting algorithm is similar to Request Counting algorithm, with a minor difference: Weighted Traffic Counting considers the number of bytes instead of number of requests. In the configuration example below, the number of bytes processed by 192.168.10.10 will be three times that of 192.168.10.11.
<Proxy balancer://myapp>
BalancerMember http://192.168.10.11/ loadfactor=1 # Balancer member 1
BalancerMember http://192.168.10.10/ loadfactor=3 # Balancer member 2
ProxySet lbmethod=bytraffic
</Proxy>
Pending Request Counting Algorithm
The Pending Request Counting algorithm is the latest and most sophisticated algorithm provided by Apache for load balancing. It is available from Apache 2.2.10 onward.
In this algorithm, the scheduler keeps track of the number of requests that are assigned to each back-end worker at any given time. Each new incoming request will be sent to the back end that has least number of pending requests – in other words, to the back-end worker that is relatively least loaded. This helps keep the request queues even among the back-end workers, and each request generally goes to the worker that can process it the fastest.
If two workers are equally lightly loaded, the scheduler uses the Request Counting algorithm to break the tie.
<Proxy balancer://myapp>
BalancerMember http://192.168.10.11/ # Balancer member 1
BalancerMember http://192.168.10.10/ # Balancer member 2
ProxySet lbmethod=bybusyness
</Proxy>
Enable the Balancer Manager
Sometimes you may need to change your load balancing configuration, but that may not be easy to do without affecting the running server. For such situations, the Balancer Manager module provides a web interface to change the status of back-end workers on the fly. You can use Balancer Manager to put a worker in offline mode or change its loadfactor. You must have mod_status installed in order to use Balance Manager. A sample config, which should be defined in /etc/httpd/httpd.conf, might look like:
<Location /balancer-manager>
SetHandler balancer-manager
Order Deny,Allow
Deny from all
Allow from .test.com
</Location>
Once you add directives like those above to httpd.conf and restart Apache you can open the Balancer Manager by pointing a browser at http://test.com/balancer-manager.
<VirtualHost *:80>
ProxyRequests off
ServerName domain.com
<Proxy balancer://mycluster>
# WebHead1
BalancerMember http://10.176.42.144:80
# WebHead2
BalancerMember http://10.176.42.148:80
# Security "technically we aren't blocking
# anyone but this the place to make those
# chages
Order Deny,Allow
Deny from none
Allow from all
# Load Balancer Settings
# We will be configuring a simple Round
# Robin style load balancer. This means
# that all webheads take an equal share of
# of the load.
ProxySet lbmethod=byrequests
</Proxy>
# balancer-manager
# This tool is built into the mod_proxy_balancer
# module and will allow you to do some simple
# modifications to the balanced group via a gui
# web interface.
<Location /balancer-manager>
SetHandler balancer-manager
# I recommend locking this one down to your
# your office
Order deny,allow
Allow from all
</Location>
# Point of Balance
# This setting will allow to explicitly name the
# the location in the site that we want to be
# balanced, in this example we will balance "/"
# or everything in the site.
ProxyPass /balancer-manager !
ProxyPass / balancer://mycluster/
</VirtualHost>
========================
Enable proxy_module, proxy_balancer_module and proxy_http_module in httpd.conf of Apache web server
LoadModule proxy_module modules/mod_proxy.so
LoadModule proxy_balancer_module modules/mod_proxy_balancer.so
LoadModule proxy_http_module modules/mod_proxy_http.so
Add proxy pass along with balancer name for application context root. In this example, I have proxy path as examples and balancer name as mycluster. Very important to include stickysession as not having this option will distribute same request to multiple tomcat server and you will have session expiry issues in application.
<IfModule proxy_module>
ProxyRequests Off
ProxyPass /examples balancer://mycluster stickysession=JSESSIONID
ProxyPassReverse /examples balancer://mycluster stickysession=JSESSIONID
<Proxy balancer://mycluster>
BalancerMember http://localhost:8080/examples route=server1
BalancerMember http://localhost:8090/examples route=server2
</Proxy>
</IfModule>
As you can see in above configuration, I have added route in BalancerMember so route value can be appended to session ID. Now, let’s configure Apache to print JSESSIONID in access logs.
Add following in LogFormat directive
%{JSESSIONID}C
Ex:
LogFormat "%h %l %u %t \"%r\" %>s %b \"%{Referer}i\" \"%{User-Agent}i\"\"%{JSESSIONID}C\"" combined
Restart Apache Web Server
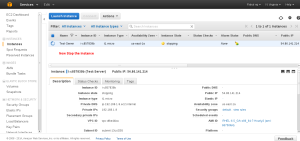
Extend a root volume in the Aws
To extend a root volume in the Aws we first need to take a snap shot of the correct volume and the create a new volume of the needed size from the snapshot. Checking the size of the Current partition. We can see that the current size is 10Gb. 
First find the correct instance ID

Check the volume section and find out which all volume are attached to the Correct instance. Check and note the volume instance and find the mount path as we need to mount the new volume to same mount path.
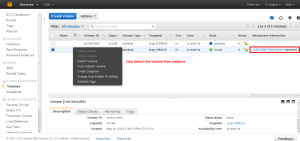
Select the Correct Volume and create a snapshot of that Volume. Right Click and select the option to create a snapshot.

Enter the snapshot name and description to create a snapshot.
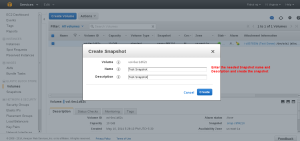
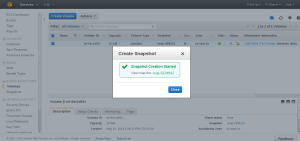
Snapshot Created.
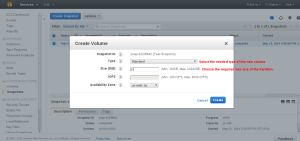
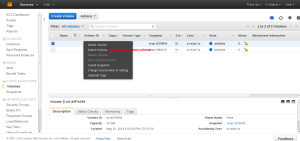
Now select the snap shot option in the right menu and choose the correct snapshot which needs to be extended and Right click to create the new volume.

Select the Needed Size , type of storage etc
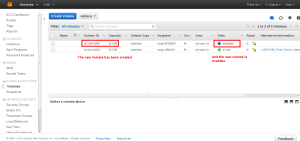
Once the Volume in created you can see it in the Volume Panel in available model.
Stop the instance in which the Volume is mounted
Select the Volume panel and Unmount the initial Volume which is of small size by right click the old volume.
Once the volume ins unmounted both the Volumes will be in available state. Now right click on the new volume and attach it into the instance.
Enter the instance to which the volume should be added and also the device path which we have save before.

Make sure you enter the device path correctly as we have noted down before.
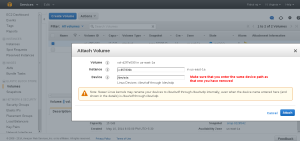
Once mounted make sure that the instance ID, Volume ID and device path are correct.

Once its all set start the instance and check the size. In some cases we need to run resize2fs to make the size of the volume extent.
In windows you can resize it from the disk management option.

First find the correct instance ID

Check the volume section and find out which all volume are attached to the Correct instance. Check and note the volume instance and find the mount path as we need to mount the new volume to same mount path.

Select the Correct Volume and create a snapshot of that Volume. Right Click and select the option to create a snapshot.

Enter the snapshot name and description to create a snapshot.

Snapshot Created.

Now select the snap shot option in the right menu and choose the correct snapshot which needs to be extended and Right click to create the new volume.

Select the Needed Size , type of storage etc

Once the Volume in created you can see it in the Volume Panel in available model.

Stop the instance in which the Volume is mounted

Select the Volume panel and Unmount the initial Volume which is of small size by right click the old volume.

Once the volume ins unmounted both the Volumes will be in available state. Now right click on the new volume and attach it into the instance.

Enter the instance to which the volume should be added and also the device path which we have save before.

Make sure you enter the device path correctly as we have noted down before.

Once mounted make sure that the instance ID, Volume ID and device path are correct.

Once its all set start the instance and check the size. In some cases we need to run resize2fs to make the size of the volume extent.

In windows you can resize it from the disk management option.
Friday, May 9, 2014
AWS IAM- Identity and Access Management
An AWS account has full permission to perform all actions on the vaults in the account. However, the AWS Identity and Access Management (IAM) users don't have any permission by default.
IAM helps us to securely control access to Amazon Web Services and your account resources. With IAM, you can create multiple IAM users under the umbrella of your AWS account.
Every user you create in the IAM system starts with no permissions. In other words, by default, users can do nothing. Permission is a general term we use to mean the ability to perform an action against a resource, unless you explicitly grant a user permissions, that user cannot perform any of these actions. You grant permission to a user with a policy. A policy is a document that formally states one or more permissions.
IAM Users
An IAM user is an entity that you create in AWS that provides a way to interact with AWS. A primary use for IAM users is to give people you work with identities that they can use to sign in to the AWS Management Console and to make requests to AWS services.
AWS IAM GROUP.
A group is a collection of IAM users. Groups let you specify permissions for a collection of users, which can make it easier to manage the permissions for those users. For example, you could have a group called Admins and give that group the types of permissions that administrators typically need. Any user in that group automatically has the permissions that are assigned to the group. If a new user joins your organization and should have administrator privileges, you can assign the appropriate permissions by adding the user to that group. Similarly, if a person changes jobs in your organization, instead of editing that user's permissions, you can remove him or her from the old group and add him or her to the new group.

Creating a Group with needed Privileges.
Entering the Group Name

Selecting Permissions
Aws provides a set of custom permission templates which we can use. The custom template provided by the Aws covers all the services in the AWS.
We can also generate Custom Policies with the help of Policy Generator

First select the service of which we need to create Policies.

Select the permission’s we need to add into the Policies
The Amazon Resource Name : This gives the API details about the service ,region, resource account ect.
Arn format
==========
arn:aws:service:region:account:resource
arn:aws:service:region:account:resourcetype/resource
arn:aws:service:region:account:resourcetype:resource
More details can be found at
http://docs.aws.amazon.com/general/latest/gr/aws-arns-and-namespaces.html

Once the ARN is added we can Add Statement so that we can see the rule’s added.

Now we will be able to see the policy codes which if needed we can use for create custom Policies.
Creating the Group

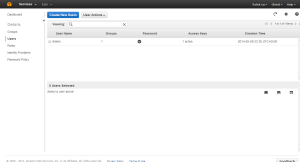
Creating the User

Keep the Access Key ID and Secret Key safe because this is the last time you will see it in AWS. AWS will not save them for you. But you can create as many keys you need.

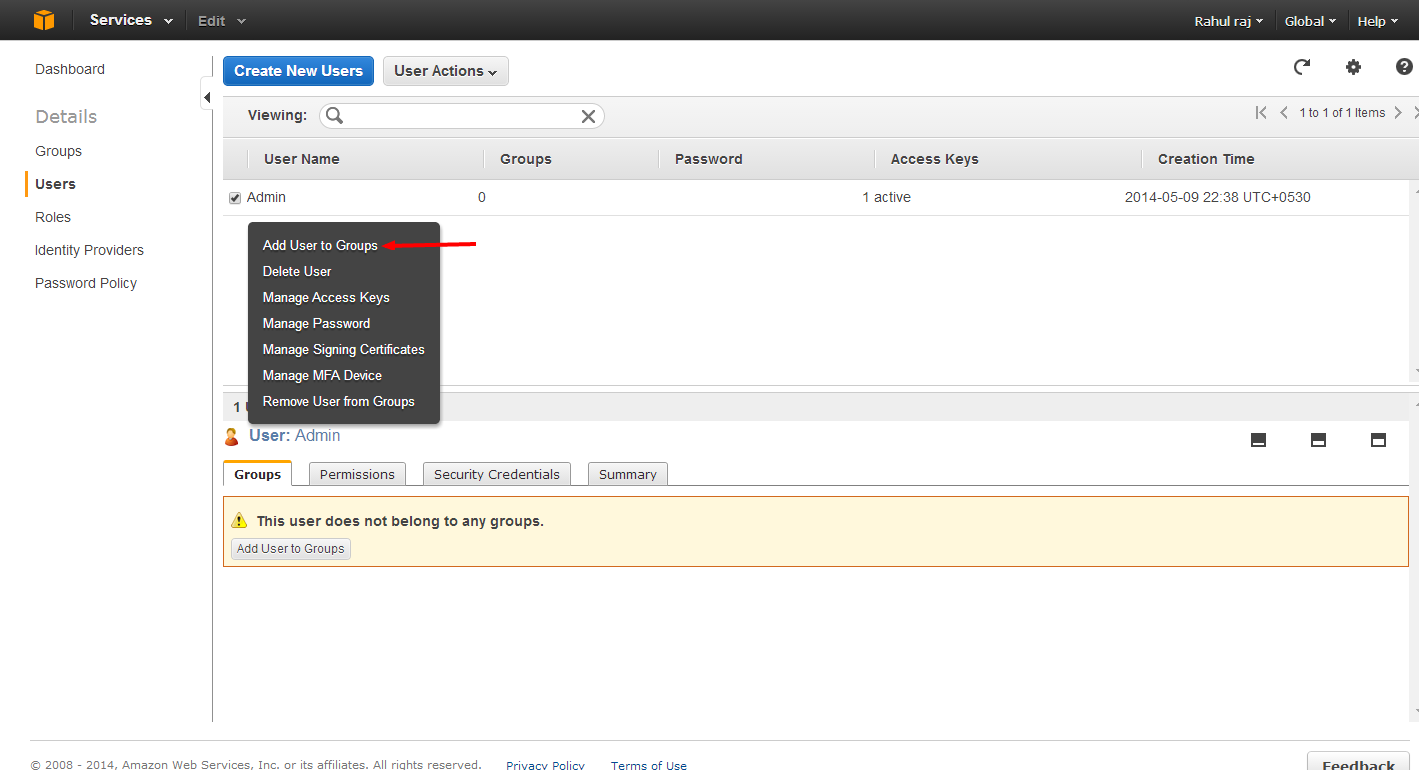
Adding the User to Group
Right click on the needed user to get more options.

Select the required Group

Once the group is added we need to give the user a password

Assign the needed Password
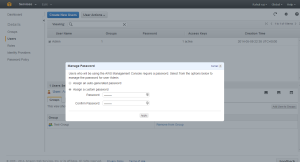
The Group and password are set for the User.
Once the User is set we can set the IAM URL alias

Give the needed Alias
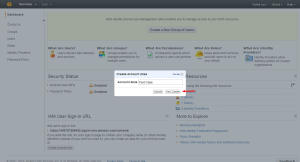
The URL is set.

Now you can use the URL to access the IAM login portal.
IAM helps us to securely control access to Amazon Web Services and your account resources. With IAM, you can create multiple IAM users under the umbrella of your AWS account.
Every user you create in the IAM system starts with no permissions. In other words, by default, users can do nothing. Permission is a general term we use to mean the ability to perform an action against a resource, unless you explicitly grant a user permissions, that user cannot perform any of these actions. You grant permission to a user with a policy. A policy is a document that formally states one or more permissions.
IAM Users
An IAM user is an entity that you create in AWS that provides a way to interact with AWS. A primary use for IAM users is to give people you work with identities that they can use to sign in to the AWS Management Console and to make requests to AWS services.
AWS IAM GROUP.
A group is a collection of IAM users. Groups let you specify permissions for a collection of users, which can make it easier to manage the permissions for those users. For example, you could have a group called Admins and give that group the types of permissions that administrators typically need. Any user in that group automatically has the permissions that are assigned to the group. If a new user joins your organization and should have administrator privileges, you can assign the appropriate permissions by adding the user to that group. Similarly, if a person changes jobs in your organization, instead of editing that user's permissions, you can remove him or her from the old group and add him or her to the new group.

Creating a Group with needed Privileges.
Entering the Group Name

Selecting Permissions
Aws provides a set of custom permission templates which we can use. The custom template provided by the Aws covers all the services in the AWS.

We can also generate Custom Policies with the help of Policy Generator

First select the service of which we need to create Policies.

Select the permission’s we need to add into the Policies

The Amazon Resource Name : This gives the API details about the service ,region, resource account ect.
Arn format
==========
arn:aws:service:region:account:resource
arn:aws:service:region:account:resourcetype/resource
arn:aws:service:region:account:resourcetype:resource
More details can be found at
http://docs.aws.amazon.com/general/latest/gr/aws-arns-and-namespaces.html

Once the ARN is added we can Add Statement so that we can see the rule’s added.

Now we will be able to see the policy codes which if needed we can use for create custom Policies.

Creating the Group

Creating the User

Keep the Access Key ID and Secret Key safe because this is the last time you will see it in AWS. AWS will not save them for you. But you can create as many keys you need.

Adding the User to Group
Right click on the needed user to get more options.
Select the required Group

Once the group is added we need to give the user a password

Assign the needed Password

The Group and password are set for the User.

Once the User is set we can set the IAM URL alias

Give the needed Alias

The URL is set.

Now you can use the URL to access the IAM login portal.
Thursday, May 8, 2014
Cgroups--Part 2 sample examples and commands
https://www.kernel.org/doc/Documentation/cgroups/
Mounting all the subsystems in the system
for i in `lssubsys -am`; do mkdir -p /cgroup/$i ; mount -t cgroup -o $i $i /cgroup/$i ;done
blkio — this subsystem sets limits on input/output access to and from block devices such as physical drives (disk, solid state, USB, etc.).
cpu — this subsystem uses the scheduler to provide cgroup tasks access to the CPU.
cpuacct — this subsystem generates automatic reports on CPU resources used by tasks in a cgroup
memory — this subsystem sets limits on memory use by tasks in a cgroup, and generates automatic reports on memory resources used by those tasks.
Define two cgroups that can be used to assign tasks to run on different sets of CPU cores.
mount -t cgroup -o cpu cpu /cgroup/cpu
mount -t cgroup -o memory memory /cgroup/memory
mount -t cgroup -o blkio blkio /cgroup/blkio
cgcreate -g blkio:high
cgcreate -g blkio:low
cgcreate -g cpu:high
cgcreate -g cpu:low
cgcreate -g memory:high
cgcreate -g memory:low
cgset -r blkio.weight=1000 high
cgset -r blkio.weight=500 low
cgset -r memory.swappiness=30 high
cgset -r memory.swappiness=60 low
cgset -r cpu.shares=4096 high
cgset -r cpu.shares=2048 low
Smaple configuration's ..we can edit the /etc/cgconfig.conf to make our own groups
Controlling CPU Cores on which process need to run
mount {
cpuset = /cgroup/coregrp;
}
group locores {
cpuset {
cpuset.mems="0";
# Run tasks on cores 0 through 3
cpuset.cpus="0-3";
}
}
group hicores {
cpuset {
cpuset.mems="0";
# Run tasks on cores 4 through 7
cpuset.cpus="4-7";
}
}
Controlling CPU and Memory Usage
# High priority group
group hipri {
cpu {
# Set the relative share of CPU resources equal to 75%
cpu.shares="750";
}
cpuset {
# No alternate memory nodes if the system is not NUMA
cpuset.mems="0";
# Make all CPU cores available to tasks
cpuset.cpus="0-7";
}
memory {
# Allocate at most 2 GB of memory to tasks
memory.limit_in_bytes="2G";
# Allocate at most 4 GB of memory+swap to tasks
memory.memsw.limit_in_bytes="4G";
# Apply a soft limit of 1 GB to tasks
memory.soft_limit_in_bytes="1G";
}
}
# Low priority group
group lopri {
cpu {
# Set the relative share of CPU resources equal to 25%
cpu.shares="250";
}
cpuset {
# No alternate memory nodes if the system is not NUMA
cpuset.mems="0";
# Make only cores 0 and 1 available to tasks
cpuset.cpus="0,1";
}
memory {
# Allocate at most 1 GB of memory to tasks
memory.limit_in_bytes="1G";
# Allocate at most 2 GB of memory+swap to tasks
memory.memsw.limit_in_bytes="2G";
# Apply a soft limit of 512 MB to tasks
memory.soft_limit_in_bytes="512M";
}
}
Throttling I/O Bandwidth
Define a cgroup that limits the I/O bandwidth to 50MB/s when reading from /dev/sda1.
mount {
blkio = /cgroup/iolimit;
}
group iocap1 {
blkio {
# Limit reads from /dev/sda1 to 50 MB/s
blkio.throttle.read_bps_device="8:1 52428800";
}
}
Define a cgroup that limits the number of read transactions to 100 per second when reading from /dev/sdd.
mount {
blkio = /cgroup/iolimit;
}
group iocap2 {
blkio {
# Limit read tps from /dev/sdd to 100 per second
blkio.throttle.read_iops_device="8:48 100";
}
}
Define two cgroups with different shares of I/O access to /dev/sdb .
mount {
blkio = /cgroup/iolimit;
}
# Low access share group
group iolo {
blkio {
# Set the share of I/O access by /dev/sdb to 25%
blkio.weight_device="8:16 250";
}
}
# High access share group
group iohi {
blkio {
# Set the share of I/O access by /dev/sdb to 75%
blkio.weight_device="8:16 750";
}
}
ruining the application in the corresponding group
cgexec -g cpu,memory:group2 httpd
cgexec -g blkio:iohi httpd
Cgroup installation and configuration. Part 1
Installing Cgroups.
yum install libcgroup
starting Cgroup rule creator
/etc/init.d/cgconfig start
Checking the subsystem which are mounted in the kernel
lssubsys -am
ns
perf_event
net_prio
cpuset /cgroup/cpuset
cpu /cgroup/cpu
cpuacct /cgroup/cpuacct
memory /cgroup/memory
devices /cgroup/devices
freezer /cgroup/freezer
net_cls /cgroup/net_cls
blkio /cgroup/blkio
Basic subsystems are
cpuset assigns individual CPUs and memory nodes to cgroup tasks
cpu schedules CPU access (for example, according to relative shares, as in Figure 1, or for real-time processes)
cpuacct reports total CPU time used.
memory reports or limits memory use.
devices grants or denies access to devices.
freezer suspends or resumes tasks.
net_cls tags outgoing network packets with an identifier.
blkio reports or controls I/O bandwidth for block devices.
Checking which all subsystem are mounted using thereown filesystem
[root@ip-192-168-1-129 ~]# ls -al /cgroup/
total 8
drwxr-xr-x. 10 root root 4096 May 8 07:38 .
dr-xr-xr-x. 25 root root 4096 May 8 07:27 ..
drwxr-xr-x. 5 root root 0 May 8 08:31 blkio
drwxr-xr-x. 2 root root 0 May 8 08:31 cpu
drwxr-xr-x. 2 root root 0 May 8 08:31 cpuacct
drwxr-xr-x. 2 root root 0 May 8 08:31 cpuset
drwxr-xr-x. 2 root root 0 May 8 08:31 devices
drwxr-xr-x. 2 root root 0 May 8 08:31 freezer
drwxr-xr-x. 2 root root 0 May 8 08:31 memory
drwxr-xr-x. 2 root root 0 May 8 08:31 net_cls
[root@ip-192-168-1-129 ~]#
if its not mounted manually mount it.
here following are not mounted so we can mount it.
ns
perf_event
net_prio
# mkdir /cgroup/ns
# ll /cgroup/ns/
total 0
# mount -t cgroup -o ns ns /cgroup/ns
# ll /cgroup/ns/
total 0
--w--w--w-. 1 root root 0 May 8 08:48 cgroup.event_control
-rw-r--r--. 1 root root 0 May 8 08:48 cgroup.procs
-rw-r--r--. 1 root root 0 May 8 08:48 notify_on_release
-rw-r--r--. 1 root root 0 May 8 08:48 release_agent
-rw-r--r--. 1 root root 0 May 8 08:48 tasks
Creating Cgroups under blkio for settting the different IO rate
[root@ip-192-168-1-129 cgroup]# cgcreate -g blkio:high_io
[root@ip-192-168-1-129 cgroup]# cgcreate -g blkio:low_io
[root@ip-192-168-1-129 cgroup]# cgcreate -g blkio:avg_io
Cgroup are created
==================
[root@ip-192-168-1-129 cgroup]# ll /cgroup/blkio/|grep drwx
drwxr-xr-x. 2 root root 0 May 8 09:39 avg_io
drwxr-xr-x. 2 root root 0 May 8 09:38 high_io
drwxr-xr-x. 2 root root 0 May 8 09:39 low_io
[root@ip-192-168-1-129 cgroup]#
Files inside are created automatically
[root@ip-192-168-1-129 cgroup]# ll /cgroup/blkio/avg_io/
total 0
-r--r--r--. 1 root root 0 May 8 09:39 blkio.io_merged
-r--r--r--. 1 root root 0 May 8 09:39 blkio.io_queued
-r--r--r--. 1 root root 0 May 8 09:39 blkio.io_service_bytes
-r--r--r--. 1 root root 0 May 8 09:39 blkio.io_serviced
-r--r--r--. 1 root root 0 May 8 09:39 blkio.io_service_time
-r--r--r--. 1 root root 0 May 8 09:39 blkio.io_wait_time
--w--w----. 1 root root 0 May 8 09:39 blkio.reset_stats
-r--r--r--. 1 root root 0 May 8 09:39 blkio.sectors
-r--r--r--. 1 root root 0 May 8 09:39 blkio.throttle.io_service_bytes
-r--r--r--. 1 root root 0 May 8 09:39 blkio.throttle.io_serviced
-rw-rw-r--. 1 root root 0 May 8 09:39 blkio.throttle.read_bps_device
-rw-rw-r--. 1 root root 0 May 8 09:39 blkio.throttle.read_iops_device
-rw-rw-r--. 1 root root 0 May 8 09:39 blkio.throttle.write_bps_device
-rw-rw-r--. 1 root root 0 May 8 09:39 blkio.throttle.write_iops_device
-r--r--r--. 1 root root 0 May 8 09:39 blkio.time
-rw-rw-r--. 1 root root 0 May 8 09:39 blkio.weight
-rw-rw-r--. 1 root root 0 May 8 09:39 blkio.weight_device
--w--w----. 1 root root 0 May 8 09:39 cgroup.event_control
-rw-rw-r--. 1 root root 0 May 8 09:39 cgroup.procs
-rw-rw-r--. 1 root root 0 May 8 09:39 notify_on_release
-rw-rw-r--. 1 root root 0 May 8 09:39 tasks
[root@ip-192-168-1-129 cgroup]#
Getting Current weight-age of the sub system
cgget -r blkio.weight high_io
Setting required weight-age for the sub system
cgset -r blkio.weight=1000 high_io
Assign processes to a cgroup.
Using Pid of process
cgclassify -g blkio:high_io 1407
This has the same effect as putting PID 1410 into the tasks file:
echo 1410 >> /cgroup/blkio/high_io/tasks
Any process subsequently launched in the shell is automatically assigned to the shell's cgroup.
Alternatively, the cgexec command can launch a process in the specified cgroup:
[root@ip-192-168-1-129 ~]# cgexec -g blkio:high_io httpd
httpd: apr_sockaddr_info_get() failed for ip-192-168-1-129.ec2.internal
httpd: Could not reliably determine the server's fully qualified domain name, using 127.0.0.1 for ServerName
[root@ip-192-168-1-129 ~]#
[root@ip-192-168-1-129 ~]#
[root@ip-192-168-1-129 ~]# pidof httpd
1521 1520 1519 1518 1517 1516 1515 1514 1513
[root@ip-192-168-1-129 ~]# cat /cgroup/blkio/high_io/tasks
1513
1514
1515
1516
1517
1518
1519
1520
1521
[root@ip-192-168-1-129 ~]#
For services that have a configuration file in /etc/sysconfig, you can edit the configuration file to allocate the service to a cgroup automatically. For example, add this line to /etc/sysconfig/httpd:
CGROUP_DAEMON="blkio:high_io"
Then start the service to automatically execute the processes in the specified cgroup:
===============
The changes made above will be erased on server reboot so to make the rules permanent we need to add the rule in the configuration.
Capturing Parameters
Up to this point, everything I've done on the command line won't persist across reboots. Once I've set up hierarchies, attached cgroups, and defined parameters the way I want them, I can capture an existing configuration with cgsnapshot:
# cgsnapshot -s > cgconfig-example.conf
now check the configuration at /etc/cgconfig.conf and do needed changes as of cgconfig-example.conf .
To clear all the setting we can use
[root@ip-192-168-1-129 ~]# cgclear
[root@ip-192-168-1-129 ~]# lscgroup
cgroups can't be listed: Cgroup is not mounted
[root@ip-192-168-1-129 ~]#
Tcp Wrapper's Security
TCP wrapper based access List Rules can be included in the two files
/etc/hosts.allow and
/etc/hosts.deny .
Work precedence:
/etc/hosts.allow-
if allow will not check 2
if not found then go to 2
/etc/hosts.deny .
if not found allow access.
Points to remember
You can have only one rule per service in hosts.allow and hosts.deny file.
Any changes to hosts.allow and hosts.deny file takes immediate effect.
The last line in the files hosts.allow and hosts.deny must be a new line character. Or else the rule will fail.
ALL : 192.168.0.1/255.255.255.0
sshd : ALL EXCEPT 192.168.0.15
in.telnetd : 192.168.5.5 : deny
in.telnetd : 192.168.5.6 : allow
Tuesday, May 6, 2014
CpuLimit -- Limiting User's resource Usage
sudo yum install cpulimit
If it’s not possible in your distro then it’s extremely easy to compile it:
cd /usr/src/
wget --no-check-certificate https://github.com/opsengine/cpulimit/tarball/master -O cpulimit.tar
tar -xvf cpulimit.tar
cd opsengine-cpulimit-9df7758
make
ln -s src/cpulimit /usr/sbin/cpulimit
/usr/sbin/cpulimit --limit=10 /bin/gzip test.tar
Using cpulimit you can also allocate CPU limit to already running processes, e.g. below command will allocate 20% CPU limit to process with PID 2342:
/usr/sbin/cpulimit -p 2342 -l 20
It’s possible to specify process by its executable file instead of PID:
/usr/sbin/cpulimit -P /usr/sbin/nginx -l 30
Subscribe to:
Posts (Atom)