Open the command prompt with elevated privileges. To do this click the Start Orb then All Programs, click on Accessories, then right-click on Command Prompt and then select Run as administrator.
In the Command Prompt, type
net user administrator /active:yes
Tuesday, September 2, 2014
Monday, September 1, 2014
Download files through Command Prompt in Windows
HTTP
PowerShell
$source = "http://yoursite.com/file.xml"
$destination = "c:\application\data\newdata.xml"
Invoke-WebRequest $source -OutFile $destination
The Invoke-WebRequest cmdlet
Invoke-WebRequest is a cmdlet that lets you upload or download data from a remote server. This cmdlet allows for user agents, proxies, and credentials.
FTP
PowerShell
$source = "ftp://yoursite.com/file.xml"
$destination = "c:\application\data\newdata.xml"
Invoke-WebRequest $source -OutFile $destination -Credential ftpUser
The code example above is almost identical to the HTTP sample, with the main difference being that the $source variable has “ftp” at the beginning instead of “http”. You may also notice that we have used the -Credential parameter since FTP connections generally require a username and password.
PowerShell
$source = "http://yoursite.com/file.xml"
$destination = "c:\application\data\newdata.xml"
Invoke-WebRequest $source -OutFile $destination
The Invoke-WebRequest cmdlet
Invoke-WebRequest is a cmdlet that lets you upload or download data from a remote server. This cmdlet allows for user agents, proxies, and credentials.
FTP
PowerShell
$source = "ftp://yoursite.com/file.xml"
$destination = "c:\application\data\newdata.xml"
Invoke-WebRequest $source -OutFile $destination -Credential ftpUser
The code example above is almost identical to the HTTP sample, with the main difference being that the $source variable has “ftp” at the beginning instead of “http”. You may also notice that we have used the -Credential parameter since FTP connections generally require a username and password.
Creating Custom Windows Images for Openstack
Setting up the KVM environment to create the custom images.
yum install kvm qemu-kvm python-virtinst libvirt libvirt-python virt-manager libguestfs-tools
Once the packages are installed we need to get the ISO’s.
For example are getting windows7 from the http://www.w7forums.com/threads/official-windows-7-sp1-iso-image-downloads.12325/
wget http://msft.digitalrivercontent.net/win/X17-24395.iso
Now we need the Virtio Driver’s so that windows can detect unsigned devices like linux from http://alt.fedoraproject.org/pub/alt/virtio-win/latest/
wget http://alt.fedoraproject.org/pub/alt/virtio-win/latest/virtio-win-0.1-81.iso
First Create the Disk on which the OS need to be installed
qemu-img create -f qcow2 -o preallocation=metadata windows.qcow2 20G
Start the KVM installation
/usr/libexec/qemu-kvm -m 2048 -smp 2 -cdrom X17-24395.iso -drive file=virtio-win-0.1-81.iso,index=3,media=cdrom -drive file= windows.qcow2,if=virtio,boot=off -boot d -vga std -k en-us -vnc 10.1.17.42:1 -usbdevice tablet
Connect to Installation
Once the above step is done you will be able to connect to VNC using 10.1.17.42:1
You will be connected to VNC and you will be at the installations screen. Click Next to continue
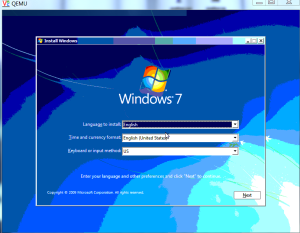
Select Install option to continue with installation.

While secting the Installation driver we need to load the driver, Select the load driveroption and load the driver from the Virto ISO we have mounted

Continue with the installation

Once you are done download the Cloud init for windows from
https://github.com/cloudbase/cloudbase-init
Once installation is completed load the computer with virto NIC with following Command
/usr/libexec/qemu-kvm -m 2048 -smp 2 -drive file=virtio-win-0.1-81.iso,index=3,media=cdrom -drive file=windows-7.qcow2,if=virtio -boot d -vga std -k en-us -vnc 10.1.17.42:1 -usbdevice tablet -net nic,model=virtio
Connect to VNC and add the Virto NIC Driver From Device manager

Now install the Cloud-init and initialize the Image

Enable RDP for the access.
Now the Image is ready for Use .
You can get the windows password by
nova get-password <instance ID> <ssh-key>
Nova Rule
nova secgroup-add-rule default tcp 3389 3389 0.0.0.0/0
Thursday, August 28, 2014
Windows 8 and fedora 20 Dual boot in HP
Recently I have moved to fedora 20 and window 8 which showed that HP laptops have a special bios which only allows windows EFI to be loaded as default so even after installing both the OS and making the EFI partition of fedora default the system boots from Windows EFI directory. To get the grub to boot first I did the following steps.
My disk partition are as below. Device Start End Size Type
/dev/sda1 2048 616447 300M Windows recovery environment
/dev/sda2 616448 821247 100M EFI System
/dev/sda3 821248 1083391 128M Microsoft reserved
/dev/sda4 1083392 122882047 58.1G Microsoft basic data
/dev/sda5 122882048 123291647 200M EFI System
/dev/sda6 123291648 124315647 500M Microsoft basic data
/dev/sda7 124315648 548470783 202.3G Linux LVM
/dev/sda8 548470784 976771071 204.2G Microsoft basic data
Here I have two EFI partition /dev/sda2 (Windows) and /dev/sda5 (Fedora). As the setting is embedded in HP bios we needed a work around.
So I mounted the partititons first .
mount /dev/sda5 fedora/
mount /dev/sda2 win/
Now we copy the Fedora EFI content to Windows partions as follows
cp -rp fedora/EFI/fedora win/EFI/
In the windows partion you can find a default HP EFI content . Just rename it to some thing else.
Now rename the windows boot loader
mv win/EFI/Microsoft/Boot/bootmgfw.efi win/EFI/Microsoft/Boot/bootmgfwB.efi
Now copy the grubloader into the place of windows bootloader
cp win/EFI/fedora/grubx64.efi win/EFI/Microsoft/Boot/bootmgfw.efi
Now recreate the grub.cfg and place it in win/EFI/fedora
grub2-mkconfig -o win/EFI/fedora/grub.cfg
It should be done by now reboot the machine and check it .
kvm + Vnc + Mouse pointer sync issue
While we use the Vnc we could see that the mouse pointer in the Vnc Viewer is not sync with the system Vnc.
This can be solved by adding the option -usbdevice tablet along the kvm command
Example
$KVM -m 2048 -smp 2 -cdrom $ISO -drive file=$VIRTIO_ISO,index=3,media=cdrom -drive file=$IMAGE,if=virtio,boot=off -boot d -vga std -k en-us -vnc 10.1.17.42:1 -usbdevice tablet
This can be solved by adding the option -usbdevice tablet along the kvm command
Example
$KVM -m 2048 -smp 2 -cdrom $ISO -drive file=$VIRTIO_ISO,index=3,media=cdrom -drive file=$IMAGE,if=virtio,boot=off -boot d -vga std -k en-us -vnc 10.1.17.42:1 -usbdevice tablet
Tuesday, August 26, 2014
"Host key verification failed" error while resizing instance Openstack
Setting allow_resize_to_same_host=true will enable the resizing in All in one model of installation . but if we have mutiple controller and compute node's we will be getting an authentication error as following
"/usr/lib/python2.6/site-packages/nova/virt/libvirt/driver.py", line 4907,
in migrate_disk_and_power_off\n utils.execute(\'ssh\', dest, \'mkdir\', \'-p\', inst_base)\n', '
File "/usr/lib/python2.6/site-packages/nova/utils.py", line 165, in execute\n return processutils.execute(*cmd, **kwargs)\n', '
File "/usr/lib/python2.6/site-packages/nova/openstack/common/processutils.py", line 193, in execute\n cmd=\' \'.join(cmd))\n',
"ProcessExecutionError: Unexpected error while running command.\nCommand: ssh 10.1.15.44
mkdir -p /var/lib/nova/instances/5d5ced81-6fb1-4028-97cd-686e450d1bab\nExit code: 255\nStdout: ''\nStderr:
'Host key verification failed.\\r\\n'\n"]
This is due to a bug in nova as told in below bug report which can be solved by enabling password less authentication between the compute and controller node's nova user .
https://bugzilla.redhat.com/show_bug.cgi?id=975014#c3
By default the nova user does not have a shell so we need to enable the shell and do steps to enable password less authentication between all the server .
In all the controller and compute server’s enable nova user.
sed -i "s/\/var\/lib\/nova:\/sbin\/nologin/\/var\/lib\/nova:\/bin\/bash/g" /etc/passwd
cat /etc/passwd |grep nova
nova:x:162:162:OpenStack Nova Daemons:/var/lib/nova:/bin/bash
Enable password less authentication
Between all the compute and controller nodes create password less authenticatioin for user nova.
su - nova
ssh-keygen
ssh-copy-id
"/usr/lib/python2.6/site-packages/nova/virt/libvirt/driver.py", line 4907,
in migrate_disk_and_power_off\n utils.execute(\'ssh\', dest, \'mkdir\', \'-p\', inst_base)\n', '
File "/usr/lib/python2.6/site-packages/nova/utils.py", line 165, in execute\n return processutils.execute(*cmd, **kwargs)\n', '
File "/usr/lib/python2.6/site-packages/nova/openstack/common/processutils.py", line 193, in execute\n cmd=\' \'.join(cmd))\n',
"ProcessExecutionError: Unexpected error while running command.\nCommand: ssh 10.1.15.44
mkdir -p /var/lib/nova/instances/5d5ced81-6fb1-4028-97cd-686e450d1bab\nExit code: 255\nStdout: ''\nStderr:
'Host key verification failed.\\r\\n'\n"]
This is due to a bug in nova as told in below bug report which can be solved by enabling password less authentication between the compute and controller node's nova user .
https://bugzilla.redhat.com/show_bug.cgi?id=975014#c3
By default the nova user does not have a shell so we need to enable the shell and do steps to enable password less authentication between all the server .
Enable shell for nova user
In all the controller and compute server’s enable nova user.
sed -i "s/\/var\/lib\/nova:\/sbin\/nologin/\/var\/lib\/nova:\/bin\/bash/g" /etc/passwd
cat /etc/passwd |grep nova
nova:x:162:162:OpenStack Nova Daemons:/var/lib/nova:/bin/bash
Enable password less authentication
Between all the compute and controller nodes create password less authenticatioin for user nova.
su - nova
ssh-keygen
ssh-copy-id
Tuesday, August 19, 2014
Creating Multiple Network in Openstack – Icehouse
Adding first network
On Network Node
#Add the integration bridge:
ovs-vsctl add-br br-int
#Add the external bridge:
ovs-vsctl add-br br-ex
#Add a port to the external bridge that connects to the physical external network interface:
#Replace INTERFACE_NAME with the actual interface name. For example, eth2 or ens256.
ovs-vsctl add-port br-ex eth2
On Controller Node
[root@controller1 ~]# source /root/admin-openrc.sh
[root@controller1 ~]# neutron net-create ext-net --shared --router:external=True
Created a new network:
+---------------------------+--------------------------------------+
| Field | Value |
+---------------------------+--------------------------------------+
| admin_state_up | True |
| id | 2fdfff06-5837-4ab8-b971-c08696165e9d |
| name | ext-net |
| provider:network_type | gre |
| provider:physical_network | |
| provider:segmentation_id | 1 |
| router:external | True |
| shared | True |
| status | ACTIVE |
| subnets | |
| tenant_id | 8c9fb6577a1e45879f35e3e43b34de58 |
+---------------------------+--------------------------------------+
[root@controller1 ~]#
[root@controller1 ~]# neutron subnet-create ext-net --name ext-subnet --allocation-pool start=192.168.10.129,end=192.168.10.254 --disable-dhcp --gateway 192.168.10.1 192.168.10.128/24
Created a new subnet:
+------------------+------------------------------------------------+
| Field | Value |
+------------------+------------------------------------------------+
| allocation_pools | {"start": "192.168.10.129", "end": "192.168.10.254"} |
| cidr | 192.168.10.0/24 |
| dns_nameservers | |
| enable_dhcp | False |
| gateway_ip | 192.168.10.1 |
| host_routes | |
| id | 09ec246e-4b1d-4fcb-babc-fdfd73ad13d0 |
| ip_version | 4 |
| name | ext-subnet |
| network_id | 2fdfff06-5837-4ab8-b971-c08696165e9d |
| tenant_id | 8c9fb6577a1e45879f35e3e43b34de58 |
+------------------+------------------------------------------------+
[root@controller1 ~]# neutron net-create demo-net
Created a new network:
+---------------------------+--------------------------------------+
| Field | Value |
+---------------------------+--------------------------------------+
| admin_state_up | True |
| id | df86ab38-57f2-432b-8ea8-ef30ceb72607 |
| name | demo-net |
| provider:network_type | gre |
| provider:physical_network | |
| provider:segmentation_id | 2 |
| shared | False |
| status | ACTIVE |
| subnets | |
| tenant_id | 8c9fb6577a1e45879f35e3e43b34de58 |
+---------------------------+--------------------------------------+
[root@controller1 ~]# neutron subnet-create demo-net --name demo-subnet --gateway 10.0.0.1 10.0.0.0/24
Created a new subnet:
+------------------+--------------------------------------------+
| Field | Value |
+------------------+--------------------------------------------+
| allocation_pools | {"start": "10.0.0.2", "end": "10.0.0.254"} |
| cidr | 10.0.0.0/24 |
| dns_nameservers | |
| enable_dhcp | True |
| gateway_ip | 10.0.0.1 |
| host_routes | |
| id | 7f103f72-1d77-48d9-a4eb-fdb10c6dc11d |
| ip_version | 4 |
| name | demo-subnet |
| network_id | df86ab38-57f2-432b-8ea8-ef30ceb72607 |
| tenant_id | 8c9fb6577a1e45879f35e3e43b34de58 |
+------------------+--------------------------------------------+
[root@controller1 ~]# neutron router-create demo-router
Created a new router:
+-----------------------+--------------------------------------+
| Field | Value |
+-----------------------+--------------------------------------+
| admin_state_up | True |
| external_gateway_info | |
| id | d2e481dd-a624-4447-8ea7-54fac383ec52 |
| name | demo-router |
| status | ACTIVE |
| tenant_id | 8c9fb6577a1e45879f35e3e43b34de58 |
+-----------------------+--------------------------------------+
[root@controller1 ~]# neutron router-interface-add demo-router demo-subnet
uter demo-router
neutron router-gateway-set demo-router ext-net
Added interface 628fbec4-625b-4b03-a2c5-92666cbc72af to router demo-router.
[root@controller1 ~]# #Set gateway for router demo-router
[root@controller1 ~]# neutron router-gateway-set demo-router ext-net
Set gateway for router demo-router
On Network Node
Edit /etc/neutron/l3_agent.ini and add following details
handle_internal_only_routers = True
gateway_external_network_id = ****.*****.*****.*****.****
external_network_bridge = br-ex
As per above example
handle_internal_only_routers = True
gateway_external_network_id = 2fdfff06-5837-4ab8-b971-c08696165e9d
external_network_bridge = br-ex
Adding the Second Network
On Network Node
ovs-vsctl add-br br-ex-2
ovs-vsctl add-port br-ex-2 eth3
On Controller Node
[root@controller1 ~]# source /root/admin-openrc.sh
[root@controller1 ~]# neutron net-create ext-net-2 --shared --router:external=True
Created a new network:
+---------------------------+--------------------------------------+
| Field | Value |
+---------------------------+--------------------------------------+
| admin_state_up | True |
| id | 19b85183-9637-4bea-9b26-92caf2a5cb99 |
| name | ext-net-2 |
| provider:network_type | gre |
| provider:physical_network | |
| provider:segmentation_id | 3 |
| router:external | True |
| shared | True |
| status | ACTIVE |
| subnets | |
| tenant_id | 8c9fb6577a1e45879f35e3e43b34de58 |
+---------------------------+--------------------------------------+
[root@controller1 ~]# neutron subnet-create ext-net-2 --name ext-subnet-2 --allocation-pool start=192.168.11.50,end=192.168.11.254 --disable-dhcp --gateway 192.168.11.1 192.168.11.0/24
Created a new subnet:
+------------------+-----------------------------------------------+
| Field | Value |
+------------------+-----------------------------------------------+
| allocation_pools | {"start": "192.168.11.50", "end": "192.168.11.254"} |
| cidr | 192.168.11.0/24 |
| dns_nameservers | |
| enable_dhcp | False |
| gateway_ip | 192.168.11.1 |
| host_routes | |
| id | 92dcc66d-00a3-4678-a8ac-9d72a94613ed |
| ip_version | 4 |
| name | ext-subnet-2 |
| network_id | 19b85183-9637-4bea-9b26-92caf2a5cb99 |
| tenant_id | 8c9fb6577a1e45879f35e3e43b34de58 |
+------------------+-----------------------------------------------+
[root@controller1 ~]# neutron router-create demo-router-2
Created a new router:
+-----------------------+--------------------------------------+
| Field | Value |
+-----------------------+--------------------------------------+
| admin_state_up | True |
| external_gateway_info | |
| id | e9e194bb-dafe-4e41-b867-0a64c2e74e29 |
| name | demo-router-2 |
| status | ACTIVE |
| tenant_id | 8c9fb6577a1e45879f35e3e43b34de58 |
+-----------------------+--------------------------------------+
[root@controller1 ~]# neutron router-gateway-set demo-router-2 ext-net-2
Set gateway for router demo-router-2
[root@controller1 ~]# neutron net-create demo-net-2
Created a new network:
+---------------------------+--------------------------------------+
| Field | Value |
+---------------------------+--------------------------------------+
| admin_state_up | True |
| id | f6238c45-9de4-4869-ad3e-cf3d1a647285 |
| name | demo-net-2 |
| provider:network_type | gre |
| provider:physical_network | |
| provider:segmentation_id | 4 |
| shared | False |
| status | ACTIVE |
| subnets | |
| tenant_id | 8c9fb6577a1e45879f35e3e43b34de58 |
+---------------------------+--------------------------------------+
[root@controller1 ~]# neutron subnet-create demo-net-2 --name demo-subnet-2 --gateway 10.1.0.1 10.1.0.0/24
Created a new subnet:
+------------------+--------------------------------------------+
| Field | Value |
+------------------+--------------------------------------------+
| allocation_pools | {"start": "10.1.0.2", "end": "10.1.0.254"} |
| cidr | 10.1.0.0/24 |
| dns_nameservers | |
| enable_dhcp | True |
| gateway_ip | 10.1.0.1 |
| host_routes | |
| id | 30bcb484-e7e7-42a5-9a08-b7364f94180a |
| ip_version | 4 |
| name | demo-subnet-2 |
| network_id | f6238c45-9de4-4869-ad3e-cf3d1a647285 |
| tenant_id | 8c9fb6577a1e45879f35e3e43b34de58 |
+------------------+--------------------------------------------+
[root@controller1 ~]# neutron router-interface-add demo-router-2 demo-subnet-2
Added interface daa4f64d-117c-49ee-a5b6-430c837a59d5 to router demo-router-2.
[root@controller1 ~]#
On Network Node
Edit /etc/neutron/l3_agent.ini and add following details
handle_internal_only_routers = False
gateway_external_network_id = ****.*****.*****.*****.****
external_network_bridge = br-ex
As per above example
handle_internal_only_routers = False
gateway_external_network_id = 19b85183-9637-4bea-9b26-92caf2a5cb99
external_network_bridge = br-ex-2
[root@neutron1 ~]# cp /etc/init.d/neutron-l3-agent /etc/init.d/neutron-l3-agent-2
Make the change in the following Lines to get the difference command as below
[root@neutron1 ~]# diff -n /etc/init.d/neutron-l3-agent /etc/init.d/neutron-l3-agent-2
d3 1
a3 1
# neutron-l3-agent-2 OpenStack Neutron Layer 3 Agent
d18 1
a18 1
"/etc/$proj/l3_agent-2.ini" \
d21 1
a21 1
pidfile="/var/run/$proj/$prog-2.pid"
d23 1
a23 1
[ -e /etc/sysconfig/$prog-2 ] && . /etc/sysconfig/$prog-2
d25 1
a25 1
lockfile=/var/lock/subsys/$prog-2
d32 2
a33 3
echo -n $"Starting $prog-2: "
daemon --user neutron --pidfile $pidfile "$exec --log-file /var/log/$proj/$plugin-2.log --config-file /usr/share/neutron/neutron-dist.conf --config-file /etc/neutron/neutron.conf --config-file /etc/neutron/l3_agent-2.ini --config-file /etc/neutron/fwaas_driver.ini &>/dev/null & echo \$! > $pidfile"
d41 2
a42 2
echo -n $"Stopping $prog-2: "
killproc -p $pidfile $prog-2
[root@neutron1 ~]#
[root@neutron1 ~]# chkconfig neutron-l3-agent-2 on
[root@neutron1 ~]# openstack-service restart
Stopping neutron-dhcp-agent: [ OK ]
Starting neutron-dhcp-agent: [ OK ]
Stopping neutron-l3-agent: [ OK ]
Starting neutron-l3-agent: [ OK ]
Stopping neutron-l3-agent-2: [ OK ]
Starting neutron-l3-agent-2: [ OK ]
Stopping neutron-metadata-agent: [ OK ]
Starting neutron-metadata-agent: [ OK ]
Stopping neutron-openvswitch-agent: [ OK ]
Starting neutron-openvswitch-agent: [ OK ]
[root@neutron1 ~]#
On Network Node
#Add the integration bridge:
ovs-vsctl add-br br-int
#Add the external bridge:
ovs-vsctl add-br br-ex
#Add a port to the external bridge that connects to the physical external network interface:
#Replace INTERFACE_NAME with the actual interface name. For example, eth2 or ens256.
ovs-vsctl add-port br-ex eth2
On Controller Node
[root@controller1 ~]# source /root/admin-openrc.sh
[root@controller1 ~]# neutron net-create ext-net --shared --router:external=True
Created a new network:
+---------------------------+--------------------------------------+
| Field | Value |
+---------------------------+--------------------------------------+
| admin_state_up | True |
| id | 2fdfff06-5837-4ab8-b971-c08696165e9d |
| name | ext-net |
| provider:network_type | gre |
| provider:physical_network | |
| provider:segmentation_id | 1 |
| router:external | True |
| shared | True |
| status | ACTIVE |
| subnets | |
| tenant_id | 8c9fb6577a1e45879f35e3e43b34de58 |
+---------------------------+--------------------------------------+
[root@controller1 ~]#
[root@controller1 ~]# neutron subnet-create ext-net --name ext-subnet --allocation-pool start=192.168.10.129,end=192.168.10.254 --disable-dhcp --gateway 192.168.10.1 192.168.10.128/24
Created a new subnet:
+------------------+------------------------------------------------+
| Field | Value |
+------------------+------------------------------------------------+
| allocation_pools | {"start": "192.168.10.129", "end": "192.168.10.254"} |
| cidr | 192.168.10.0/24 |
| dns_nameservers | |
| enable_dhcp | False |
| gateway_ip | 192.168.10.1 |
| host_routes | |
| id | 09ec246e-4b1d-4fcb-babc-fdfd73ad13d0 |
| ip_version | 4 |
| name | ext-subnet |
| network_id | 2fdfff06-5837-4ab8-b971-c08696165e9d |
| tenant_id | 8c9fb6577a1e45879f35e3e43b34de58 |
+------------------+------------------------------------------------+
[root@controller1 ~]# neutron net-create demo-net
Created a new network:
+---------------------------+--------------------------------------+
| Field | Value |
+---------------------------+--------------------------------------+
| admin_state_up | True |
| id | df86ab38-57f2-432b-8ea8-ef30ceb72607 |
| name | demo-net |
| provider:network_type | gre |
| provider:physical_network | |
| provider:segmentation_id | 2 |
| shared | False |
| status | ACTIVE |
| subnets | |
| tenant_id | 8c9fb6577a1e45879f35e3e43b34de58 |
+---------------------------+--------------------------------------+
[root@controller1 ~]# neutron subnet-create demo-net --name demo-subnet --gateway 10.0.0.1 10.0.0.0/24
Created a new subnet:
+------------------+--------------------------------------------+
| Field | Value |
+------------------+--------------------------------------------+
| allocation_pools | {"start": "10.0.0.2", "end": "10.0.0.254"} |
| cidr | 10.0.0.0/24 |
| dns_nameservers | |
| enable_dhcp | True |
| gateway_ip | 10.0.0.1 |
| host_routes | |
| id | 7f103f72-1d77-48d9-a4eb-fdb10c6dc11d |
| ip_version | 4 |
| name | demo-subnet |
| network_id | df86ab38-57f2-432b-8ea8-ef30ceb72607 |
| tenant_id | 8c9fb6577a1e45879f35e3e43b34de58 |
+------------------+--------------------------------------------+
[root@controller1 ~]# neutron router-create demo-router
Created a new router:
+-----------------------+--------------------------------------+
| Field | Value |
+-----------------------+--------------------------------------+
| admin_state_up | True |
| external_gateway_info | |
| id | d2e481dd-a624-4447-8ea7-54fac383ec52 |
| name | demo-router |
| status | ACTIVE |
| tenant_id | 8c9fb6577a1e45879f35e3e43b34de58 |
+-----------------------+--------------------------------------+
[root@controller1 ~]# neutron router-interface-add demo-router demo-subnet
uter demo-router
neutron router-gateway-set demo-router ext-net
Added interface 628fbec4-625b-4b03-a2c5-92666cbc72af to router demo-router.
[root@controller1 ~]# #Set gateway for router demo-router
[root@controller1 ~]# neutron router-gateway-set demo-router ext-net
Set gateway for router demo-router
On Network Node
Edit /etc/neutron/l3_agent.ini and add following details
handle_internal_only_routers = True
gateway_external_network_id = ****.*****.*****.*****.****
external_network_bridge = br-ex
As per above example
handle_internal_only_routers = True
gateway_external_network_id = 2fdfff06-5837-4ab8-b971-c08696165e9d
external_network_bridge = br-ex
Adding the Second Network
On Network Node
ovs-vsctl add-br br-ex-2
ovs-vsctl add-port br-ex-2 eth3
On Controller Node
[root@controller1 ~]# source /root/admin-openrc.sh
[root@controller1 ~]# neutron net-create ext-net-2 --shared --router:external=True
Created a new network:
+---------------------------+--------------------------------------+
| Field | Value |
+---------------------------+--------------------------------------+
| admin_state_up | True |
| id | 19b85183-9637-4bea-9b26-92caf2a5cb99 |
| name | ext-net-2 |
| provider:network_type | gre |
| provider:physical_network | |
| provider:segmentation_id | 3 |
| router:external | True |
| shared | True |
| status | ACTIVE |
| subnets | |
| tenant_id | 8c9fb6577a1e45879f35e3e43b34de58 |
+---------------------------+--------------------------------------+
[root@controller1 ~]# neutron subnet-create ext-net-2 --name ext-subnet-2 --allocation-pool start=192.168.11.50,end=192.168.11.254 --disable-dhcp --gateway 192.168.11.1 192.168.11.0/24
Created a new subnet:
+------------------+-----------------------------------------------+
| Field | Value |
+------------------+-----------------------------------------------+
| allocation_pools | {"start": "192.168.11.50", "end": "192.168.11.254"} |
| cidr | 192.168.11.0/24 |
| dns_nameservers | |
| enable_dhcp | False |
| gateway_ip | 192.168.11.1 |
| host_routes | |
| id | 92dcc66d-00a3-4678-a8ac-9d72a94613ed |
| ip_version | 4 |
| name | ext-subnet-2 |
| network_id | 19b85183-9637-4bea-9b26-92caf2a5cb99 |
| tenant_id | 8c9fb6577a1e45879f35e3e43b34de58 |
+------------------+-----------------------------------------------+
[root@controller1 ~]# neutron router-create demo-router-2
Created a new router:
+-----------------------+--------------------------------------+
| Field | Value |
+-----------------------+--------------------------------------+
| admin_state_up | True |
| external_gateway_info | |
| id | e9e194bb-dafe-4e41-b867-0a64c2e74e29 |
| name | demo-router-2 |
| status | ACTIVE |
| tenant_id | 8c9fb6577a1e45879f35e3e43b34de58 |
+-----------------------+--------------------------------------+
[root@controller1 ~]# neutron router-gateway-set demo-router-2 ext-net-2
Set gateway for router demo-router-2
[root@controller1 ~]# neutron net-create demo-net-2
Created a new network:
+---------------------------+--------------------------------------+
| Field | Value |
+---------------------------+--------------------------------------+
| admin_state_up | True |
| id | f6238c45-9de4-4869-ad3e-cf3d1a647285 |
| name | demo-net-2 |
| provider:network_type | gre |
| provider:physical_network | |
| provider:segmentation_id | 4 |
| shared | False |
| status | ACTIVE |
| subnets | |
| tenant_id | 8c9fb6577a1e45879f35e3e43b34de58 |
+---------------------------+--------------------------------------+
[root@controller1 ~]# neutron subnet-create demo-net-2 --name demo-subnet-2 --gateway 10.1.0.1 10.1.0.0/24
Created a new subnet:
+------------------+--------------------------------------------+
| Field | Value |
+------------------+--------------------------------------------+
| allocation_pools | {"start": "10.1.0.2", "end": "10.1.0.254"} |
| cidr | 10.1.0.0/24 |
| dns_nameservers | |
| enable_dhcp | True |
| gateway_ip | 10.1.0.1 |
| host_routes | |
| id | 30bcb484-e7e7-42a5-9a08-b7364f94180a |
| ip_version | 4 |
| name | demo-subnet-2 |
| network_id | f6238c45-9de4-4869-ad3e-cf3d1a647285 |
| tenant_id | 8c9fb6577a1e45879f35e3e43b34de58 |
+------------------+--------------------------------------------+
[root@controller1 ~]# neutron router-interface-add demo-router-2 demo-subnet-2
Added interface daa4f64d-117c-49ee-a5b6-430c837a59d5 to router demo-router-2.
[root@controller1 ~]#
On Network Node
Edit /etc/neutron/l3_agent.ini and add following details
handle_internal_only_routers = False
gateway_external_network_id = ****.*****.*****.*****.****
external_network_bridge = br-ex
As per above example
handle_internal_only_routers = False
gateway_external_network_id = 19b85183-9637-4bea-9b26-92caf2a5cb99
external_network_bridge = br-ex-2
[root@neutron1 ~]# cp /etc/init.d/neutron-l3-agent /etc/init.d/neutron-l3-agent-2
Make the change in the following Lines to get the difference command as below
[root@neutron1 ~]# diff -n /etc/init.d/neutron-l3-agent /etc/init.d/neutron-l3-agent-2
d3 1
a3 1
# neutron-l3-agent-2 OpenStack Neutron Layer 3 Agent
d18 1
a18 1
"/etc/$proj/l3_agent-2.ini" \
d21 1
a21 1
pidfile="/var/run/$proj/$prog-2.pid"
d23 1
a23 1
[ -e /etc/sysconfig/$prog-2 ] && . /etc/sysconfig/$prog-2
d25 1
a25 1
lockfile=/var/lock/subsys/$prog-2
d32 2
a33 3
echo -n $"Starting $prog-2: "
daemon --user neutron --pidfile $pidfile "$exec --log-file /var/log/$proj/$plugin-2.log --config-file /usr/share/neutron/neutron-dist.conf --config-file /etc/neutron/neutron.conf --config-file /etc/neutron/l3_agent-2.ini --config-file /etc/neutron/fwaas_driver.ini &>/dev/null & echo \$! > $pidfile"
d41 2
a42 2
echo -n $"Stopping $prog-2: "
killproc -p $pidfile $prog-2
[root@neutron1 ~]#
[root@neutron1 ~]# chkconfig neutron-l3-agent-2 on
[root@neutron1 ~]# openstack-service restart
Stopping neutron-dhcp-agent: [ OK ]
Starting neutron-dhcp-agent: [ OK ]
Stopping neutron-l3-agent: [ OK ]
Starting neutron-l3-agent: [ OK ]
Stopping neutron-l3-agent-2: [ OK ]
Starting neutron-l3-agent-2: [ OK ]
Stopping neutron-metadata-agent: [ OK ]
Starting neutron-metadata-agent: [ OK ]
Stopping neutron-openvswitch-agent: [ OK ]
Starting neutron-openvswitch-agent: [ OK ]
[root@neutron1 ~]#
Subscribe to:
Posts (Atom)