Pages

Tuesday, September 16, 2014

Adding License for Vmware Esxi

Following Command allow us to add the Vmware license through the ssh access into the Esxi Server.


vim-cmd vimsvc/license --set *********************

rsync error: protocol incompatibility

ERROR: rsync error: protocol incompatibility (code 2) at compat.c(171) [sender=3.0.6]

I use rsync with ssh and authorized key files for auto login to mirror a remote system to the local one.The only change I made was on my .bashrc on the remote end I added in some commands to show file system usage. do a du -f and a tail of the log on login for conveniences.

My assumption here is that when rsync executes the ssh to connect it received 'junk'. Once I removed the extra output from the .bashrc file on the remote end, it worked just fine.SO check your remote end for .profile, .bashrc, .bash_profile etc.... any scripts running that add extra output on login.

Wednesday, September 10, 2014

logrotate not working

When default log rotate is not working we need to check its configuration using command

/usr/sbin/logrotate -f /etc/logrotate.conf

and try running a selected configuration using

logrotate -fd /etc/logrotate.d/test

where test is the configuration file name.

Thursday, September 4, 2014

Openstack Icehouse install Part -7 Cinder Service Block storage

Install Cinder- Block Storage Service

On Controller Node
Install the appropriate packages

yum install openstack-cinder -y

Configure Block Storage to use your database

openstack-config --set /etc/cinder/cinder.conf database connection mysql://cinder:cinder4admin@controller/cinder

Creating Database
On Mysql Server

mysql -u root -p

CREATE DATABASE cinder;
GRANT ALL PRIVILEGES ON cinder.* TO 'cinder'@'localhost' IDENTIFIED BY 'cinder4admin';
GRANT ALL PRIVILEGES ON cinder.* TO 'cinder'@'10.1.15.30' IDENTIFIED BY 'cinder4admin';
GRANT ALL PRIVILEGES ON cinder.* TO 'cinder'@'%' IDENTIFIED BY 'cinder4admin';
GRANT ALL PRIVILEGES ON cinder.* TO 'cinder'@'10.1.15.31' IDENTIFIED BY 'cinder4admin';
GRANT ALL PRIVILEGES ON cinder.* TO 'cinder'@'10.1.15.35' IDENTIFIED BY 'cinder4admin';
GRANT ALL PRIVILEGES ON cinder.* TO 'cinder'@'10.1.15.36' IDENTIFIED BY 'cinder4admin';
GRANT ALL PRIVILEGES ON cinder.* TO 'cinder'@'10.1.15.32' IDENTIFIED BY 'cinder4admin';
GRANT ALL PRIVILEGES ON cinder.* TO 'cinder'@'10.1.15.42' IDENTIFIED BY 'cinder4admin';
exit;

Create the database tables

su -s /bin/sh -c "cinder-manage db sync" cinder

Create a cinder user.

keystone user-create --name=cinder --pass=cinder4admin --email=cinder@example.com
keystone user-role-add --user=cinder --tenant=service --role=admin

Edit the /etc/cinder/cinder.conf configuration file:

openstack-config --set /etc/cinder/cinder.conf DEFAULT auth_strategy keystone
openstack-config --set /etc/cinder/cinder.conf keystone_authtoken auth_uri http://controller:5000
openstack-config --set /etc/cinder/cinder.conf keystone_authtoken auth_host controller
openstack-config --set /etc/cinder/cinder.conf keystone_authtoken auth_protocol http
openstack-config --set /etc/cinder/cinder.conf keystone_authtoken auth_port 35357
openstack-config --set /etc/cinder/cinder.conf keystone_authtoken admin_user cinder
openstack-config --set /etc/cinder/cinder.conf keystone_authtoken admin_tenant_name service
openstack-config --set /etc/cinder/cinder.conf keystone_authtoken admin_password cinder4admin

Configure Block Storage to use the Qpid message broker:

openstack-config --set /etc/cinder/cinder.conf DEFAULT rpc_backend cinder.openstack.common.rpc.impl_qpid
openstack-config --set /etc/cinder/cinder.conf DEFAULT qpid_hostname 10.1.15.40

Register the Block Storage service with the Identity service so that other OpenStack services can locate it:

keystone service-create --name=cinder --type=volume --description="OpenStack Block Storage"
keystone endpoint-create --service-id=$(keystone service-list | awk '/ volume / {print $2}') --publicurl=http://controller:8776/v1/%\(tenant_id\)s --internalurl=http://controller:8776/v1/%\(tenant_id\)s --adminurl=http://controller:8776/v1/%\(tenant_id\)s

Register a service and endpoint for version 2 of the Block Storage service API:

keystone service-create --name=cinderv2 --type=volumev2 --description="OpenStack Block Storage v2"
keystone endpoint-create --service-id=$(keystone service-list | awk '/ volumev2 / {print $2}') --publicurl=http://controller:8776/v2/%\(tenant_id\)s --internalurl=http://controller:8776/v2/%\(tenant_id\)s --adminurl=http://controller:8776/v2/%\(tenant_id\)s

Start and configure the Block Storage services to start when the system boots:

service openstack-cinder-api start
service openstack-cinder-scheduler start
chkconfig openstack-cinder-api on
chkconfig openstack-cinder-scheduler on

On Cinder Service Node.

Setting Up NFS Share .

Installing NFS packages
yum install nfs-utils nfs-utils-lib

Make and configure partition
mkfs.ext4 /dev/mapper/vg_cloud2-LogVol03
mkdir /home/cinder_nfs
mount /dev/mapper/vg_cloud2-LogVol03 /home/cinder_nfs/
Add entries in Fstab
/dev/mapper/vg_cloud2-LogVol02 /home/cinder_nfs ext4 rw 0 0

Add Share to NFS
vi /etc/exports
/home/cinder_nfs *(rw,sync,no_root_squash,no_subtree_check)
exportfs -a
showmount -e 192.168.11.42

service nfs start
service nfs restart
service iptables stop
chkconfig iptables off
Install the Cinder Software
yum install openstack-cinder scsi-target-utils

Configure the Service

Copy the /etc/cinder/cinder.conf configuration file from the controller, or perform the following steps to set the keystone credentials:
openstack-config --set /etc/cinder/cinder.conf DEFAULT auth_strategy keystone
openstack-config --set /etc/cinder/cinder.conf keystone_authtoken auth_uri http://controller:5000
openstack-config --set /etc/cinder/cinder.conf keystone_authtoken auth_host controller
openstack-config --set /etc/cinder/cinder.conf keystone_authtoken auth_protocol http
openstack-config --set /etc/cinder/cinder.conf keystone_authtoken auth_port 35357
openstack-config --set /etc/cinder/cinder.conf keystone_authtoken admin_user cinder
openstack-config --set /etc/cinder/cinder.conf keystone_authtoken admin_tenant_name service
openstack-config --set /etc/cinder/cinder.conf keystone_authtoken admin_password cinder4admin
openstack-config --set /etc/cinder/cinder.conf DEFAULT rpc_backend cinder.openstack.common.rpc.impl_qpid
openstack-config --set /etc/cinder/cinder.conf DEFAULT qpid_hostname 10.1.15.40

openstack-config --set /etc/cinder/cinder.conf database connection mysql://cinder:cinder4admin@controller/cinder
openstack-config --set /etc/cinder/cinder.conf DEFAULT glance_host controller

[root@compute2 ~]# cat /etc/cinder/nfsshares
192.168.11.42:/home/cinder_nfs
[root@compute2 ~]#

openstack-config --set /etc/cinder/cinder.conf DEFAULT nfs_shares_config /etc/cinder/nfsshares
openstack-config --set /etc/cinder/cinder.conf DEFAULT volume_driver cinder.volume.drivers.nfs.NfsDriver
service openstack-cinder-volume start
chkconfig openstack-cinder-volume on

Tuesday, September 2, 2014

Enable Administrator Account in Windows

Open the command prompt with elevated privileges. To do this click the Start Orb then All Programs, click on Accessories, then right-click on Command Prompt and then select Run as administrator.
In the Command Prompt, type

net user administrator /active:yes


Monday, September 1, 2014

Download files through Command Prompt in Windows

HTTP
PowerShell

$source = "http://yoursite.com/file.xml"
$destination = "c:\application\data\newdata.xml"
Invoke-WebRequest $source -OutFile $destination

The Invoke-WebRequest cmdlet
Invoke-WebRequest is a cmdlet that lets you upload or download data from a remote server. This cmdlet allows for user agents, proxies, and credentials.

FTP
PowerShell

$source = "ftp://yoursite.com/file.xml"
$destination = "c:\application\data\newdata.xml"

Invoke-WebRequest $source -OutFile $destination -Credential ftpUser

The code example above is almost identical to the HTTP sample, with the main difference being that the $source variable has “ftp” at the beginning instead of “http”. You may also notice that we have used the -Credential parameter since FTP connections generally require a username and password.

Creating Custom Windows Images for Openstack

Setting up the KVM environment to create the custom images.

yum install kvm qemu-kvm python-virtinst libvirt libvirt-python virt-manager libguestfs-tools

Once the packages are installed we need to get the ISO’s.

For example are getting windows7 from the http://www.w7forums.com/threads/official-windows-7-sp1-iso-image-downloads.12325/
wget http://msft.digitalrivercontent.net/win/X17-24395.iso

Now we need the Virtio Driver’s so that windows can detect unsigned devices like linux from http://alt.fedoraproject.org/pub/alt/virtio-win/latest/

wget http://alt.fedoraproject.org/pub/alt/virtio-win/latest/virtio-win-0.1-81.iso

First Create the Disk on which the OS need to be installed

qemu-img create -f qcow2 -o preallocation=metadata windows.qcow2 20G

Start the KVM installation
/usr/libexec/qemu-kvm -m 2048 -smp 2 -cdrom X17-24395.iso -drive file=virtio-win-0.1-81.iso,index=3,media=cdrom -drive file= windows.qcow2,if=virtio,boot=off -boot d -vga std -k en-us -vnc 10.1.17.42:1 -usbdevice tablet

Connect to Installation

Once the above step is done you will be able to connect to VNC using 10.1.17.42:1
You will be connected to VNC and you will be at the installations screen. Click Next to continue

Windows-install00

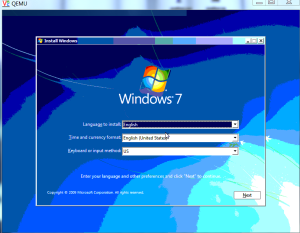
Select Install option to continue with installation.

Windows-install01

While secting the Installation driver we need to load the driver, Select the load driveroption and load the driver from the Virto ISO we have mounted

Windows-install02

Continue with the installation

Windows-install04

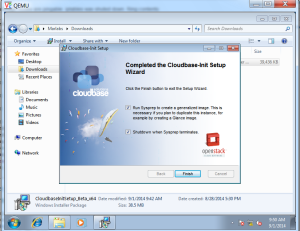
Once you are done download the Cloud init for windows from

https://github.com/cloudbase/cloudbase-init
Once installation is completed load the computer with virto NIC with following Command

/usr/libexec/qemu-kvm -m 2048 -smp 2 -drive file=virtio-win-0.1-81.iso,index=3,media=cdrom -drive file=windows-7.qcow2,if=virtio -boot d -vga std -k en-us -vnc 10.1.17.42:1 -usbdevice tablet -net nic,model=virtio
Connect to VNC and add the Virto NIC Driver From Device manager

Windows-install06

Now install the Cloud-init and initialize the Image

Windows-install10

Enable RDP for the access.

Now the Image is ready for Use .

You can get the windows password by

nova get-password <instance ID> <ssh-key>


Nova Rule

nova secgroup-add-rule default tcp 3389 3389 0.0.0.0/0