Kibana doesn’t support authentication or restricting access to dashboards by default.We can restrict access to Kibana 4 using nginx as a proxy in front of Kibana.
Install nginx server:
Install nginx server:
To install Nginx using yum we need to include the Nginx repository, install the Nginx repository using,
1
| rpm -Uvh http://nginx.org/packages/centos/7/noarch/RPMS/nginx-release-centos-7-0.el7.ngx.noarch.rpm |
Install Nginx and httpd-tools by issuing the following command,
1
| yum -y install nginx httpd-tools |
Create a password file for basic authentication of http users, this is to enable the password protected access to kibana portal. Replace “admin” with your own user name
1
| htpasswd -c /etc/nginx/conf.d/kibana.htpasswd adin |
Configure Nginx:
Create a confiiguration file with the name kibana.conf in /etc/nginx/conf.d directory
1
| vi /etc/nginx/conf.d/kibana.conf |
Place the following content to the kibana.conf file, assuming that both kibana and Nginx are installed on same server
server {
listen *:8080;
server_name 192.168.01;
access_log /var/log/nginx/kibana-access.log;
error_log /var/log/nginx/kibana-error.log;
location / {
auth_basic "Restricted Access";
auth_basic_user_file /etc/nginx/conf.d/kibana.htpasswd;
proxy_pass http://192.168.01:5601;
#proxy_connect_timeout 150;
#proxy_send_timeout 100;
#proxy_read_timeout 100;
}
}
Restart nginx server:
1
| sudo service nginx restart |
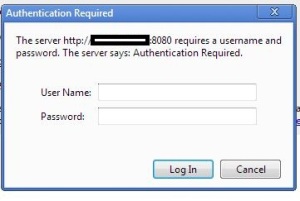
Go to the URL : http://192,168.01:8080, we should get an authentication screen as below on successful setup,

If nothing is showing up check the logs and see whether you have encountered an error as below,
2015/08/11 22:31:13 [crit] 80274#0: *3 connect() to 192.168.1.5:5601 failed (13: Permission denied) while connecting to upstream, client: 10.200.100.29, server: 10.242.126.73, request: "GET / HTTP/1.1", upstream: "http://192.168.1.5:5601/", host: "192.168.1.5:8080"
Error Resolution:
This is happening because we have selinux enabled on our machine.
This is happening because we have selinux enabled on our machine.
Disable the selinux by running the command
1
| sudo setsebool -P httpd_can_network_connect 1 |
Restart nginx:
1
| sudo service nginx restart |