Pages

Friday, May 9, 2014

AWS IAM- Identity and Access Management

An AWS account has full permission to perform all actions on the vaults in the account. However, the AWS Identity and Access Management (IAM) users don't have any permission by default.

IAM helps us to securely control access to Amazon Web Services and your account resources. With IAM, you can create multiple IAM users under the umbrella of your AWS account.

Every user you create in the IAM system starts with no permissions. In other words, by default, users can do nothing. Permission is a general term we use to mean the ability to perform an action against a resource, unless you explicitly grant a user permissions, that user cannot perform any of these actions. You grant permission to a user with a policy. A policy is a document that formally states one or more permissions.

IAM Users

An IAM user is an entity that you create in AWS that provides a way to interact with AWS. A primary use for IAM users is to give people you work with identities that they can use to sign in to the AWS Management Console and to make requests to AWS services.

AWS IAM GROUP.

group is a collection of IAM users. Groups let you specify permissions for a collection of users, which can make it easier to manage the permissions for those users. For example, you could have a group called Admins and give that group the types of permissions that administrators typically need. Any user in that group automatically has the permissions that are assigned to the group. If a new user joins your organization and should have administrator privileges, you can assign the appropriate permissions by adding the user to that group. Similarly, if a person changes jobs in your organization, instead of editing that user's permissions, you can remove him or her from the old group and add him or her to the new group.

IAM_Group


Creating a Group with needed Privileges.

Entering the Group Name

IAM_Group-00

Selecting Permissions

Aws provides a set of custom permission templates which we can use. The custom template provided by the Aws covers all the services in the AWS.

IAM_Group-00-Policy-section-00

We can also generate Custom Policies with the help of Policy Generator

IAM_Group-00-Policy-Generator-00

First select the service of which we need to create Policies.

IAM_Group-00-Policy-Generator-01


Select the permission’s we need to add into the Policies

IAM_Group-00-Policy-Generator-03

The Amazon Resource Name  : This gives the API details about the service ,region, resource account ect.


Arn format

==========

arn:aws:service:region:account:resource

arn:aws:service:region:account:resourcetype/resource

arn:aws:service:region:account:resourcetype:resource


More details can be found at

http://docs.aws.amazon.com/general/latest/gr/aws-arns-and-namespaces.html

IAM_Group-00-Policy-Generator-04

Once the ARN is added we can Add Statement so that we can see the rule’s added.

IAM_Group-00-Policy-Generator-05


Now we will be able to see the policy codes which if needed we can use for create custom Policies.

IAM_Group-00-Policy-Generator-06

Creating the Group

IAM_Group-00-Policy-Generator-07


Creating the User

IAM_User-00

Keep the Access Key ID and Secret Key safe because this is the last time you will see it in AWS. AWS will not save them for you. But you can create as many keys you need.

IAM_User-01


Adding the User to Group

Right click on the needed user to get more options.

IAM_User-01-togroup-00

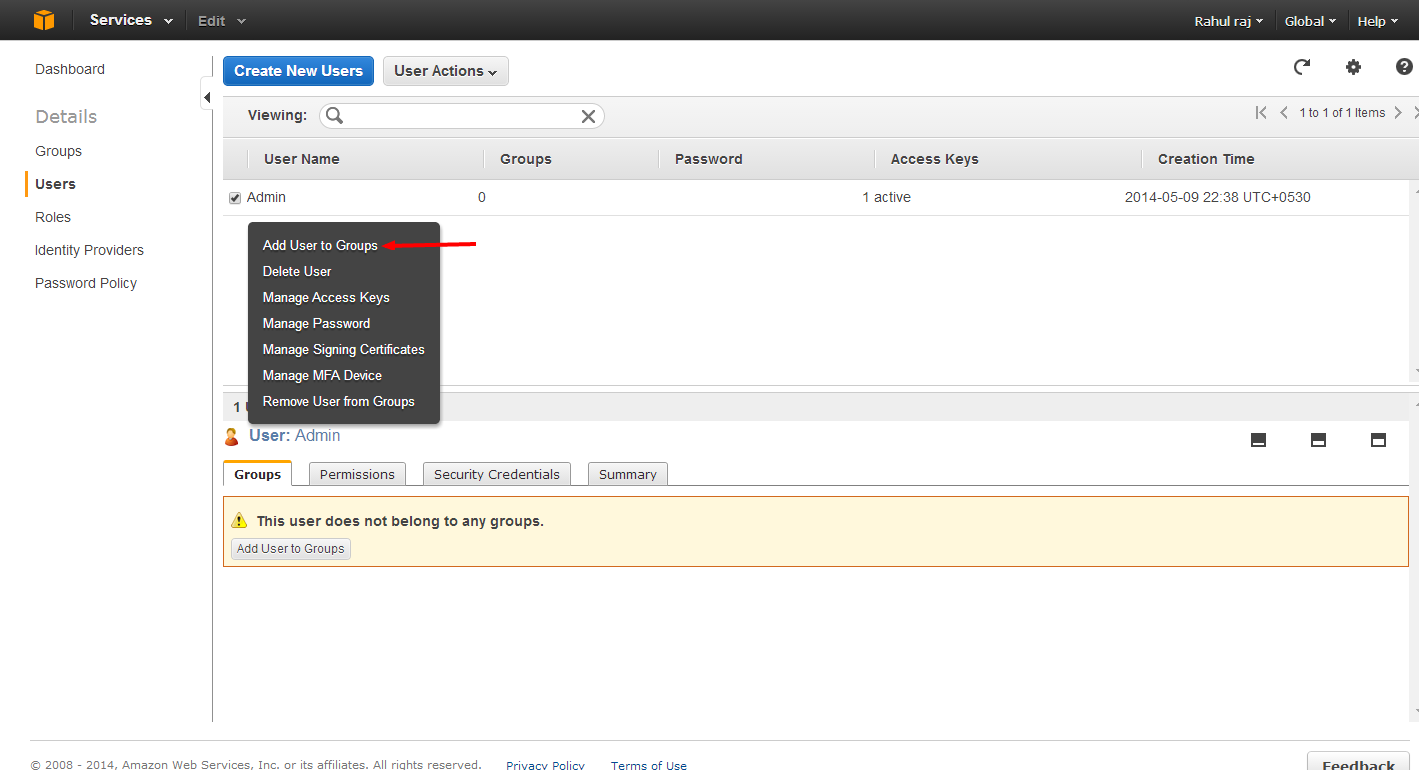
Select the required Group

IAM_User-01-togroup-01

Once the group is added we need to give the user a password

IAM_User-01-password-setting-00

Assign the needed Password

IAM_User-01-password-setting-01


The Group and password are set for the User.

IAM_User-01-password-setting-02


Once the User is set we can set the IAM URL alias

IAM-URL

Give the needed Alias

IAM-URL-Alias


The URL is set.

IAM-URL-Alias-01


Now you can use the URL to access the IAM login portal.


Thursday, May 8, 2014

Cgroups--Part 2 sample examples and commands


https://www.kernel.org/doc/Documentation/cgroups/

Mounting all the subsystems in the system
for i in `lssubsys -am`; do mkdir -p /cgroup/$i ; mount -t cgroup -o $i $i /cgroup/$i ;done
blkio — this subsystem sets limits on input/output access to and from block devices such as physical drives (disk, solid state, USB, etc.).
cpu — this subsystem uses the scheduler to provide cgroup tasks access to the CPU.
cpuacct — this subsystem generates automatic reports on CPU resources used by tasks in a cgroup
memory — this subsystem sets limits on memory use by tasks in a cgroup, and generates automatic reports on memory resources used by those tasks.
Define two cgroups that can be used to assign tasks to run on different sets of CPU cores.
mount -t cgroup -o cpu cpu /cgroup/cpu
mount -t cgroup -o memory memory /cgroup/memory
mount -t cgroup -o blkio blkio /cgroup/blkio

cgcreate -g blkio:high
cgcreate -g blkio:low
cgcreate -g cpu:high
cgcreate -g cpu:low
cgcreate -g memory:high
cgcreate -g memory:low

cgset -r blkio.weight=1000 high
cgset -r blkio.weight=500 low
cgset -r memory.swappiness=30 high
cgset -r memory.swappiness=60 low
cgset -r cpu.shares=4096 high
cgset -r cpu.shares=2048 low
Smaple configuration's ..we can edit the /etc/cgconfig.conf to make our own groups

Controlling CPU Cores on which process need to run

mount {
cpuset = /cgroup/coregrp;
}

group locores {
cpuset {
cpuset.mems="0";
# Run tasks on cores 0 through 3
cpuset.cpus="0-3";
}
}

group hicores {
cpuset {
cpuset.mems="0";
# Run tasks on cores 4 through 7
cpuset.cpus="4-7";
}
}
Controlling CPU and Memory Usage

# High priority group
group hipri {
cpu {
# Set the relative share of CPU resources equal to 75%
cpu.shares="750";
}
cpuset {
# No alternate memory nodes if the system is not NUMA
cpuset.mems="0";
# Make all CPU cores available to tasks
cpuset.cpus="0-7";
}
memory {
# Allocate at most 2 GB of memory to tasks
memory.limit_in_bytes="2G";
# Allocate at most 4 GB of memory+swap to tasks
memory.memsw.limit_in_bytes="4G";
# Apply a soft limit of 1 GB to tasks
memory.soft_limit_in_bytes="1G";
}
}

# Low priority group
group lopri {
cpu {
# Set the relative share of CPU resources equal to 25%
cpu.shares="250";
}
cpuset {
# No alternate memory nodes if the system is not NUMA
cpuset.mems="0";
# Make only cores 0 and 1 available to tasks
cpuset.cpus="0,1";
}
memory {
# Allocate at most 1 GB of memory to tasks
memory.limit_in_bytes="1G";
# Allocate at most 2 GB of memory+swap to tasks
memory.memsw.limit_in_bytes="2G";
# Apply a soft limit of 512 MB to tasks
memory.soft_limit_in_bytes="512M";
}
}

Throttling I/O Bandwidth

Define a cgroup that limits the I/O bandwidth to 50MB/s when reading from /dev/sda1.

mount {
blkio = /cgroup/iolimit;
}

group iocap1 {
blkio {
# Limit reads from /dev/sda1 to 50 MB/s
blkio.throttle.read_bps_device="8:1 52428800";
}
}
Define a cgroup that limits the number of read transactions to 100 per second when reading from /dev/sdd.

mount {
blkio = /cgroup/iolimit;
}

group iocap2 {
blkio {
# Limit read tps from /dev/sdd to 100 per second
blkio.throttle.read_iops_device="8:48 100";
}
}

Define two cgroups with different shares of I/O access to /dev/sdb .
mount {
blkio = /cgroup/iolimit;
}

# Low access share group
group iolo {
blkio {
# Set the share of I/O access by /dev/sdb to 25%
blkio.weight_device="8:16 250";
}
}

# High access share group
group iohi {
blkio {
# Set the share of I/O access by /dev/sdb to 75%
blkio.weight_device="8:16 750";
}
}
ruining the application in the corresponding group

cgexec -g cpu,memory:group2 httpd
cgexec -g blkio:iohi httpd


Cgroup installation and configuration. Part 1

Installing Cgroups.
yum install libcgroup

starting Cgroup rule creator
/etc/init.d/cgconfig start

Checking the subsystem which are mounted in the kernel

lssubsys -am

ns
perf_event
net_prio
cpuset /cgroup/cpuset
cpu /cgroup/cpu
cpuacct /cgroup/cpuacct
memory /cgroup/memory
devices /cgroup/devices
freezer /cgroup/freezer
net_cls /cgroup/net_cls
blkio /cgroup/blkio
Basic subsystems are

cpuset assigns individual CPUs and memory nodes to cgroup tasks
cpu schedules CPU access (for example, according to relative shares, as in Figure 1, or for real-time processes)
cpuacct reports total CPU time used.
memory reports or limits memory use.
devices grants or denies access to devices.
freezer suspends or resumes tasks.
net_cls tags outgoing network packets with an identifier.
blkio reports or controls I/O bandwidth for block devices.


Checking which all subsystem are mounted using thereown filesystem
[root@ip-192-168-1-129 ~]# ls -al /cgroup/
total 8
drwxr-xr-x. 10 root root 4096 May 8 07:38 .
dr-xr-xr-x. 25 root root 4096 May 8 07:27 ..
drwxr-xr-x. 5 root root 0 May 8 08:31 blkio
drwxr-xr-x. 2 root root 0 May 8 08:31 cpu
drwxr-xr-x. 2 root root 0 May 8 08:31 cpuacct
drwxr-xr-x. 2 root root 0 May 8 08:31 cpuset
drwxr-xr-x. 2 root root 0 May 8 08:31 devices
drwxr-xr-x. 2 root root 0 May 8 08:31 freezer
drwxr-xr-x. 2 root root 0 May 8 08:31 memory
drwxr-xr-x. 2 root root 0 May 8 08:31 net_cls
[root@ip-192-168-1-129 ~]#

if its not mounted manually mount it.

here following are not mounted so we can mount it.
ns
perf_event
net_prio

# mkdir /cgroup/ns
# ll /cgroup/ns/
total 0
# mount -t cgroup -o ns ns /cgroup/ns
# ll /cgroup/ns/
total 0
--w--w--w-. 1 root root 0 May 8 08:48 cgroup.event_control
-rw-r--r--. 1 root root 0 May 8 08:48 cgroup.procs
-rw-r--r--. 1 root root 0 May 8 08:48 notify_on_release
-rw-r--r--. 1 root root 0 May 8 08:48 release_agent
-rw-r--r--. 1 root root 0 May 8 08:48 tasks

Creating Cgroups under blkio for settting the different IO rate

[root@ip-192-168-1-129 cgroup]# cgcreate -g blkio:high_io
[root@ip-192-168-1-129 cgroup]# cgcreate -g blkio:low_io
[root@ip-192-168-1-129 cgroup]# cgcreate -g blkio:avg_io

Cgroup are created
==================
[root@ip-192-168-1-129 cgroup]# ll /cgroup/blkio/|grep drwx
drwxr-xr-x. 2 root root 0 May 8 09:39 avg_io
drwxr-xr-x. 2 root root 0 May 8 09:38 high_io
drwxr-xr-x. 2 root root 0 May 8 09:39 low_io
[root@ip-192-168-1-129 cgroup]#
Files inside are created automatically

[root@ip-192-168-1-129 cgroup]# ll /cgroup/blkio/avg_io/
total 0
-r--r--r--. 1 root root 0 May 8 09:39 blkio.io_merged
-r--r--r--. 1 root root 0 May 8 09:39 blkio.io_queued
-r--r--r--. 1 root root 0 May 8 09:39 blkio.io_service_bytes
-r--r--r--. 1 root root 0 May 8 09:39 blkio.io_serviced
-r--r--r--. 1 root root 0 May 8 09:39 blkio.io_service_time
-r--r--r--. 1 root root 0 May 8 09:39 blkio.io_wait_time
--w--w----. 1 root root 0 May 8 09:39 blkio.reset_stats
-r--r--r--. 1 root root 0 May 8 09:39 blkio.sectors
-r--r--r--. 1 root root 0 May 8 09:39 blkio.throttle.io_service_bytes
-r--r--r--. 1 root root 0 May 8 09:39 blkio.throttle.io_serviced
-rw-rw-r--. 1 root root 0 May 8 09:39 blkio.throttle.read_bps_device
-rw-rw-r--. 1 root root 0 May 8 09:39 blkio.throttle.read_iops_device
-rw-rw-r--. 1 root root 0 May 8 09:39 blkio.throttle.write_bps_device
-rw-rw-r--. 1 root root 0 May 8 09:39 blkio.throttle.write_iops_device
-r--r--r--. 1 root root 0 May 8 09:39 blkio.time
-rw-rw-r--. 1 root root 0 May 8 09:39 blkio.weight
-rw-rw-r--. 1 root root 0 May 8 09:39 blkio.weight_device
--w--w----. 1 root root 0 May 8 09:39 cgroup.event_control
-rw-rw-r--. 1 root root 0 May 8 09:39 cgroup.procs
-rw-rw-r--. 1 root root 0 May 8 09:39 notify_on_release
-rw-rw-r--. 1 root root 0 May 8 09:39 tasks
[root@ip-192-168-1-129 cgroup]#

Getting Current weight-age of the sub system
cgget -r blkio.weight high_io

Setting required weight-age for the sub system
cgset -r blkio.weight=1000 high_io

Assign processes to a cgroup.

Using Pid of process
cgclassify -g blkio:high_io 1407

This has the same effect as putting PID 1410 into the tasks file:

echo 1410 >> /cgroup/blkio/high_io/tasks

Any process subsequently launched in the shell is automatically assigned to the shell's cgroup.

Alternatively, the cgexec command can launch a process in the specified cgroup:
[root@ip-192-168-1-129 ~]# cgexec -g blkio:high_io httpd
httpd: apr_sockaddr_info_get() failed for ip-192-168-1-129.ec2.internal
httpd: Could not reliably determine the server's fully qualified domain name, using 127.0.0.1 for ServerName
[root@ip-192-168-1-129 ~]#
[root@ip-192-168-1-129 ~]#
[root@ip-192-168-1-129 ~]# pidof httpd
1521 1520 1519 1518 1517 1516 1515 1514 1513
[root@ip-192-168-1-129 ~]# cat /cgroup/blkio/high_io/tasks
1513
1514
1515
1516
1517
1518
1519
1520
1521
[root@ip-192-168-1-129 ~]#

For services that have a configuration file in /etc/sysconfig, you can edit the configuration file to allocate the service to a cgroup automatically. For example, add this line to /etc/sysconfig/httpd:

CGROUP_DAEMON="blkio:high_io"

Then start the service to automatically execute the processes in the specified cgroup:

===============
The changes made above will be erased on server reboot so to make the rules permanent we need to add the rule in the configuration.


Capturing Parameters
Up to this point, everything I've done on the command line won't persist across reboots. Once I've set up hierarchies, attached cgroups, and defined parameters the way I want them, I can capture an existing configuration with cgsnapshot:
# cgsnapshot -s > cgconfig-example.conf

now check the configuration at /etc/cgconfig.conf and do needed changes as of cgconfig-example.conf .
To clear all the setting we can use
[root@ip-192-168-1-129 ~]# cgclear
[root@ip-192-168-1-129 ~]# lscgroup
cgroups can't be listed: Cgroup is not mounted
[root@ip-192-168-1-129 ~]#