Thursday, May 8, 2014
Cgroups--Part 2 sample examples and commands
https://www.kernel.org/doc/Documentation/cgroups/
Mounting all the subsystems in the system
for i in `lssubsys -am`; do mkdir -p /cgroup/$i ; mount -t cgroup -o $i $i /cgroup/$i ;done
blkio — this subsystem sets limits on input/output access to and from block devices such as physical drives (disk, solid state, USB, etc.).
cpu — this subsystem uses the scheduler to provide cgroup tasks access to the CPU.
cpuacct — this subsystem generates automatic reports on CPU resources used by tasks in a cgroup
memory — this subsystem sets limits on memory use by tasks in a cgroup, and generates automatic reports on memory resources used by those tasks.
Define two cgroups that can be used to assign tasks to run on different sets of CPU cores.
mount -t cgroup -o cpu cpu /cgroup/cpu
mount -t cgroup -o memory memory /cgroup/memory
mount -t cgroup -o blkio blkio /cgroup/blkio
cgcreate -g blkio:high
cgcreate -g blkio:low
cgcreate -g cpu:high
cgcreate -g cpu:low
cgcreate -g memory:high
cgcreate -g memory:low
cgset -r blkio.weight=1000 high
cgset -r blkio.weight=500 low
cgset -r memory.swappiness=30 high
cgset -r memory.swappiness=60 low
cgset -r cpu.shares=4096 high
cgset -r cpu.shares=2048 low
Smaple configuration's ..we can edit the /etc/cgconfig.conf to make our own groups
Controlling CPU Cores on which process need to run
mount {
cpuset = /cgroup/coregrp;
}
group locores {
cpuset {
cpuset.mems="0";
# Run tasks on cores 0 through 3
cpuset.cpus="0-3";
}
}
group hicores {
cpuset {
cpuset.mems="0";
# Run tasks on cores 4 through 7
cpuset.cpus="4-7";
}
}
Controlling CPU and Memory Usage
# High priority group
group hipri {
cpu {
# Set the relative share of CPU resources equal to 75%
cpu.shares="750";
}
cpuset {
# No alternate memory nodes if the system is not NUMA
cpuset.mems="0";
# Make all CPU cores available to tasks
cpuset.cpus="0-7";
}
memory {
# Allocate at most 2 GB of memory to tasks
memory.limit_in_bytes="2G";
# Allocate at most 4 GB of memory+swap to tasks
memory.memsw.limit_in_bytes="4G";
# Apply a soft limit of 1 GB to tasks
memory.soft_limit_in_bytes="1G";
}
}
# Low priority group
group lopri {
cpu {
# Set the relative share of CPU resources equal to 25%
cpu.shares="250";
}
cpuset {
# No alternate memory nodes if the system is not NUMA
cpuset.mems="0";
# Make only cores 0 and 1 available to tasks
cpuset.cpus="0,1";
}
memory {
# Allocate at most 1 GB of memory to tasks
memory.limit_in_bytes="1G";
# Allocate at most 2 GB of memory+swap to tasks
memory.memsw.limit_in_bytes="2G";
# Apply a soft limit of 512 MB to tasks
memory.soft_limit_in_bytes="512M";
}
}
Throttling I/O Bandwidth
Define a cgroup that limits the I/O bandwidth to 50MB/s when reading from /dev/sda1.
mount {
blkio = /cgroup/iolimit;
}
group iocap1 {
blkio {
# Limit reads from /dev/sda1 to 50 MB/s
blkio.throttle.read_bps_device="8:1 52428800";
}
}
Define a cgroup that limits the number of read transactions to 100 per second when reading from /dev/sdd.
mount {
blkio = /cgroup/iolimit;
}
group iocap2 {
blkio {
# Limit read tps from /dev/sdd to 100 per second
blkio.throttle.read_iops_device="8:48 100";
}
}
Define two cgroups with different shares of I/O access to /dev/sdb .
mount {
blkio = /cgroup/iolimit;
}
# Low access share group
group iolo {
blkio {
# Set the share of I/O access by /dev/sdb to 25%
blkio.weight_device="8:16 250";
}
}
# High access share group
group iohi {
blkio {
# Set the share of I/O access by /dev/sdb to 75%
blkio.weight_device="8:16 750";
}
}
ruining the application in the corresponding group
cgexec -g cpu,memory:group2 httpd
cgexec -g blkio:iohi httpd
Cgroup installation and configuration. Part 1
Installing Cgroups.
yum install libcgroup
starting Cgroup rule creator
/etc/init.d/cgconfig start
Checking the subsystem which are mounted in the kernel
lssubsys -am
ns
perf_event
net_prio
cpuset /cgroup/cpuset
cpu /cgroup/cpu
cpuacct /cgroup/cpuacct
memory /cgroup/memory
devices /cgroup/devices
freezer /cgroup/freezer
net_cls /cgroup/net_cls
blkio /cgroup/blkio
Basic subsystems are
cpuset assigns individual CPUs and memory nodes to cgroup tasks
cpu schedules CPU access (for example, according to relative shares, as in Figure 1, or for real-time processes)
cpuacct reports total CPU time used.
memory reports or limits memory use.
devices grants or denies access to devices.
freezer suspends or resumes tasks.
net_cls tags outgoing network packets with an identifier.
blkio reports or controls I/O bandwidth for block devices.
Checking which all subsystem are mounted using thereown filesystem
[root@ip-192-168-1-129 ~]# ls -al /cgroup/
total 8
drwxr-xr-x. 10 root root 4096 May 8 07:38 .
dr-xr-xr-x. 25 root root 4096 May 8 07:27 ..
drwxr-xr-x. 5 root root 0 May 8 08:31 blkio
drwxr-xr-x. 2 root root 0 May 8 08:31 cpu
drwxr-xr-x. 2 root root 0 May 8 08:31 cpuacct
drwxr-xr-x. 2 root root 0 May 8 08:31 cpuset
drwxr-xr-x. 2 root root 0 May 8 08:31 devices
drwxr-xr-x. 2 root root 0 May 8 08:31 freezer
drwxr-xr-x. 2 root root 0 May 8 08:31 memory
drwxr-xr-x. 2 root root 0 May 8 08:31 net_cls
[root@ip-192-168-1-129 ~]#
if its not mounted manually mount it.
here following are not mounted so we can mount it.
ns
perf_event
net_prio
# mkdir /cgroup/ns
# ll /cgroup/ns/
total 0
# mount -t cgroup -o ns ns /cgroup/ns
# ll /cgroup/ns/
total 0
--w--w--w-. 1 root root 0 May 8 08:48 cgroup.event_control
-rw-r--r--. 1 root root 0 May 8 08:48 cgroup.procs
-rw-r--r--. 1 root root 0 May 8 08:48 notify_on_release
-rw-r--r--. 1 root root 0 May 8 08:48 release_agent
-rw-r--r--. 1 root root 0 May 8 08:48 tasks
Creating Cgroups under blkio for settting the different IO rate
[root@ip-192-168-1-129 cgroup]# cgcreate -g blkio:high_io
[root@ip-192-168-1-129 cgroup]# cgcreate -g blkio:low_io
[root@ip-192-168-1-129 cgroup]# cgcreate -g blkio:avg_io
Cgroup are created
==================
[root@ip-192-168-1-129 cgroup]# ll /cgroup/blkio/|grep drwx
drwxr-xr-x. 2 root root 0 May 8 09:39 avg_io
drwxr-xr-x. 2 root root 0 May 8 09:38 high_io
drwxr-xr-x. 2 root root 0 May 8 09:39 low_io
[root@ip-192-168-1-129 cgroup]#
Files inside are created automatically
[root@ip-192-168-1-129 cgroup]# ll /cgroup/blkio/avg_io/
total 0
-r--r--r--. 1 root root 0 May 8 09:39 blkio.io_merged
-r--r--r--. 1 root root 0 May 8 09:39 blkio.io_queued
-r--r--r--. 1 root root 0 May 8 09:39 blkio.io_service_bytes
-r--r--r--. 1 root root 0 May 8 09:39 blkio.io_serviced
-r--r--r--. 1 root root 0 May 8 09:39 blkio.io_service_time
-r--r--r--. 1 root root 0 May 8 09:39 blkio.io_wait_time
--w--w----. 1 root root 0 May 8 09:39 blkio.reset_stats
-r--r--r--. 1 root root 0 May 8 09:39 blkio.sectors
-r--r--r--. 1 root root 0 May 8 09:39 blkio.throttle.io_service_bytes
-r--r--r--. 1 root root 0 May 8 09:39 blkio.throttle.io_serviced
-rw-rw-r--. 1 root root 0 May 8 09:39 blkio.throttle.read_bps_device
-rw-rw-r--. 1 root root 0 May 8 09:39 blkio.throttle.read_iops_device
-rw-rw-r--. 1 root root 0 May 8 09:39 blkio.throttle.write_bps_device
-rw-rw-r--. 1 root root 0 May 8 09:39 blkio.throttle.write_iops_device
-r--r--r--. 1 root root 0 May 8 09:39 blkio.time
-rw-rw-r--. 1 root root 0 May 8 09:39 blkio.weight
-rw-rw-r--. 1 root root 0 May 8 09:39 blkio.weight_device
--w--w----. 1 root root 0 May 8 09:39 cgroup.event_control
-rw-rw-r--. 1 root root 0 May 8 09:39 cgroup.procs
-rw-rw-r--. 1 root root 0 May 8 09:39 notify_on_release
-rw-rw-r--. 1 root root 0 May 8 09:39 tasks
[root@ip-192-168-1-129 cgroup]#
Getting Current weight-age of the sub system
cgget -r blkio.weight high_io
Setting required weight-age for the sub system
cgset -r blkio.weight=1000 high_io
Assign processes to a cgroup.
Using Pid of process
cgclassify -g blkio:high_io 1407
This has the same effect as putting PID 1410 into the tasks file:
echo 1410 >> /cgroup/blkio/high_io/tasks
Any process subsequently launched in the shell is automatically assigned to the shell's cgroup.
Alternatively, the cgexec command can launch a process in the specified cgroup:
[root@ip-192-168-1-129 ~]# cgexec -g blkio:high_io httpd
httpd: apr_sockaddr_info_get() failed for ip-192-168-1-129.ec2.internal
httpd: Could not reliably determine the server's fully qualified domain name, using 127.0.0.1 for ServerName
[root@ip-192-168-1-129 ~]#
[root@ip-192-168-1-129 ~]#
[root@ip-192-168-1-129 ~]# pidof httpd
1521 1520 1519 1518 1517 1516 1515 1514 1513
[root@ip-192-168-1-129 ~]# cat /cgroup/blkio/high_io/tasks
1513
1514
1515
1516
1517
1518
1519
1520
1521
[root@ip-192-168-1-129 ~]#
For services that have a configuration file in /etc/sysconfig, you can edit the configuration file to allocate the service to a cgroup automatically. For example, add this line to /etc/sysconfig/httpd:
CGROUP_DAEMON="blkio:high_io"
Then start the service to automatically execute the processes in the specified cgroup:
===============
The changes made above will be erased on server reboot so to make the rules permanent we need to add the rule in the configuration.
Capturing Parameters
Up to this point, everything I've done on the command line won't persist across reboots. Once I've set up hierarchies, attached cgroups, and defined parameters the way I want them, I can capture an existing configuration with cgsnapshot:
# cgsnapshot -s > cgconfig-example.conf
now check the configuration at /etc/cgconfig.conf and do needed changes as of cgconfig-example.conf .
To clear all the setting we can use
[root@ip-192-168-1-129 ~]# cgclear
[root@ip-192-168-1-129 ~]# lscgroup
cgroups can't be listed: Cgroup is not mounted
[root@ip-192-168-1-129 ~]#
Tcp Wrapper's Security
TCP wrapper based access List Rules can be included in the two files
/etc/hosts.allow and
/etc/hosts.deny .
Work precedence:
/etc/hosts.allow-
if allow will not check 2
if not found then go to 2
/etc/hosts.deny .
if not found allow access.
Points to remember
You can have only one rule per service in hosts.allow and hosts.deny file.
Any changes to hosts.allow and hosts.deny file takes immediate effect.
The last line in the files hosts.allow and hosts.deny must be a new line character. Or else the rule will fail.
ALL : 192.168.0.1/255.255.255.0
sshd : ALL EXCEPT 192.168.0.15
in.telnetd : 192.168.5.5 : deny
in.telnetd : 192.168.5.6 : allow
Tuesday, May 6, 2014
CpuLimit -- Limiting User's resource Usage
sudo yum install cpulimit
If it’s not possible in your distro then it’s extremely easy to compile it:
cd /usr/src/
wget --no-check-certificate https://github.com/opsengine/cpulimit/tarball/master -O cpulimit.tar
tar -xvf cpulimit.tar
cd opsengine-cpulimit-9df7758
make
ln -s src/cpulimit /usr/sbin/cpulimit
/usr/sbin/cpulimit --limit=10 /bin/gzip test.tar
Using cpulimit you can also allocate CPU limit to already running processes, e.g. below command will allocate 20% CPU limit to process with PID 2342:
/usr/sbin/cpulimit -p 2342 -l 20
It’s possible to specify process by its executable file instead of PID:
/usr/sbin/cpulimit -P /usr/sbin/nginx -l 30
Wednesday, April 30, 2014
S3cmd : Used to copy files to s3 bucket from server. AWS
S3cmd : AWS command used to copy/Sync content to S3 bucket
s3cmd can be installed from epel repo or by manually compiling the code.
While installing from epel there could be dependency issue for the python.
while using epel repo we need the python version 2.4 in the server if you are having another version of python its better to go with the manual installation.
## RHEL/CentOS 6 32-Bit ##
# wget http://download.fedoraproject.org/pub/epel/6/i386/epel-release-6-8.noarch.rpm
# rpm -ivh epel-release-6-8.noarch.rpm
## RHEL/CentOS 6 64-Bit ##
# wget http://download.fedoraproject.org/pub/epel/6/x86_64/epel-release-6-8.noarch.rpm
# rpm -ivh epel-release-6-8.noarch.rpm
yum install s3cmd
For manual installation Download the tar file from
http://sourceforge.net/projects/s3tools/files/s3cmd/
get the tar file of the needed version .
make sure you have a python version > than 2.4 installed in the server.
untar the file using tar zxvf or zjvf as per the need and use python to run the installation script
python setup.py install
..
Configuring/Reconfiguring the s3cmd command
s3cmd --configure
Enter new values or accept defaults in brackets with Enter.
Refer to user manual for detailed description of all options.
Access key and Secret key are your identifiers for Amazon S3
Access Key: xxxxxxxxxxxxxxxxxxxxxx
Secret Key: xxxxxxxxxxxxxxxxxxxxxxxxxxxxxxxxxxxx
Encryption password is used to protect your files from reading
by unauthorized persons while in transfer to S3
Encryption password: xxxxxxxxxx
Path to GPG program [/usr/bin/gpg]:
When using secure HTTPS protocol all communication with Amazon S3
servers is protected from 3rd party eavesdropping. This method is
slower than plain HTTP and can't be used if you're behind a proxy
Use HTTPS protocol [No]: Yes
New settings:
Access Key: xxxxxxxxxxxxxxxxxxxxxx
Secret Key: xxxxxxxxxxxxxxxxxxxxxxxxxxxxxxxxxxxx
Encryption password: xxxxxxxxxx
Path to GPG program: /usr/bin/gpg
Use HTTPS protocol: True
HTTP Proxy server name:
HTTP Proxy server port: 0
Test access with supplied credentials? [Y/n] Y
Please wait, attempting to list all buckets...
Success. Your access key and secret key worked fine :-)
Now verifying that encryption works...
Success. Encryption and decryption worked fine :-)
Save settings? [y/N] y
Configuration saved to '/root/.s3cfg'
# s3cmd mb s3://test
Bucket 's3://test/' created
# s3cmd ls s3://test/
Upload a file
# s3cmd put file.txt s3://test/
Upload Similar files
# s3cmd put *.txt s3://test/
Uploading complete Directory
# s3cmd put -r upload-dir s3://test/
Upload files in a directory
# s3cmd put -r upload-dir/ s3://test/
Get a file
# s3cmd get s3://test/file.txt
Removing file from s3 bucket
# s3cmd del s3://test/file.txt
File s3://test/file.txt deleted
Removing directory from s3 bucket
# s3cmd del s3://test/backup
File s3://test/backup deleted
Sync direcotry .
# s3cmd sync ./back s3://test/back
attributes that can be used with Sync
--delete-removed :-remove files that are removed from the local directory .
--skip-existing :-Don't sync the files already synced.
—exclude / —include — standard shell-style wildcards, enclose them into apostrophes to avoid their expansion by the shell. For example --exclude 'x*.jpg' will match x12345.jpg but not abcdef.jpg.
—rexclude / —rinclude — regular expression version of the above. Much more powerful way to create match patterns. I realise most users have no clue about RegExps, which is sad. Anyway, if you’re one of them and can get by with shell style wildcards just use —exclude/—include and don’t worry about —rexclude/—rinclude. Or read some tutorial on RegExps, such a knowledge will come handy one day, I promise ;-)
—exclude-from / —rexclude-from / —(r)include-from — Instead of having to supply all the patterns on the command line, write them into a file and pass that file’s name as a parameter to one of these options. For instance --exclude '*.jpg' --exclude '*.gif' is the same as --
Tuesday, April 29, 2014
SSH-Tunneling
Main Options we use in ssh tunneling
-L [bind_address:]port:host:hostport
Specifies that the given port on the local (client) host is to be forwarded to the given host and port on the remote side. This works by allocating a socket to listen to port on the local side, optionally bound to the specified bind_address. Whenever a connection is made to this port, the connection is forwarded over the secure channel, and a connection is made to host port hostport from the remote machine. Port forwardings can also be specified in the configuration file. IPv6 addresses can be specified with an alternative syntax: [bind_address/]port/host/hostport or by enclosing the address in square brackets. Only the superuser can forward privileged ports. By default, the local port is bound in accordance with the GatewayPorts setting. However, an explicit bind_address may be used to bind the connection to a specific address. The bind_address of “localhost” indicates that the listen- ing port be bound for local use only, while an empty address or ‘*’ indicates that the port should be available from all interfaces.
-f Requests ssh to go to background just before command execution.
This is use-ful if ssh is going to ask for passwords or passphrases, but the user wants it in the background. This implies -n. The recommended way to start X11 programs at a remote site is with something like ssh -f host xterm.
If the ExitOnForwardFailure configuration option is set to “yes”, then a client started with -f will wait for all remote port forwards to be success- fully established before placing itself in the background.
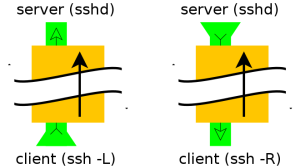
Difference between Reverse tunneling and Normal tunneling.
Normal tunneling
ssh -L 8888:www.linux.ro:80 user@computer -N
ssh -L 8888:www.linux.ro:80 -L 110:mail.linux.ro:110 \
25:mail.linux.ro:25 user@computer -N
The second example (see above) show you how to setup your ssh tunnel for web, pop3
and smtp. It is useful to recive/send your e-mails when you don't have direct access
to the mail server.
For the ASCII art and lynx browser fans here is illustrated the first example:
+--------------+<--port 22-->+--------------------+<--port 80-->o-----------+
|SSH Client|----------------------|ssh_server|----------------------| host |
+-------------------+ +----------+ o-----------+
localhost:8888 computer www.linuxon.ro:80
For example, if the remote server in question was myserver.example.com you could run the following command on your local system to create a tunnel as described above:
ssh -T -N -L 3308:localhost:3306 myserver.example.com
The meat of the command is the -L option, which tells ssh to listen on port 3308 locally and then on the remote side to forward all traffic on that port to localhost:3306. Note that the localhost here is not referring to the local system but rather where to forward things to on the remote side, in this case to localhost on the remote side.
ssh -T -N -L 3308:private.local:3306 myserver.example.com
Here, ssh listens on port 3308 on the local system and it forwards that data to port 3306 on private.host, but it does that via the server myserver.example.com. In other words the local traffic on port 3308 gets transferred first to the remote system which then transfers it to port 3306 on private.host. Of course, if private.local's mysql server is only listening on its local interface this won't work, you'll need something more involved.
ssh -R 9001:intra-site.com:80 home (Executed from 'work')
Once executed the SSH client at ‘work’ will connect to SSH server running at home creating a SSH channel. Then the server will bind port 9001 on ‘home’ machine to listen for incoming requests which would subsequently be routed through the created SSH channel between ‘home’ and ‘work’. Now it’s possible to browse the internal site
by visiting http://localhost:9001 in ‘home’ web browser. The ‘work’ will then create a connection to intra-site and relay back the response to ‘home’ via the created SSH channel.
-L [bind_address:]port:host:hostport
Specifies that the given port on the local (client) host is to be forwarded to the given host and port on the remote side. This works by allocating a socket to listen to port on the local side, optionally bound to the specified bind_address. Whenever a connection is made to this port, the connection is forwarded over the secure channel, and a connection is made to host port hostport from the remote machine. Port forwardings can also be specified in the configuration file. IPv6 addresses can be specified with an alternative syntax: [bind_address/]port/host/hostport or by enclosing the address in square brackets. Only the superuser can forward privileged ports. By default, the local port is bound in accordance with the GatewayPorts setting. However, an explicit bind_address may be used to bind the connection to a specific address. The bind_address of “localhost” indicates that the listen- ing port be bound for local use only, while an empty address or ‘*’ indicates that the port should be available from all interfaces.
-N Do not execute a remote command. This is useful for just forwarding ports (protocol version 2 only).
-R [bind_address:]port:host:hostport
Specifies that the given port on the remote (server) host is to be forwarded to the given host and port on the local side. This works by allocating a socket to listen to port on the remote side, and whenever a connection is made to this port, the connection is forwarded over the secure channel, and a connection is made to host port hostport from the local machine.
Specifies that the given port on the remote (server) host is to be forwarded to the given host and port on the local side. This works by allocating a socket to listen to port on the remote side, and whenever a connection is made to this port, the connection is forwarded over the secure channel, and a connection is made to host port hostport from the local machine.
Port forwardings can also be specified in the configuration file. Privileged ports can be forwarded only when logging in as root on the remote machine. IPv6 addresses can be specified by enclosing the address in square braces or using an alternative syntax: [bind_address/]host/port/hostport.
By default, the listening socket on the server will be bound to the loopback interface only. This may be overridden by specifying a bind_address. An empty bind_address, or the address ‘*’, indicates that the remote socket should listen on all interfaces. Specifying a remote bind_address will only succeed if the server’s GatewayPorts option is enabled (see sshd_config(5)).
If the port argument is ‘0’, the listen port will be dynamically allocated on the server and reported to the client at run time.
-f Requests ssh to go to background just before command execution.
This is use-ful if ssh is going to ask for passwords or passphrases, but the user wants it in the background. This implies -n. The recommended way to start X11 programs at a remote site is with something like ssh -f host xterm.
If the ExitOnForwardFailure configuration option is set to “yes”, then a client started with -f will wait for all remote port forwards to be success- fully established before placing itself in the background.
Difference between Reverse tunneling and Normal tunneling.

Normal tunneling
ssh -L 8888:www.linux.ro:80 user@computer -N
ssh -L 8888:www.linux.ro:80 -L 110:mail.linux.ro:110 \
25:mail.linux.ro:25 user@computer -N
The second example (see above) show you how to setup your ssh tunnel for web, pop3
and smtp. It is useful to recive/send your e-mails when you don't have direct access
to the mail server.
For the ASCII art and lynx browser fans here is illustrated the first example:
+--------------+<--port 22-->+--------------------+<--port 80-->o-----------+
|SSH Client|----------------------|ssh_server|----------------------| host |
+-------------------+ +----------+ o-----------+
localhost:8888 computer www.linuxon.ro:80
For example, if the remote server in question was myserver.example.com you could run the following command on your local system to create a tunnel as described above:
ssh -T -N -L 3308:localhost:3306 myserver.example.com
The meat of the command is the -L option, which tells ssh to listen on port 3308 locally and then on the remote side to forward all traffic on that port to localhost:3306. Note that the localhost here is not referring to the local system but rather where to forward things to on the remote side, in this case to localhost on the remote side.
ssh -T -N -L 3308:private.local:3306 myserver.example.com
Here, ssh listens on port 3308 on the local system and it forwards that data to port 3306 on private.host, but it does that via the server myserver.example.com. In other words the local traffic on port 3308 gets transferred first to the remote system which then transfers it to port 3306 on private.host. Of course, if private.local's mysql server is only listening on its local interface this won't work, you'll need something more involved.
ssh -R 9001:intra-site.com:80 home (Executed from 'work')
Once executed the SSH client at ‘work’ will connect to SSH server running at home creating a SSH channel. Then the server will bind port 9001 on ‘home’ machine to listen for incoming requests which would subsequently be routed through the created SSH channel between ‘home’ and ‘work’. Now it’s possible to browse the internal site
by visiting http://localhost:9001 in ‘home’ web browser. The ‘work’ will then create a connection to intra-site and relay back the response to ‘home’ via the created SSH channel.
Monday, April 28, 2014
SVN access manager
To use SVN Access Manager you need at least:
a working subversion installation
a MySQL Database, version 4 or higher, a PostgreSQL 8 or higher database or an Oracle 10g or higher database
an Apache web server, version 2.0 or higher with DAV, mod_authz and SVN support
PHP version 5.2 or higher with working oci8 support if using Oracle database
Go to a directory where the software can be accessed by your Apache web server. Unpack the archive. For our example do the following:
http://sourceforge.net/projects/svn-access-mana/files/
# mkdir /etc/svn
# mkdir /etc/svn-access-manager
# mkdir /usr/share/svn-access-manager
# chown apache:apache /etc/svn /etc/svn-access-manager
# cd /usr/share/svn-access-manager
# tar -xvfz svnaccessmanager-0.5.0.0.tar.gz
2.2.3 Setup a MySQL database and a database user
You need a database for SVN Access Manager and an user with full access to this database. To create the database do the following as root user of your MySQL database:
CREATE DATABASE svnadmin;
To create a user having access to this database do the following as root user of your MySQL database:
CREATE USER 'svnadmin'@ 'localhost' IDENTIFIED BY '*******';
GRANT USAGE ON * . * TO 'svnadmin'@ 'localhost' IDENTIFIED BY '*******'
WITH MAX_QUERIES_PER_HOUR 0 MAX_CONNECTIONS_PER_HOUR 0
MAX_UPDATES_PER_HOUR 0 MAX_USER_CONNECTIONS 0 ;
GRANT ALL PRIVILEGES ON `svnadmin` . * TO 'svnadmin'@ 'localhost';
After finishing the database work continue with installing SVN Access Manager.
If you get an error "No database selected" during installation check if the database user has sufficient rights to access and to work with the database!
a working subversion installation
a MySQL Database, version 4 or higher, a PostgreSQL 8 or higher database or an Oracle 10g or higher database
an Apache web server, version 2.0 or higher with DAV, mod_authz and SVN support
PHP version 5.2 or higher with working oci8 support if using Oracle database
To use SVN Access Manager you need at least:
a working subversion installation
a MySQL Database, version 4 or higher, a PostgreSQL 8 or higher database or an Oracle 10g or higher database
an Apache web server, version 2.0 or higher with DAV, mod_authz and SVN support
PHP version 5.2 or higher with working oci8 support if using Oracle database
Go to a directory where the software can be accessed by your Apache web server. Unpack the archive. For our example do the following:
http://sourceforge.net/projects/svn-access-mana/files/
# mkdir /etc/svn
# mkdir /etc/svn-access-manager
# mkdir /usr/share/svn-access-manager
# chown apache:apache /etc/svn /etc/svn-access-manager
# cd /usr/share/svn-access-manager
# tar -xvfz svnaccessmanager-0.5.0.0.tar.gz
2.2.3 Setup a MySQL database and a database user
You need a database for SVN Access Manager and an user with full access to this database. To create the database do the following as root user of your MySQL database:
CREATE DATABASE svnadmin;
To create a user having access to this database do the following as root user of your MySQL database:
CREATE USER 'svnadmin'@ 'localhost' IDENTIFIED BY '*******';
GRANT USAGE ON * . * TO 'svnadmin'@ 'localhost' IDENTIFIED BY '*******'
WITH MAX_QUERIES_PER_HOUR 0 MAX_CONNECTIONS_PER_HOUR 0
MAX_UPDATES_PER_HOUR 0 MAX_USER_CONNECTIONS 0 ;
GRANT ALL PRIVILEGES ON `svnadmin` . * TO 'svnadmin'@ 'localhost';
After finishing the database work continue with installing SVN Access Manager.
If you get an error "No database selected" during installation check if the database user has sufficient rights to access and to work with the database!
Subscribe to:
Comments (Atom)